Operations ERP User Guide
Step-by-step instructions for support agents, dispatchers, and technicians.
User GuideGetting Started
Sign in to the Operations ERP and familiarize yourself with the main navigation areas.
Signing In
- Open the Operations ERP — Navigate to your organization’s Operations ERP URL in any modern web browser (Chrome, Firefox, Safari, or Edge).
- Enter your credentials — Type the email address and password provided by your administrator into the login form.
- Click “Sign In” — You will be redirected to the main Dashboard. If your credentials are incorrect, an error message will appear beneath the form.
- Check your role badge — Your assigned role (e.g., OPS Agent, Dispatcher) is displayed next to your name in the top-right corner of the screen. This badge determines which modules you can access.
Navigating the Sidebar
- Dashboard — Your home screen with ticket counters, charger health stats, error charger list, and recent activity feed.
- Hotline — Log and manage incoming customer phone calls with automatic contact lookup and call timing.
- Customer Requests — View incoming WhatsApp messages, AI-classified and queued for review.
- Service — Create, assign, and track service tickets through their full lifecycle.
- Chargers Hub — Look up charger statuses, view transactions, send remote commands, and force-start charging sessions.
- Finance — Check customer balances, view payment history across all gateways, and review top-ups.
- Contacts — Manage your customer contact directory with tier classifications and communication history.
- Admin — Team management, role assignments, and department configuration (Admin role only).
Signing Out
- Open the user menu — Click your name or avatar in the top-right corner of the screen.
- Click “Sign Out” — Your session will be terminated and you will be returned to the login page. For security, always sign out when you leave your workstation.
Quick-Start Checklist
Complete these five tasks during your first session to get comfortable with the system.
Your First Five Tasks
- Check the Dashboard for open tickets — Review the ticket counters at the top of the Dashboard. Note how many tickets are currently Open or In Progress, and scan the Recent Activity feed for anything urgent.
- Review charger health — Look at the DC and AC charger stat cards on the Dashboard. Identify any chargers in Faulted or Offline state, and check the Error Charger list for details on problem units.
- Browse the Contacts directory — Navigate to the Contacts page and search for a few customer names or phone numbers. Get familiar with how contact profiles display tier, organization, and communication history.
- Test the Hotline module — Go to the Hotline page and click “Start Call” to see the call logging interface. Explore the category selectors, priority options, and the notes field. You can cancel without saving if this is just practice.
- Explore the Finance module — Navigate to Finance and try looking up a customer balance in the Balances tab. Then switch to the Payments tab to see recent payment transactions and the available filter options.
Reading the Dashboard
The Dashboard is your operational command center. Here is how to read each section and act on the information presented.
Ticket Counters
- Open tickets counter — The large number at the top-left shows how many tickets are currently in an Open state. A rising count means new issues are arriving faster than they are being resolved.
- Total tickets counter — Displays the total number of tickets in the system across all statuses. Use this to gauge overall workload volume.
- Interpreting the numbers — If open tickets exceed 20% of total tickets, consider redistributing assignments or escalating unresolved items to senior staff.
DC Charger Stats (Fast Charging)
- Offline count — Number of DC chargers that have lost communication with the platform. These chargers may have network issues or power outages.
- Faulted count — Number of DC chargers reporting an active fault. These require immediate attention and may need a remote reset or on-site visit.
- Available count — Number of DC chargers ready to accept a charging session. A healthy network should have the majority of chargers in this state.
- Charging count — Number of DC chargers currently delivering power to a vehicle. High utilization during peak hours is normal.
AC Charger Stats (Slow Charging)
- Same breakdown as DC — The AC charger card shows the same Offline, Faulted, Available, and Charging counters for your slow-charging (AC) network.
- Compare DC vs. AC — Use both cards side by side to get a complete picture of network health across all charger types.
Error Charger List
- Identify problem chargers — This list shows every charger currently in a Faulted or Offline state, with its charger ID, name, and the timestamp of the last event received.
- Check last event time — A charger that has not sent an event in several hours may have a network or power issue that requires an on-site visit.
- Take action — Click on any charger in the error list to navigate directly to its detail view in the Chargers Hub, where you can attempt a remote reset.
Recent Activity Feed
- View the last 10 tickets — The Recent Activity section shows the 10 most recently updated tickets, including their reference number (TKT-XXXXXX), issue summary, priority level, and current status.
- Spot high-priority items — Critical and High priority tickets are visually highlighted. Address these first during your shift.
- Click to open — Click any ticket in the feed to jump directly to its detail view in the Service module.
Handling an Incoming Call
This is the core workflow for support agents. Follow every step to ensure calls are logged accurately and customer issues are resolved or escalated.
Complete Call Workflow
- Navigate to the Hotline page — Click “Hotline” in the left sidebar. The Hotline module opens with the call logging interface and your call history below.
- Click “Start Call” — Press the green “Start Call” button at the top of the page. A call timer begins counting automatically, recording the duration of the interaction.
- Enter the customer’s phone number — Type the caller’s phone number into the phone field (minimum 4 digits). The system begins searching for a matching contact as you type.
- Review the auto-lookup results — If a matching contact is found, the system displays the customer’s name, tier (Standard, Silver, Gold, or Platinum), organization, and a summary of their previous call and ticket history. Use this context to personalize your greeting.
- Select the call category — Choose the most appropriate category from the dropdown: Technical Support (charger faults, connectivity issues), Installation (new charger setup), Service (maintenance, repairs), or Maintenance (scheduled upkeep, inspections).
- Set the priority level — Assign a priority based on the severity of the issue: Critical (service completely down, safety concern), High (significant disruption), Normal (standard support request), or Low (informational, non-urgent).
- Enter detailed notes — Write a clear description of the customer’s issue in the notes field. Include the charger ID if applicable, the error message the customer reports, and any troubleshooting steps you have already suggested.
- If resolved immediately — click “Save” — When the issue is resolved during the call, click “Save” to log the call. The system records the call with its duration from the timer, category, priority, notes, and the associated contact.
- If escalation is needed — click “Create Ticket” — When the issue cannot be resolved on the phone, click “Create Ticket” instead. The call data (contact, category, priority, notes) is automatically prefilled into a new service ticket form for further handling.
- Confirm the call is logged — After saving, the call appears in your call history with the duration recorded from the timer. Verify that the category, priority, and notes are correct before moving on to the next call.
Processing WhatsApp Messages
Incoming customer WhatsApp messages are received, classified by AI, and queued for your review. Here is how to process them efficiently.
Reviewing Incoming Messages
- Navigate to Customer Requests — Click “Customer Requests” in the sidebar, then select the “WhatsApp” tab to view the incoming message queue.
- Scan the message list — Each row shows the sender’s phone number, matched contact name (if available), a preview of the message text, the AI-assigned category, and the current status.
- Understand AI classification — Every incoming message is automatically classified into one of seven categories: Fault (charger malfunction), Billing (payment or balance issue), RFID (card activation or pairing), Info (general inquiry), Install (installation request), Complaint (dissatisfaction), or Other (uncategorized).
- Review message statuses — Messages progress through these states: Unread (just arrived), Analysing (AI is processing), Bucketed (AI classification complete), Needs Review (requires human attention), Replied (response sent), and Archived (fully handled).
- Click a message for full details — Open any message to see the complete text, the AI-generated summary, the confidence score for the classification, and any attached media.
- Reply directly — Use the reply field at the bottom of the detail view to send a response back to the customer via WhatsApp. The reply is logged in the message thread.
- Convert to a service ticket — If the issue requires further follow-up, click “Create Ticket” on the message detail view. The customer contact and issue summary are prefilled in the ticket form.
- Archive completed messages — Once a message has been fully addressed (replied or converted to ticket), change its status to Archived to keep your queue clean.
Creating a Service Ticket
Service tickets track issues from initial report through to resolution. Create one whenever an issue cannot be resolved immediately.
New Ticket Workflow
- Navigate to the Service page — Click “Service” in the left sidebar to open the ticket management interface, which lists all existing tickets.
- Click “Create Ticket” — Press the “Create Ticket” button in the top-right corner of the page to open the new ticket form.
- Select or search for a contact — Use the contact search field to find the customer by name, phone number, or organization. Select the matching contact from the dropdown results.
- Enter the charger ID (if applicable) — If the issue relates to a specific charger, type the charger ID into the designated field. The system validates that the charger exists in the network.
- Write the issue description — Provide a clear, detailed summary of the problem in the description field. Include any relevant details: error codes, symptoms, when the issue started, and what the customer has already tried.
- Set the priority — Choose the appropriate priority level: Critical, High, Normal, or Low. Critical tickets should be reserved for safety issues or complete service outages.
- Assign to a technician — Select a team member from the assignment dropdown. The list is filtered by department capability, so only technicians qualified for the issue type are shown.
- Set a scheduled visit date — If the issue requires an on-site visit, use the date picker to set a scheduled visit date. This helps dispatchers plan technician routes.
- Click “Save” — Submit the ticket. A unique reference number (TKT-XXXXXX) is generated automatically. The ticket appears in the Service list and is visible to the assigned technician.
Managing Ticket Lifecycle
Tickets follow a defined status flow from creation to closure. Each transition should be accompanied by notes documenting progress.
Status Flow: OPEN → ASSIGNED → IN_PROGRESS → RESOLVED → CLOSED
- OPEN — Ticket is created — A newly created ticket starts in the OPEN state. It appears in the unassigned queue and awaits triage by a dispatcher or manager.
- ASSIGNED — Technician selected — Select a technician from the department-filtered dropdown in the ticket detail view. Once assigned, the ticket moves to ASSIGNED and the technician is notified.
- IN_PROGRESS — Work has begun — When the technician begins working on the issue (remote troubleshooting or on-site visit), change the status to IN_PROGRESS. Add a note describing the initial findings.
- RESOLVED — Issue is fixed — After the issue is resolved, change the status to RESOLVED. Add a detailed resolution note explaining what was done and how the problem was fixed.
- CLOSED — Confirmed complete — A manager or dispatcher reviews the resolution, confirms the customer is satisfied, and closes the ticket. No further changes are expected.
Adding Notes
- Open the ticket detail view — Click on any ticket reference in the Service list to open its full detail page.
- Click “Add Note” — Press the “Add Note” button to open the note entry field.
- Write your update — Record what has been done, what was observed, or what the next step is. Be specific enough that another team member could pick up where you left off.
- Save the note — The note is recorded with your name and a timestamp. It becomes part of the permanent ticket history.
Viewing Ticket History
- Scroll to the history section — At the bottom of the ticket detail view, the complete history shows every status change, note addition, reassignment, and priority change with timestamps and the name of the team member who made the change.
- Use history for handoffs — When taking over a ticket from a colleague, read the full history from top to bottom to understand everything that has been done so far.
Escalating a Ticket
When an issue is more urgent or complex than initially assessed, escalate the ticket to ensure it receives the right level of attention.
Escalation Workflow
- Open the ticket detail view — Navigate to the Service page and click the ticket reference number to open the full detail view.
- Increase the priority — Use the priority dropdown to raise the ticket from its current level (e.g., Normal → High, or High → Critical). This immediately changes the ticket’s visual prominence in the queue.
- Reassign to the appropriate team member — If the current assignee cannot resolve the issue, use the assignment dropdown to transfer the ticket to a more senior technician or a different department.
- Add escalation notes — Click “Add Note” and write a clear explanation of why the ticket is being escalated: what was tried, what failed, and what expertise is needed.
- Notify the team via status change — The reassignment and priority change trigger notifications to the new assignee. Verify the ticket now appears higher in the priority-sorted queue.
- Follow up on escalated tickets — Check back within the expected response time for the new priority level to ensure the escalated ticket is being actively worked on.
Looking Up a Charger
Use the Chargers Hub to quickly find any charger in the network and check its current status and connector states.
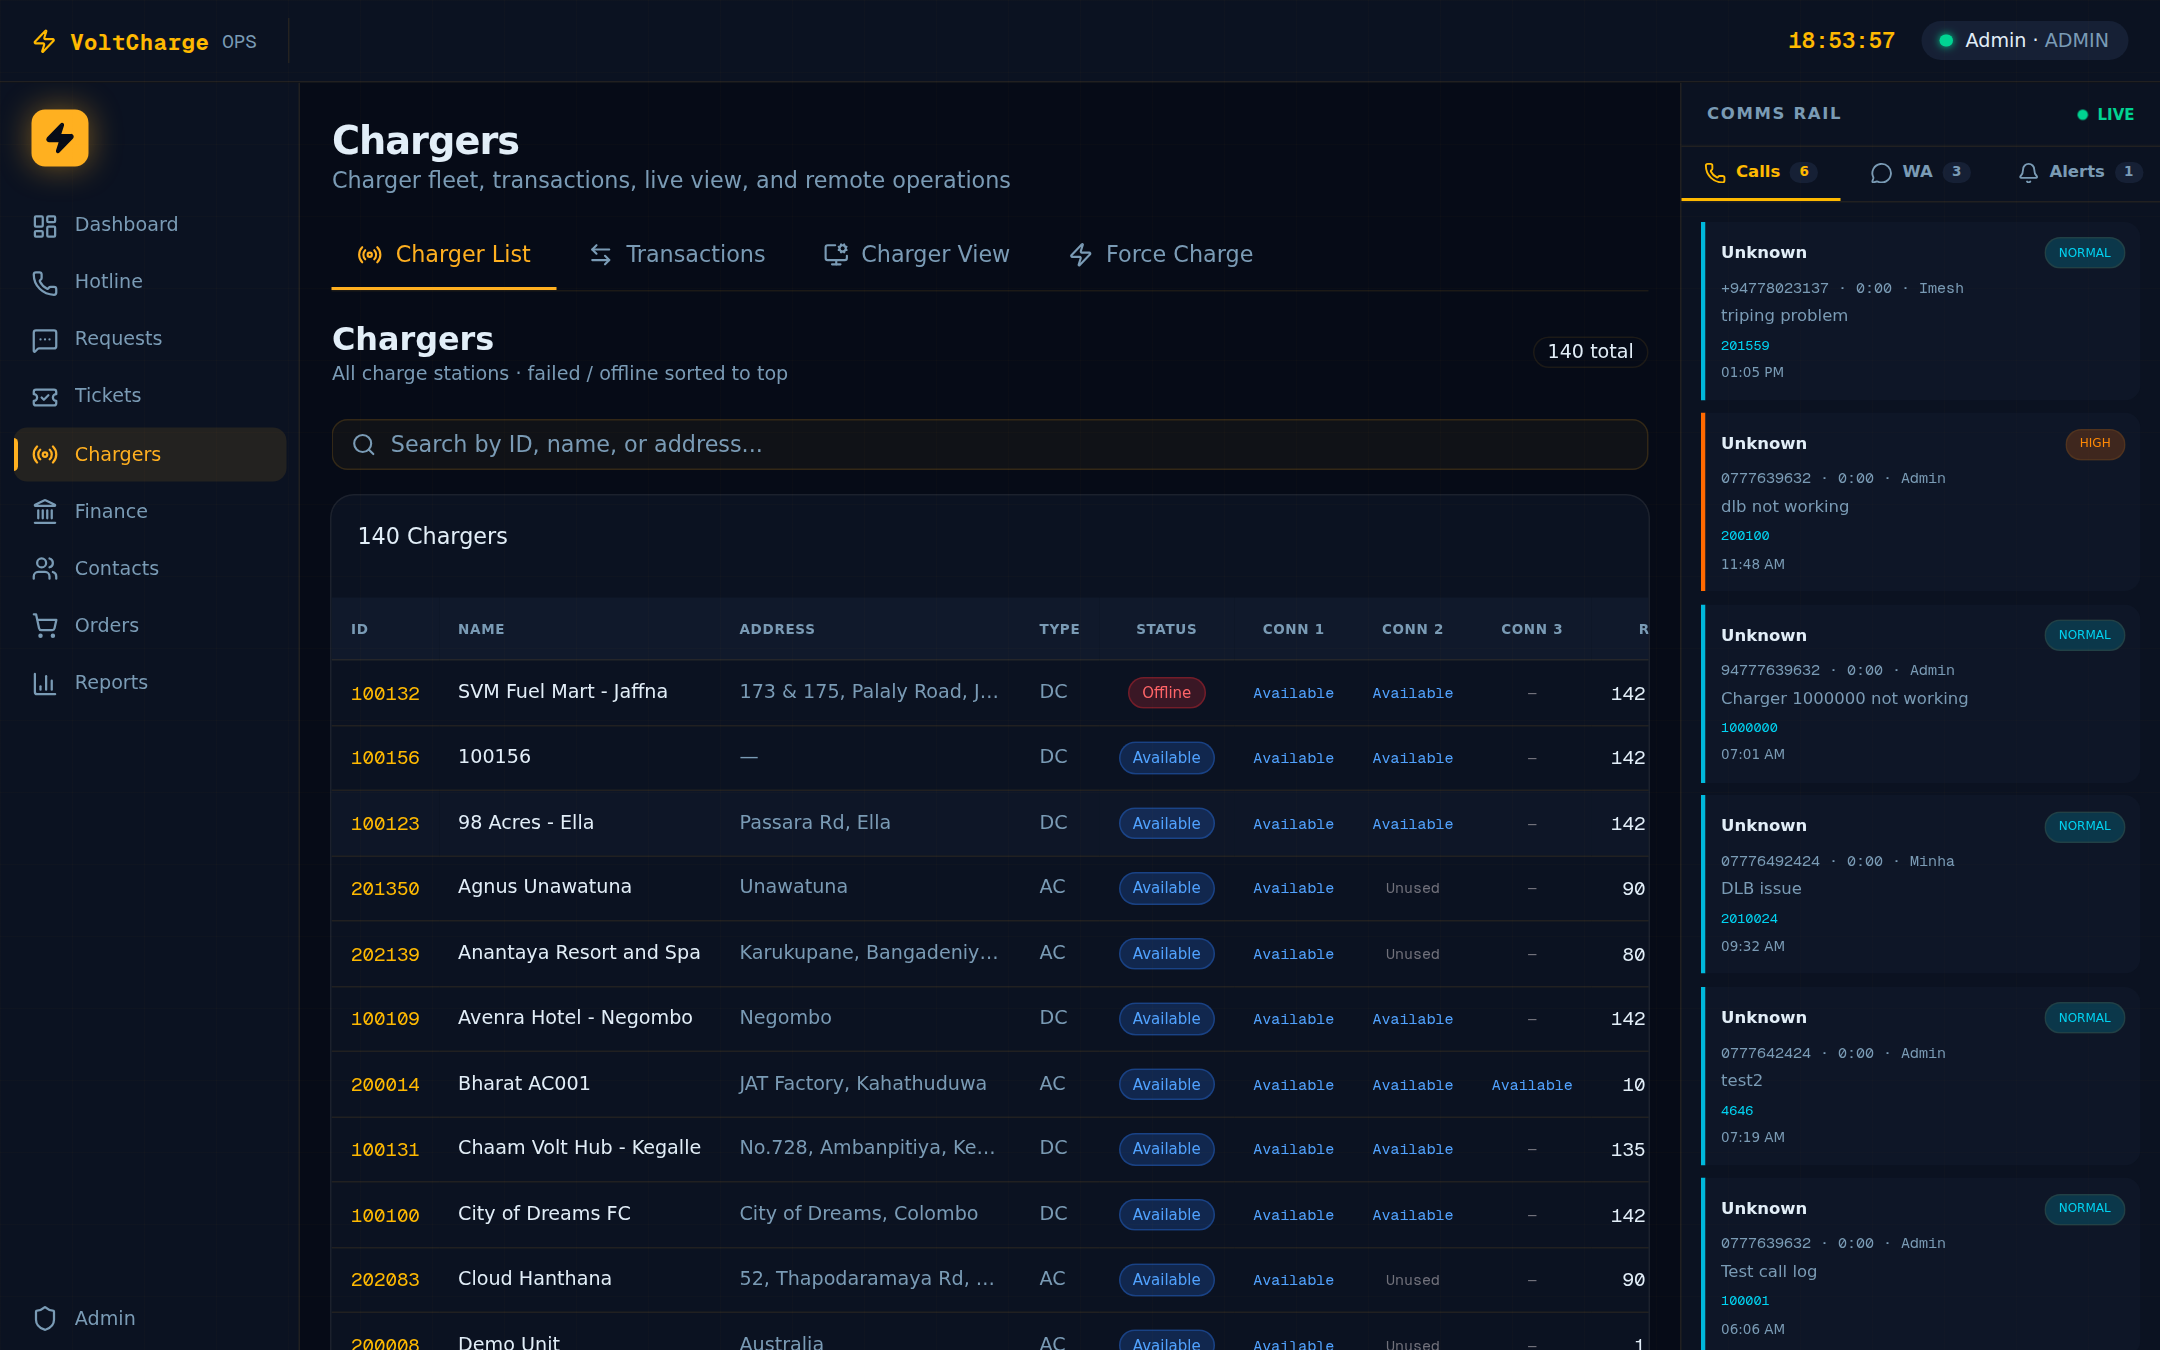
Finding a Charger
- Navigate to Chargers Hub — Click “Chargers Hub” in the left sidebar. The page displays a searchable list of all chargers in the network.
- Search by charger ID or name — Type the charger ID (e.g., 100001) or the charger name into the search bar at the top. Results filter in real-time as you type.
- Scan the charger list — Each row shows the charger ID, name, type (DC or AC), current status, and address.
- Understand status colors — Charger statuses are color-coded for quick identification: Available (green) means ready for use, Charging (blue) means actively delivering power, Faulted (red) means an error has occurred, Offline (grey) means no communication, and Preparing (orange) means a session is about to start.
- Click for expanded details — Click any charger row to open its expanded detail view, which shows the full address, all connector states, the last event timestamp, and available remote commands.
- Check connector states — In the detail view, each connector is listed individually with its own status. A charger may have one connector Available while another is Charging or Faulted.
Viewing Charger Transactions
Review charging session history for any charger to diagnose issues, verify customer complaints, or analyze usage patterns.
Transactions List
- Open the Transactions tab — In the Chargers Hub, click the “Transactions” tab at the top of the page to view a list of all recent charging sessions across the network.
- Review transaction details — Each row shows: Transaction ID, Charger ID, Customer name, Start time, End time, Energy delivered (kWh), Amount charged (LKR), and Duration.
- Sort by any column — Click a column header to sort the table. Click again to reverse the sort order. Useful for finding the highest energy sessions or most recent transactions.
- Search for specific transactions — Use the search field to filter by charger ID, customer name, or transaction ID.
Charger View (Single Charger History)
- Switch to the “Charger View” tab — Click the “Charger View” tab to access the single-charger lookup interface.
- Enter a charger ID — Type the charger ID into the search field and press Enter or click the search button.
- Review the last 20 transactions — The system displays the 20 most recent charging sessions for that specific charger, with the same detail columns as the main transactions list.
- Check totals — Below the transaction list, summary totals show the total energy delivered (kWh) and total revenue (LKR) for the displayed sessions.
Sending a Remote Command
Remote commands let you troubleshoot charger issues without an on-site visit. Use them for stuck sessions, communication faults, and routine reboots.
Sending a Command
- Find the charger — Navigate to the Chargers Hub and search for the charger by ID or name. Click on the charger to open its detail view.
- Review the charger’s current status — Before sending any command, confirm the charger’s current state. A charger that is actively Charging should not be rebooted unless the session is stuck.
- Choose the appropriate command — The available remote commands are: Reset (soft reset of the charger firmware), Reboot (full hardware restart), and Clear Fault (clear an active fault code and return the charger to Available).
- Click the command button — Press the button for your chosen command. A confirmation dialog appears asking you to verify the action.
- Confirm the action — Read the confirmation message carefully, then click “Confirm” to send the command. The system dispatches the instruction to the charger.
- Wait for the response — The charger processes the command and sends a response. A success or failure message is displayed on screen within a few seconds.
- Verify the result — After a successful command, refresh the charger detail view to confirm that the charger has returned to the expected status (e.g., Available after clearing a fault).
Common Use Cases
- Stuck charging session — If a customer reports their car has finished charging but the session is still active, send a Reset command to terminate the stuck session.
- Communication fault — If a charger shows intermittent Offline/Available cycling, a Reboot can clear network stack issues.
- Active fault code — If a charger shows Faulted but the underlying issue is transient (power spike, temporary overheating), use Clear Fault to return it to service.
- Scheduled maintenance reboot — As part of routine maintenance, a Reboot can be sent during off-peak hours to refresh the charger’s firmware and clear cached data.
Force-Starting a Charge
Force Charge allows support agents to remotely start a charging session on behalf of a customer. Use this when the customer is unable to start a session through the app.
Complete Force Charge Workflow
- Navigate to Chargers Hub > Force Charge tab — Click “Chargers Hub” in the sidebar, then select the “Force Charge” tab at the top of the page.
- Search for the customer — Enter the customer’s username or phone number in the customer search field. Results appear as you type.
- Select the customer from the dropdown — Click the correct customer in the search results. The system displays the customer’s full name, account tier, personal wallet balance, and fleet credit balance (if applicable).
- Enter the charger ID — Type the charger ID into the charger field. The system loads the charger’s current status and confirms it is Available and ready to accept a session.
- Select the connector — Choose the connector number from the dropdown (Connector 1, 2, or 3, depending on the charger model). Only connectors in an Available state can be selected.
- Choose the charge mode — Select either Time-based (charging for a specified number of minutes) or Amount-based (charging up to a specified currency amount). The default is 30 minutes for time-based mode.
- Enter the duration or amount — For time-based mode, enter the number of minutes. For amount-based mode, enter the maximum amount in LKR. The customer’s balance must be sufficient to cover the requested session.
- Click “Start Charge” and confirm — Press the “Start Charge” button. A confirmation dialog shows a summary of the session parameters. Click “Confirm” to initiate the charging session.
- Monitor the real-time session — Once the session starts, the interface switches to a live tracking view showing: current energy delivered (kWh), power output (kW), and elapsed time. The data updates in real time.
- Stop the session (if needed) — To end the session early, click the “Stop Charge” button and confirm. The session summary is recorded and the customer is charged for the energy delivered.
Looking Up a Customer Balance
Quickly check a customer’s wallet and fleet credit balance when handling calls or resolving billing inquiries.
Balance Lookup
- Navigate to Finance > Balances tab — Click “Finance” in the sidebar, then select the “Balances” tab.
- Search by username, phone, or email — Enter the customer’s username, phone number, or email address into the search field. Matching results appear as you type.
- View the personal wallet balance — The personal wallet balance is displayed in LKR. This is the amount the customer can use for charging sessions.
- View the fleet credit balance — If the customer belongs to a fleet account, their fleet credit balance is shown separately. Fleet credits are managed by the fleet administrator.
- Check account status — The account status indicator shows whether the customer’s account is active or inactive. Inactive accounts cannot initiate charging sessions.
- Communicate the balance to the customer — When handling a call, you can read the balance directly to the customer. If the balance is low, advise the customer to top up via the mobile app or payment portal.
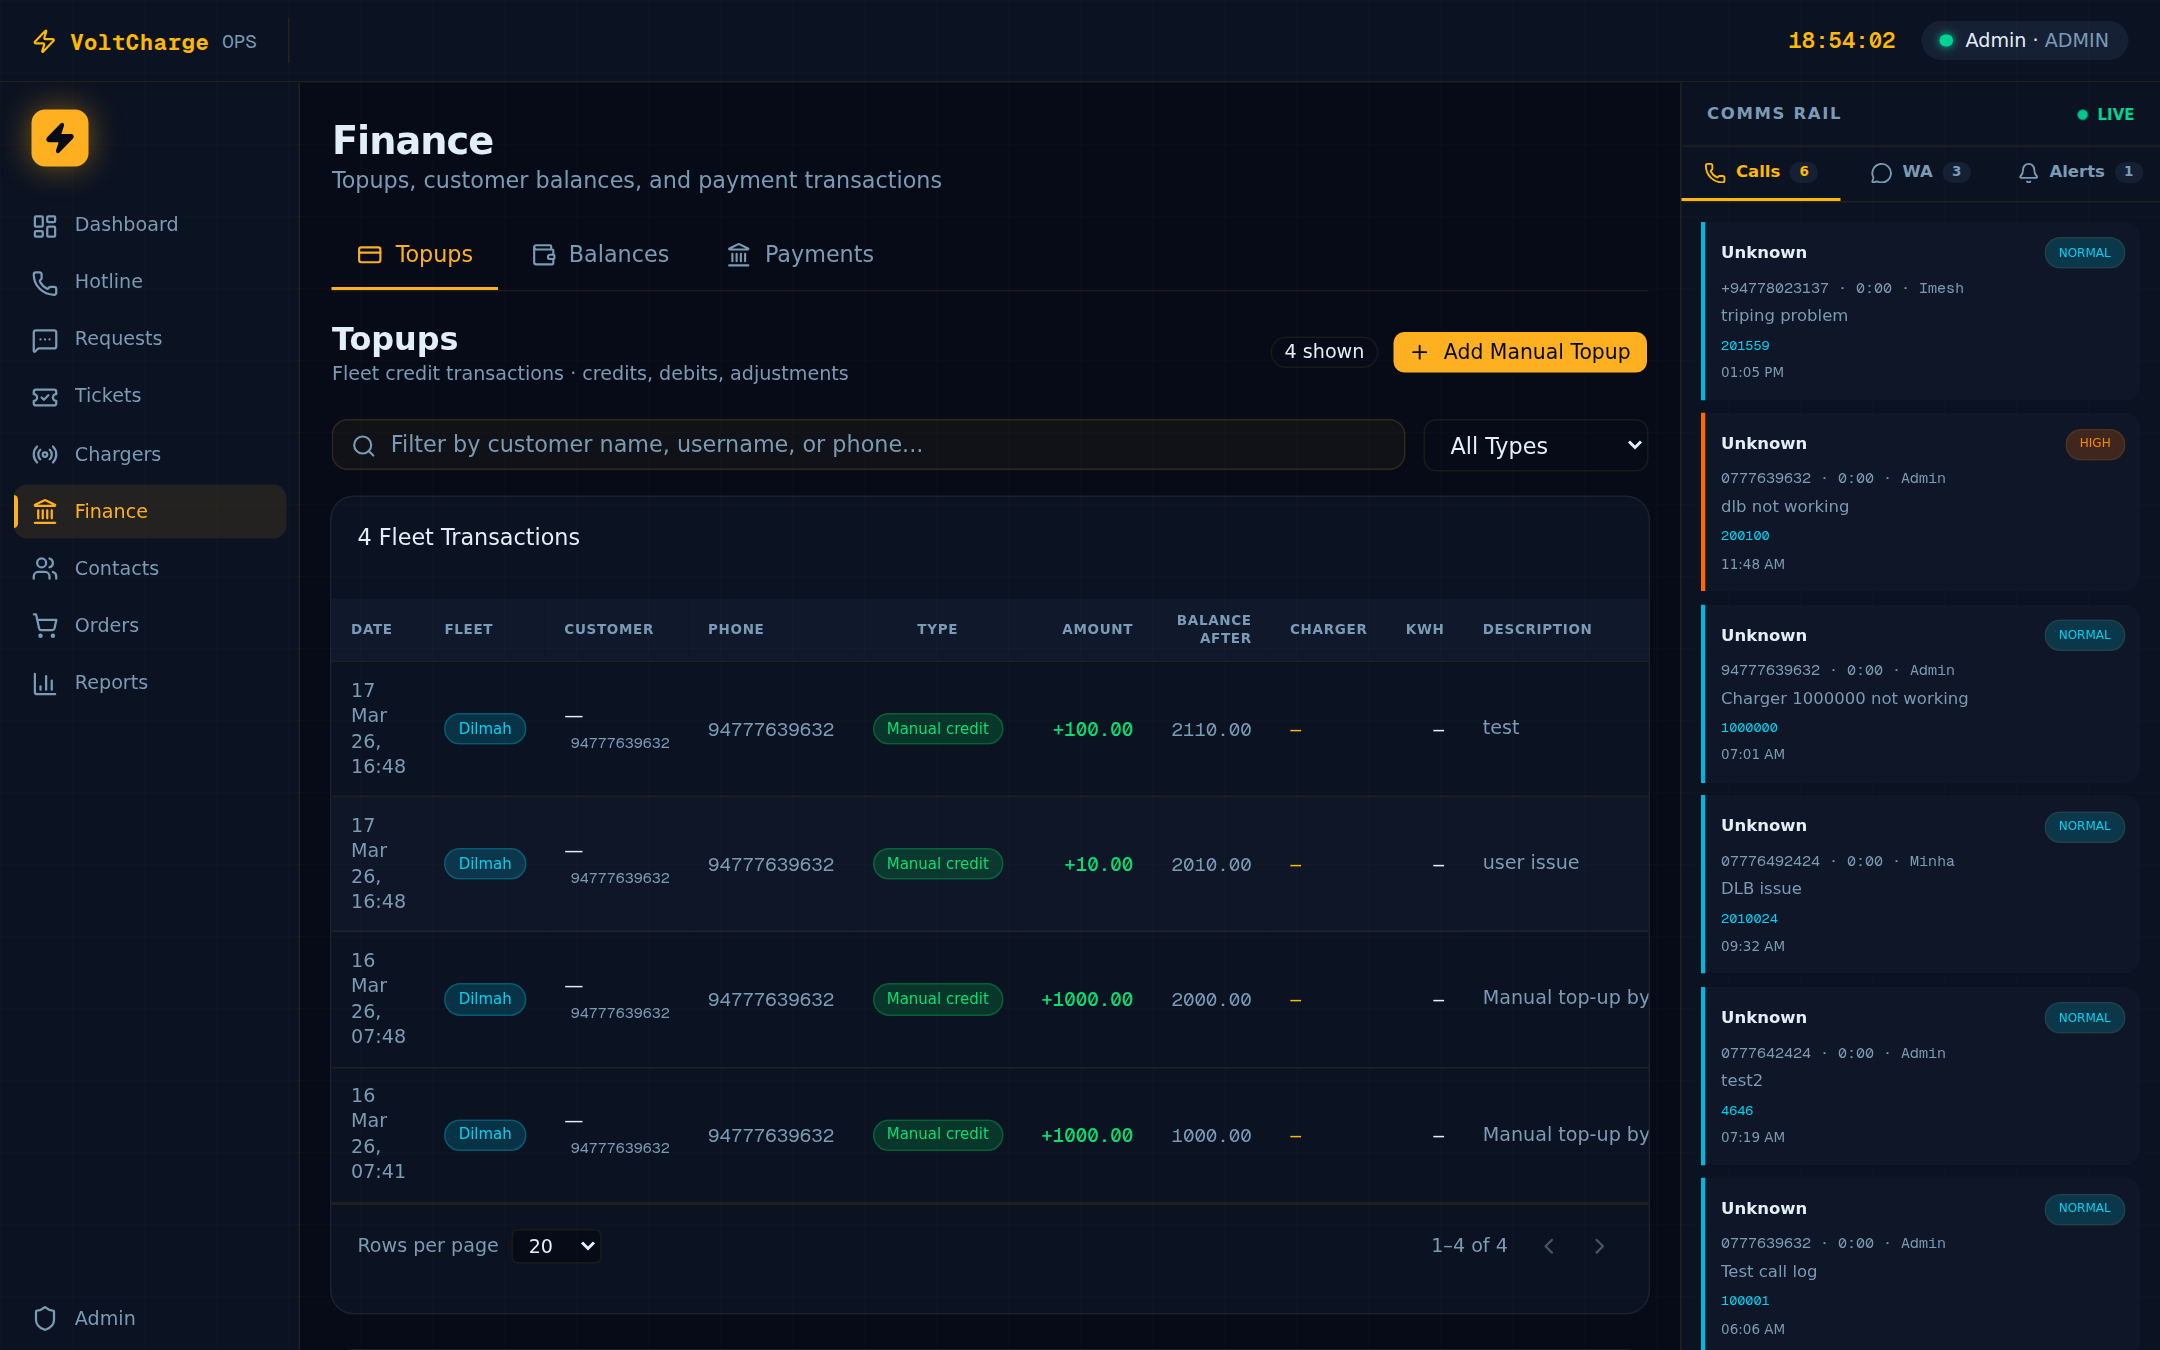
Viewing Payment History
Review all payment transactions across every gateway to investigate billing questions or verify top-up receipts.
Payment Transactions
- Navigate to Finance > Payments tab — Click “Finance” in the sidebar, then select the “Payments” tab to view the full transaction log.
- Scan the transaction list — Each row displays: Reference ID, Username, Payment Gateway, Amount (LKR), Status, Card information (last 4 digits and type), and Timestamp.
- Filter by gateway — Use the gateway filter dropdown to narrow the list to a specific payment provider: CyberSource (Visa/Mastercard online payments), Amex (American Express), Dialog Fuel Card (corporate fuel cards), or Manual (manually processed top-ups).
- Filter by status — Use the status filter to show only Success (completed payments), Failed (rejected or error), or Pending (awaiting confirmation) transactions.
- Sort by any column — Click a column header to sort ascending or descending. Sorting by timestamp shows the most recent transactions first.
- Investigate a specific transaction — When a customer questions a payment, search for their username, locate the transaction, and verify the amount, status, and timestamp against the customer’s claim.
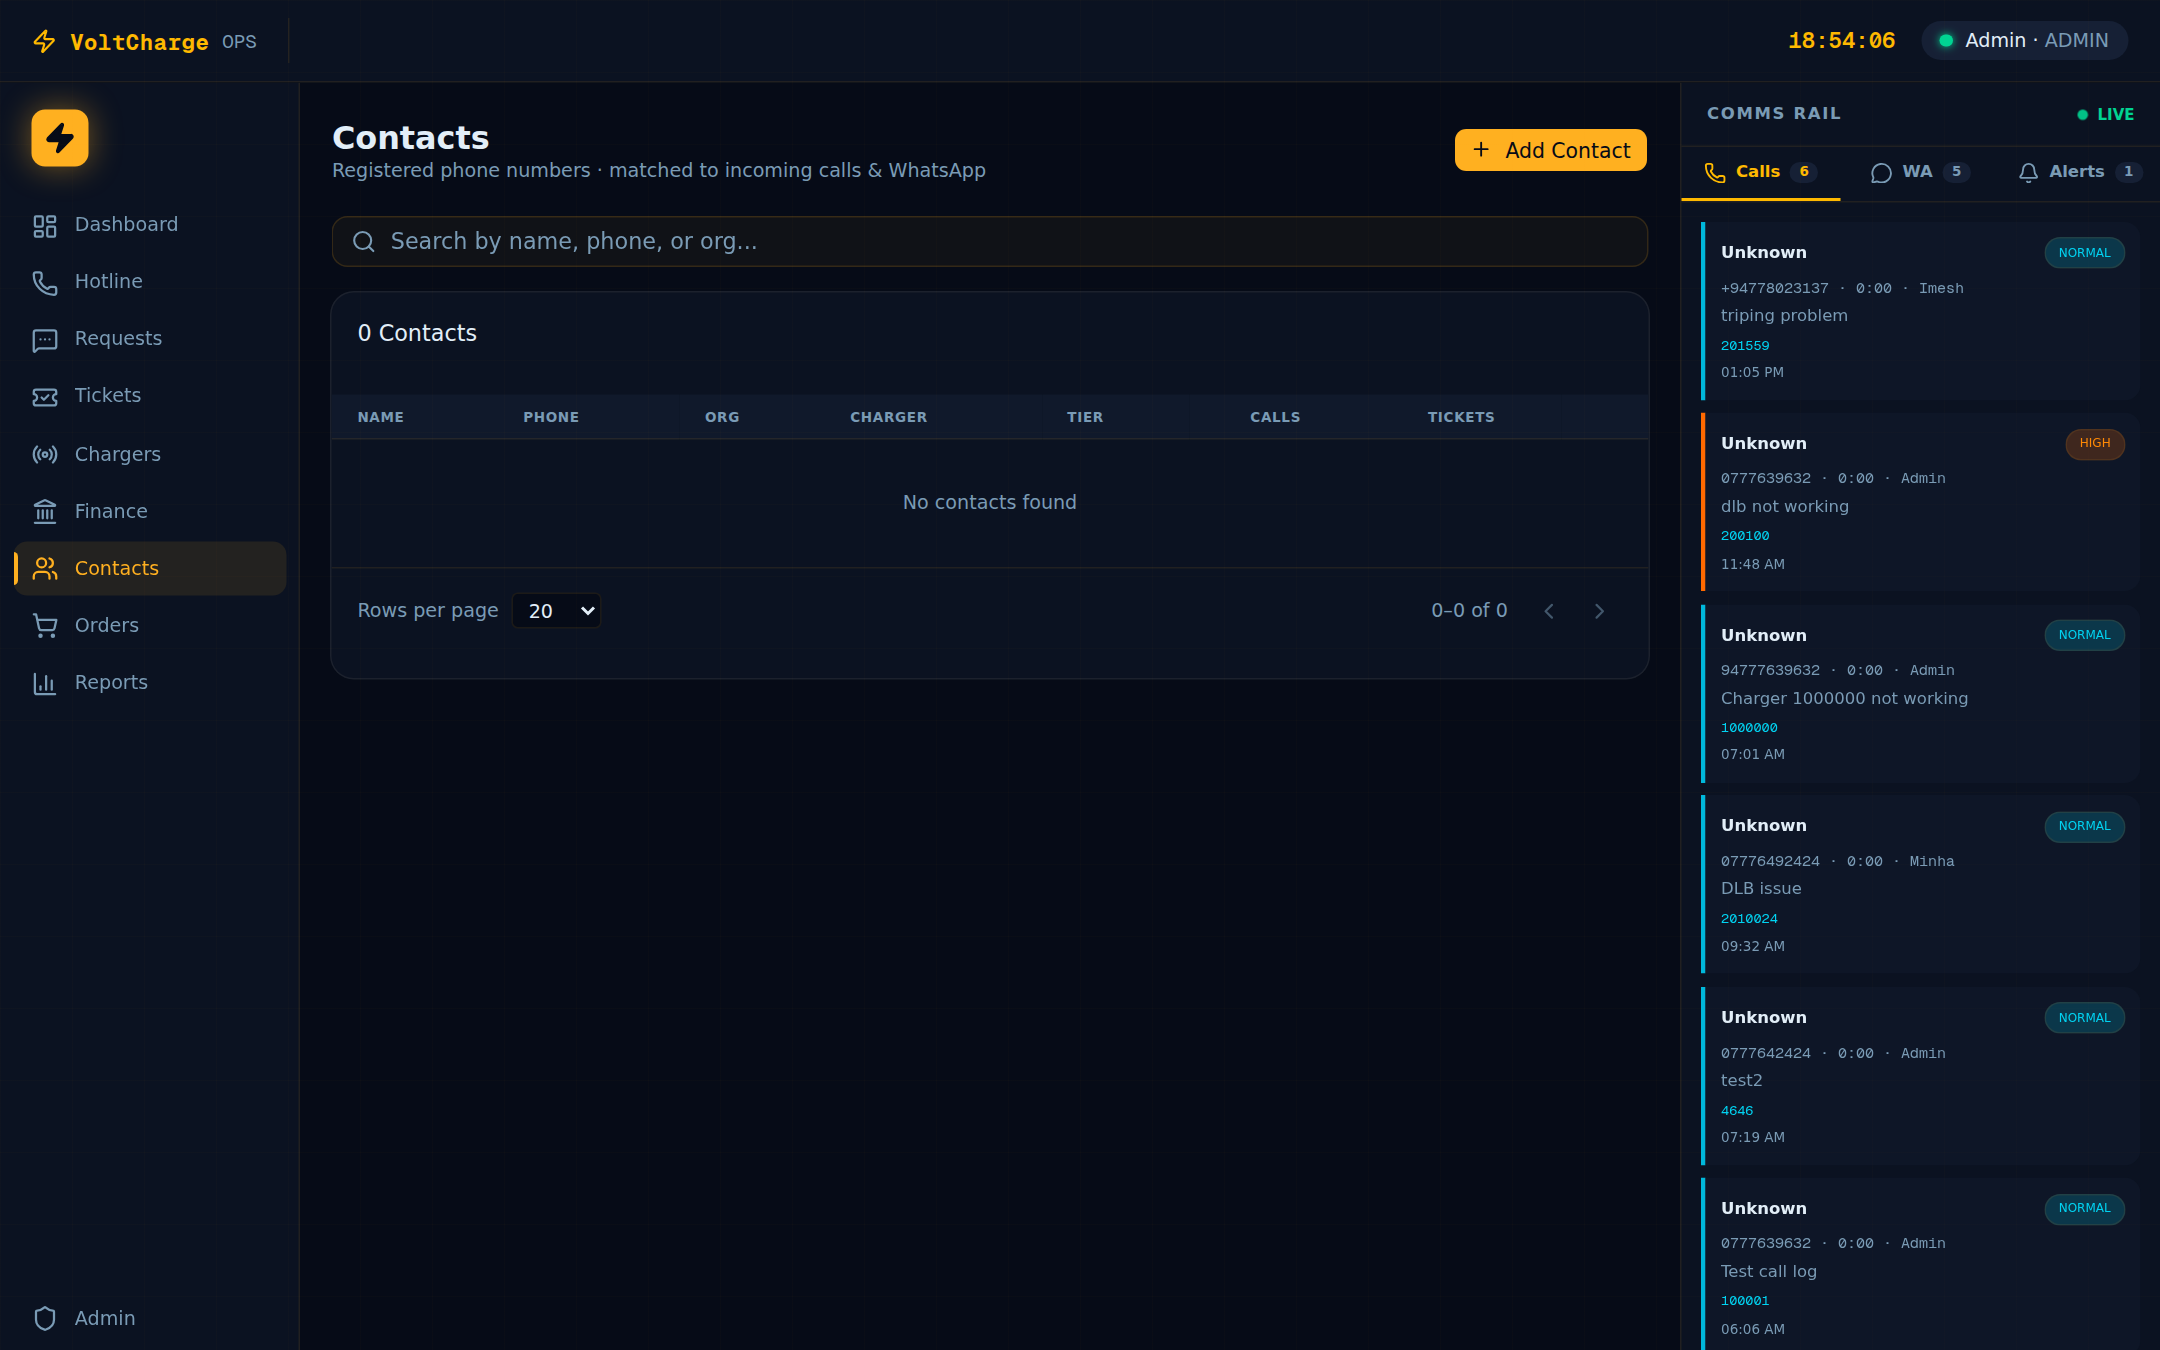
Managing Contacts
Maintain an up-to-date directory of customers and business contacts with tier classifications and communication history.
Adding a New Contact
- Navigate to the Contacts page — Click “Contacts” in the left sidebar to open the contact directory.
- Click “Add Contact” — Press the “Add Contact” button in the top-right corner to open the new contact form.
- Enter the contact name — Provide the customer’s full name. This is a required field.
- Enter the phone number — Type the contact’s phone number. Phone numbers must be unique across the directory.
- Set the organization — If the contact belongs to a company or fleet organization, enter the organization name. This helps group related contacts.
- Select the tier — Choose the customer tier: Standard (default), Silver, Gold, or Platinum. Tier classification helps prioritize support for high-value customers.
- Set the primary charger ID — If the contact primarily uses a specific charger (e.g., home charger or office charger), enter its ID for quick reference during calls.
- Add notes — Use the notes field for any additional context: preferred contact times, special requirements, or ongoing issues.
- Save the contact — Click “Save” to add the contact to the directory. It is immediately available for lookup in the Hotline and ticket creation workflows.
Searching and Editing Contacts
- Search by name, phone, or organization — Use the search bar at the top of the Contacts page to find contacts quickly. Results filter in real-time as you type.
- View contact details — Click a contact to see their full profile, including call history, ticket history, and any associated chargers.
- Edit a contact — Click the “Edit” button on the contact profile to update any field. Save changes when done.
- Delete a contact — If a contact is no longer relevant, click “Delete” and confirm the action. This cannot be undone, so use it carefully.
Managing Team Members
Add, configure, and manage team member accounts with role assignments and department capabilities.

Adding a New Team Member
- Navigate to Admin > Team Management — Click “Admin” in the sidebar, then select “Team Management” from the submenu. This section is only visible to users with the Admin role.
- Click “Add Member” — Press the “Add Member” button to open the new team member form.
- Enter the member’s name — Provide the team member’s full name as it should appear in the system.
- Enter the email address — This will be the team member’s login username. Each email must be unique.
- Enter the phone number — Provide a contact phone number for the team member.
- Set a password — Create a temporary password for the team member. Advise them to change it after their first login.
- Assign a role — Select the appropriate role from the dropdown: Admin, Manager, Dispatcher, OPS Agent, Installer, or CPO. Each role grants a different set of permissions (see Role Permissions below).
- Set department capabilities — Check the boxes for the departments this member can handle: Hotline (call handling), Service (ticket resolution), Maintenance (scheduled upkeep), and Technical (advanced diagnostics). These tags control which calls and tickets can be assigned to the member.
- Save the new member — Click “Save” to create the account. The team member can now log in with their email and password.
Editing and Deactivating Members
- Find the team member — Use the search field or scroll through the team list to find the member you want to modify.
- Edit role or departments — Click “Edit” to change the member’s role, department capabilities, phone number, or other details.
- Deactivate a member — To temporarily disable access without deleting the account, change the member’s status from Active to Inactive. They will be unable to log in until reactivated.
- Remove a member — To permanently remove a team member, click “Remove” and confirm. Their historical activity (calls logged, tickets handled) remains in the system for audit purposes.
WhatsApp Group Commands
The VoltCharge support WhatsApp group supports slash commands that let team members look up information and send charger commands directly from the chat.
Available Commands
-
/balance <phone or username> — Look up a customer’s personal wallet balance and fleet credit balance. Returns the balances directly in the group chat. Example:
/balance 0771234567 -
/status <charger-id> — View a charger’s current status and connector states. Returns the charger name, status, and each connector’s state. Example:
/status 100001 -
/reboot <charger-id> — Send a reboot command to the specified charger. The bot confirms when the command has been sent and reports the charger’s response. Example:
/reboot 100005 -
/clear <charger-id> — Clear an active fault on the specified charger and return it to Available status. Example:
/clear 100012 -
/ticket <ticket-id> — View the details of a service ticket, including its status, priority, assignee, and most recent notes. Example:
/ticket TKT-000042 -
/sessions <charger-id> — List all active charging sessions on the specified charger, including the customer, energy delivered, and elapsed time. Example:
/sessions 100003 - /help — Display the full list of available commands with brief descriptions. Use this as a quick reference when you forget a command syntax.
Support Mobile App
The VoltCharge Support app is an Android mobile application for field technicians and support agents. It provides real-time charger monitoring, OCPP debugging, remote charge control, and customer lookup — all from your phone. It uses the same Operations ERP login credentials.
Logging In
- Open the VoltCharge Support app on your Android device.
- Enter your Operations ERP email and password (same credentials you use for the web ERP).
- Tap Sign In. The app authenticates against the ERP login API and stores your session token locally.
- You will land on the Dashboard tab. The bottom navigation bar has five tabs: Dashboard, Sessions, Debug, Map, and More.
App Navigation
The app uses a bottom navigation bar with five primary tabs:
| Tab | Purpose |
|---|---|
| Dashboard | Real-time charger network overview — L2/L3 status buckets via MQTT |
| Sessions | All active charging sessions with live energy, duration, and connector status |
| Debug | Charger OCPP debug console + customer phone number lookup |
| Map | Interactive map showing all charger locations with status color-coding |
| More | Issue tracker, maintenance, force charge, tickets, alerts, push notifications, charger health |
App Dashboard & Sessions
Reading the Dashboard
- The dashboard connects to the MQTT broker automatically on load. A green "MQTT Connected" indicator appears at the top when live data is streaming.
- Chargers are split into two rows: L2 (AC) and L3 (DC). Each row shows status counts: Available, Charging, Weak Signal, Offline, and Faulted.
- Below the status summary, each charger appears as a card with its ID, display name, status, and heartbeat average.
- Use the search bar at the top to filter chargers by ID or name.
- Tap any charger card to open its detailed charger view with live MQTT data, OCPP log, and remote commands.
Viewing Active Sessions
- Tap the Sessions tab in the bottom navigation.
- The screen subscribes to MQTT topics for all chargers and displays sessions as they start. Each session card shows charger ID, connector, customer, energy delivered, and elapsed time.
- Sessions are keyed by charger + connector, so dual-gun chargers show separate entries for each connector.
- Use the search bar to filter sessions by charger ID.
- The screen auto-initializes for up to 12 seconds to collect data from all active chargers before showing results.
Charger Debug & Map
Using the Debug Console
- Tap the Debug tab in the bottom navigation.
- Under Charger Debug, enter a charger ID (e.g. 100101) and tap Open Debug.
- The debug screen opens with 5 tabs: Status, Connectors, OCPP Log, Profile, and Commands.
- Status tab — Shows charger online/offline state, last heartbeat, firmware version, and live connector statuses.
- OCPP Log tab — Real-time MQTT stream showing every OCPP message (StatusNotification, MeterValues, Heartbeat, etc.) with timestamps.
- Commands tab — Send remote OCPP commands: Reset (soft/hard), Remote Start, Remote Stop, Change Configuration, Clear Cache, and more.
Customer Lookup
- On the Debug tab, scroll down to Customer Lookup.
- Enter the customer's phone number (e.g. 94775xxxxxx) and tap Lookup.
- The customer screen shows their wallet balance, charging session history, and profile details.
Using the Charger Map
- Tap the Map tab in the bottom navigation.
- The map loads all charger locations. Red markers = DC (L3) chargers, Blue markers = AC (L2) chargers.
- A green dot on a marker indicates the charger is online; grey means offline.
- Tap any marker to see the charger name and ID. Tap again to open the full charger details screen.
Field Operations
Force-Starting a Charge
- Tap More → Force Charge.
- Enter the charger ID and tap the search button. The charger details (name, status, connectors) will load.
- Search for the customer by name or phone number. Select the customer from the results.
- Choose the connector (for dual-gun chargers) and the charge mode (by amount or by time).
- Enter the amount or duration, then tap Start Charging.
- The screen will show live session progress with energy delivered and elapsed time. Use Stop to end the session early.
Managing Issues
- Tap More → Issue Tracker.
- Issues are organized into three tabs: Assign, Ongoing, and Solved.
- Tap + to create a new issue. Select a charger, set priority (Low/Medium/High/Critical), add a description, and assign it.
- Update issue status as you work — move from Assign → Ongoing → Solved.
- Issues are stored in local SQLite on the device, so they work even without internet connectivity.
Maintenance Planning
- Tap More → Maintenance Planning.
- Tasks are split into three tabs: Pending, In Progress, and Completed.
- Create a new task with: task type (Routine, Repair, Emergency, Inspection), charger type (L2/L3), charger ID, and description.
- Filter tasks by charger type using the dropdown filter.
Support Tickets
- Tap More → Support Tickets.
- Tickets are synced with the Operations ERP. Filter by status: All, Open, In Progress, Resolved.
- Tap a ticket to view details. You can add notes and update the status from the mobile app.
Alerts & Notifications
- Tap More → Alerts Feed to view charger offline events and system alerts. Toggle between unread-only and all alerts. Tap Mark All Read to clear the badge.
- Tap More → Push Notifications to send broadcast messages to app users or configure charger-specific alert rules.
- Tap More → Charger Health to see OCPP heartbeat statistics across all chargers — online/offline counts and connectivity quality.
Role Permissions
The Operations ERP uses six roles to control access to modules and features. Refer to this table when assigning roles to team members.
Permissions Matrix
| Role | Dashboard | Hotline | Tickets | Chargers Hub | Finance | Contacts | Team Mgmt | |
|---|---|---|---|---|---|---|---|---|
| Admin | Full | Full | Full | Full | Full | Full | Full | Full |
| Manager | Full | Full | Full | Full | Full | Full | Full | — |
| Dispatcher | Full | Full | Full | Full | Full | Full | Full | — |
| OPS Agent | Full | Full | Full | Full | Full | Full | Full | — |
| Installer | Full | — | — | — | Full | — | — | — |
| CPO | Charger stats only | — | — | View only (no Force Charge) | — | Topups only | — | — |
Role Descriptions
- Admin — Full access to every module and feature, including team management, role assignments, and system configuration. Typically reserved for system administrators and senior operations leads.
- Manager — Access to all operational modules (Dashboard, Hotline, Tickets, Chargers Hub, WhatsApp, Finance, Contacts) but cannot manage team accounts or system settings. Ideal for operations managers who oversee daily workflows.
- Dispatcher — Same module access as Manager. Dispatchers focus on routing incoming calls and assigning tickets to the right technicians based on department capabilities and workload.
- OPS Agent — Full access to all operational modules. OPS Agents are the front-line support staff who handle calls, process WhatsApp messages, create and resolve tickets, and look up charger and financial information.
- Installer — Limited to the Dashboard and Customer Requests (WhatsApp) module. Installers are field technicians who primarily need to view incoming requests related to new charger installations.
- CPO (Charging Point Operator) — Limited Dashboard access showing only charger statistics, Chargers Hub access for viewing charger statuses (without Force Charge capability), and Finance access restricted to the Topups tab. Designed for external charging point operators who need visibility into their charger fleet.