Fleet Management User Guide
Step-by-step instructions for fleet managers, drivers, and accountants.
User GuideGetting Started
Learn how to log in, navigate the interface, and orient yourself with the Fleet Management module.
Logging In
- Open Fleet Management — Navigate to the Fleet Management URL in your web browser. You will see the sign-in page with the VoltCharge logo.
- Enter your credentials — Type the email address and password that were provided to you by your Fleet Administrator.
- Click "Sign In" — After authenticating, you are taken to the Fleet Dashboard. If you enter incorrect credentials three times, your account may be temporarily locked.
Navigating the Interface
- Sidebar navigation — The left sidebar contains all modules: Dashboard, Vehicles, Tracking, People, Sessions, Bookings, Maintenance, Allowances, Reports, and Settings. Click any item to navigate.
- Period selector — The top bar includes a period selector with four options: 7D (last 7 days), MTD (month-to-date), QTD (quarter-to-date), and YTD (year-to-date). This affects all dashboard KPI cards and charts.
- Role badge — Your role badge is displayed in the top-right corner of the interface. It shows your current permission level (for example, "Fleet Manager" or "Dispatcher").
- Collapse the sidebar — Click the collapse arrow at the bottom of the sidebar to minimize it and gain more screen space for maps and data tables.
- Sign out — Click your profile avatar in the top-right corner and select "Sign Out" to end your session securely.
Quick-Start Checklist
Complete these five tasks to familiarize yourself with the fleet module after your first login.
First-Day Orientation
- Review dashboard KPIs — Navigate to Dashboard and confirm that the key metrics (total vehicles, active count, idle count, charging count, and in-maintenance count) are loading correctly for your fleet.
- Check the vehicle fleet — Open the Vehicles page and verify that all your vehicles are registered with correct license plates, makes, models, and status indicators.
- Open the tracking map — Navigate to Tracking and confirm that vehicle markers are appearing on the map. Verify that GPS positions are updating and that color-coded status markers match vehicle states.
- Browse the drivers list — Open People and switch to the Drivers tab. Confirm that all active drivers are listed and that their license details and VoltCharge link statuses are correct.
- Check the maintenance schedule — Navigate to Maintenance and review any upcoming scheduled services. Ensure that no vehicles are overdue for inspection or routine service.
Reading the Dashboard
Understand the fleet dashboard KPIs, charts, and tables to monitor your fleet at a glance.
Understanding the KPI Cards
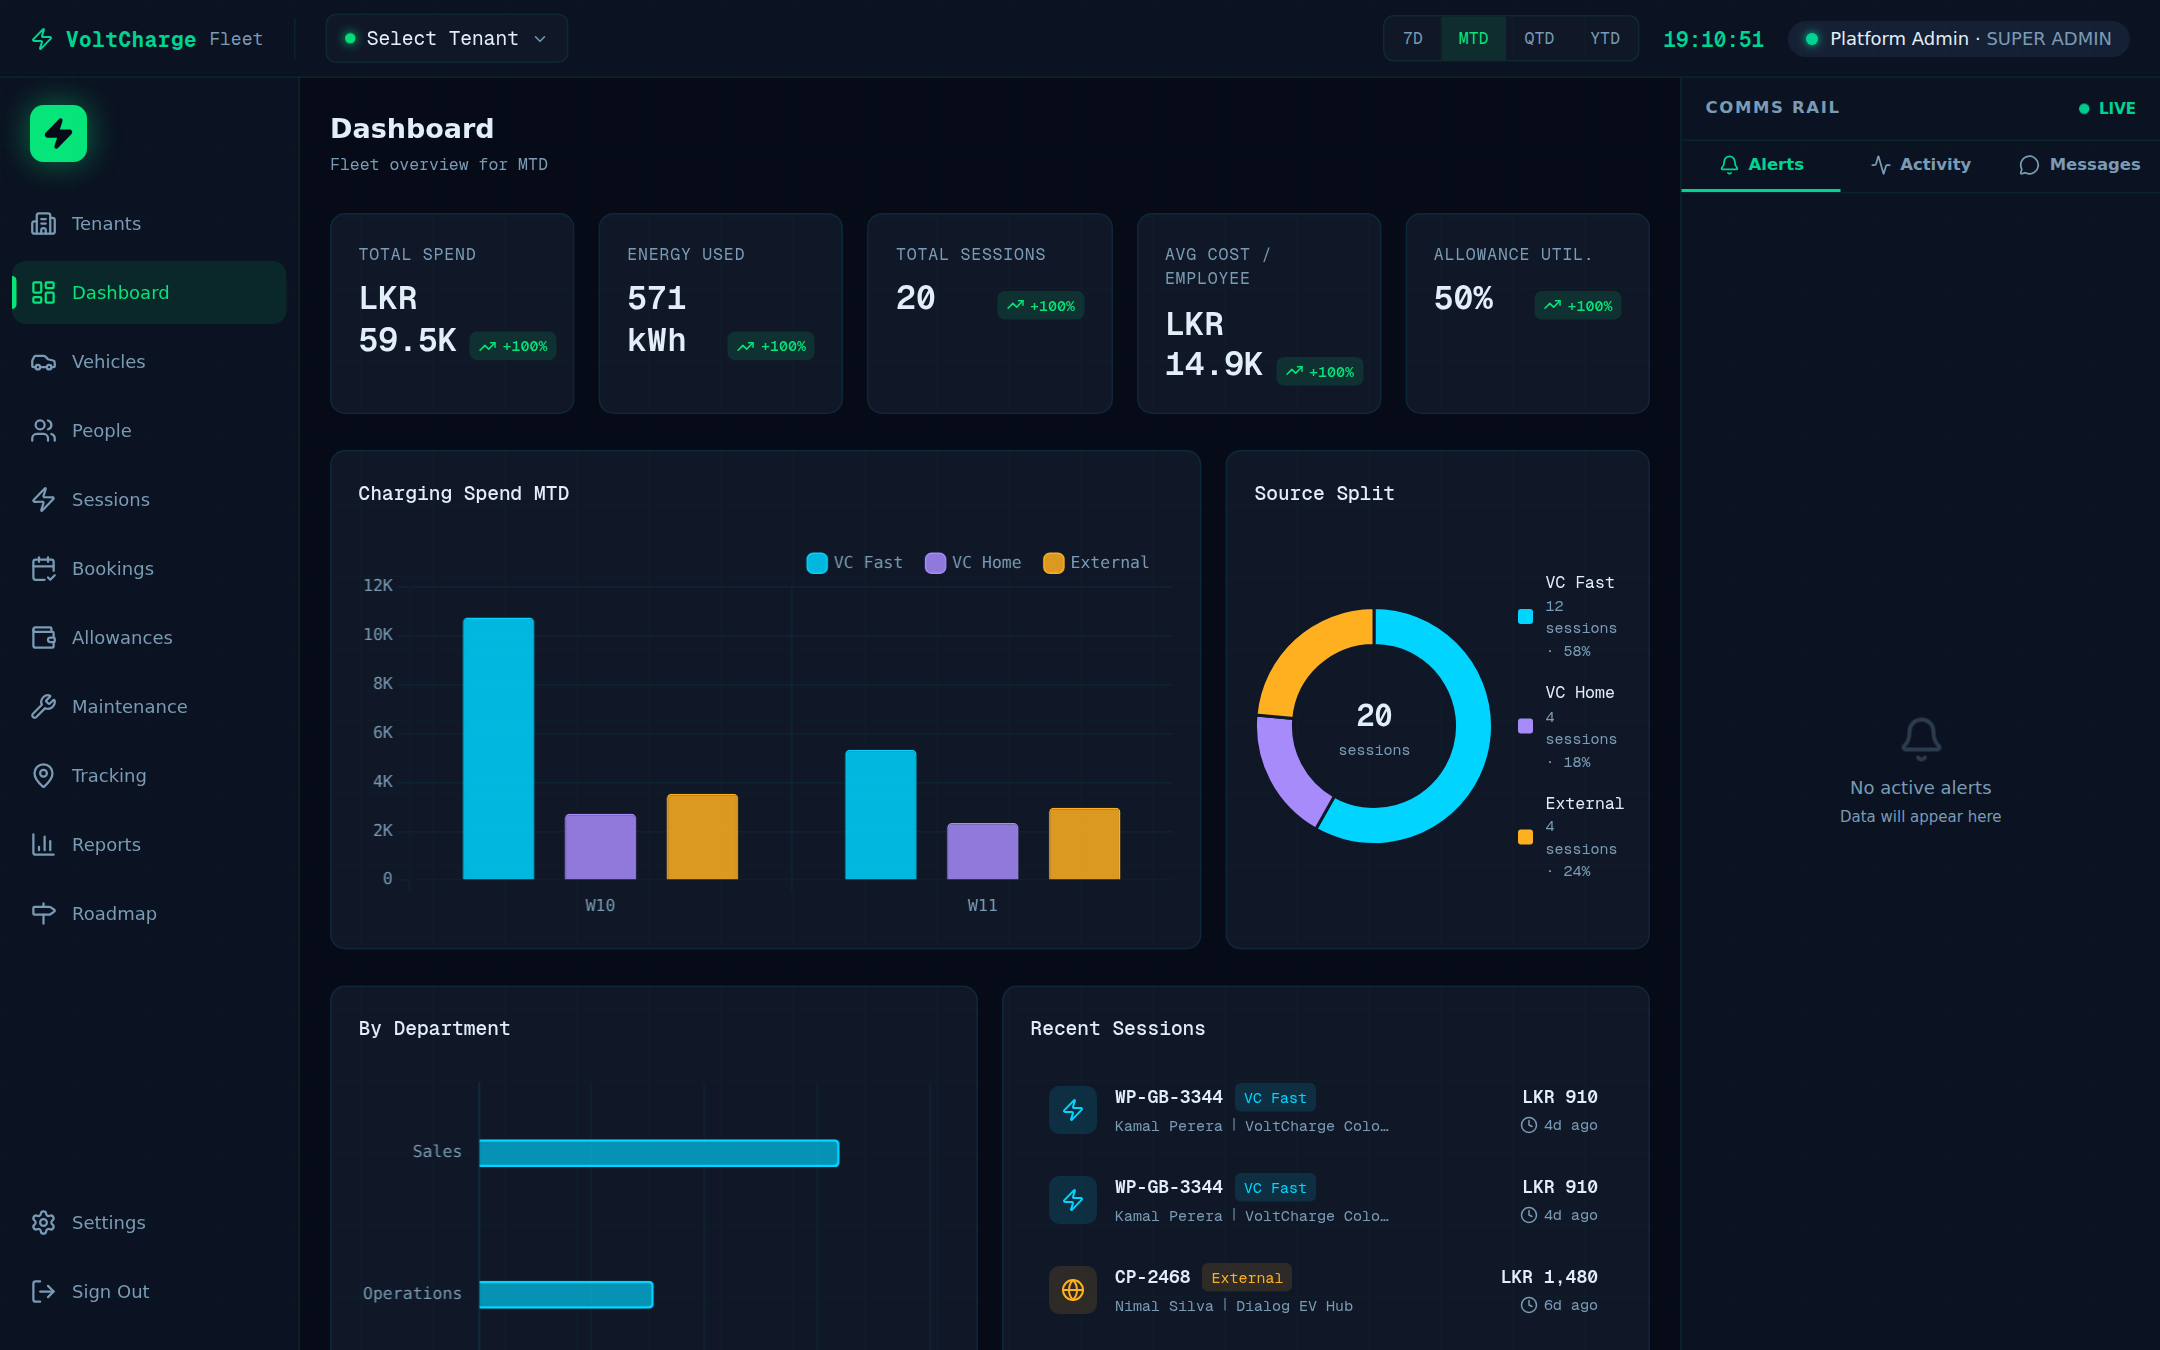
- Navigate to Dashboard — Click "Dashboard" in the sidebar. The dashboard loads with real-time fleet statistics at the top of the page.
- Review vehicle status cards — Five KPI cards are displayed: Total Vehicles (full fleet count), Active (vehicles currently on the road), Idle (parked and not in use), Charging (vehicles plugged in to a charger), and In Maintenance (vehicles at the workshop).
- Examine the weekly spend chart — Below the KPIs, a bar chart shows weekly charging expenditure broken down by source: VC Fast (public fast chargers), VC Home (workplace or depot chargers), and External (third-party charging stations).
- Review the source donut chart — To the right of the bar chart, a donut visualization shows the percentage split of charging by source. Hover over any segment to see the exact percentage and cost.
- Analyze department spend breakdown — A horizontal bar chart shows spending per department (e.g., Sales, Logistics, Executive). Use this to compare departmental charging costs.
- Browse recent charging sessions — A table at the bottom lists the most recent charging sessions with vehicle, driver, charger location, energy consumed (kWh), cost, and duration.
- Check the top vehicles leaderboard — A ranked list shows the vehicles with the highest charging spend in the selected period. Click any vehicle to jump to its detail page.
- Change the timeframe — Use the period selector in the top bar (7D, MTD, QTD, YTD) to adjust the date range for all dashboard widgets. All charts and KPIs update automatically when you switch periods.
Tracking Vehicles Live
Monitor your entire fleet in real time on an interactive map with live GPS positions and status indicators.
Using the Live Tracking Map
- Navigate to Tracking — Click "Tracking" in the sidebar. The full-screen map loads with markers for every vehicle in your fleet.
- Read the color-coded markers — Each vehicle is shown as a colored marker: green for active (driving), grey for idle (parked), blue for charging (plugged in), and red for in maintenance (at workshop).
- Filter by status — Use the vehicle list panel on the left side of the map to filter vehicles by status. Click "Active", "Idle", "Charging", or "Maintenance" to show only vehicles in that state.
- Select a vehicle — Click any vehicle marker on the map to select it. The marker glows cyan to indicate selection, and the map smoothly centers on that vehicle.
- Read the detail panel — When a vehicle is selected, a detail panel appears showing current speed, compass heading, battery percentage, and the timestamp of the last GPS update.
- Observe heading direction — Vehicle markers rotate on the map to indicate the heading direction of each vehicle. A northward-pointing marker means the vehicle is traveling north.
- Toggle geofence overlays — Click the "Geofences" toggle in the map toolbar to overlay all geofence zones on the map. Zones appear as shaded polygons or circles with their names labeled.
- Switch map views — Toggle between Street, Satellite, and Terrain map views using the layer selector in the top-right corner of the map.
- Observe auto-refresh — The map automatically refreshes vehicle positions every 30 seconds. A countdown indicator at the top-right shows when the next update will occur. You can also click "Refresh" to update immediately.
- Show nearby chargers — Click "Charger overlay" in the map toolbar to display nearby VoltCharge charging stations as bolt icons. This helps dispatchers direct vehicles to the closest available charger.
Viewing Route History
Replay past trips for any vehicle, analyze speed patterns, and identify stop points along a route.
Replaying Past Routes
- Select a vehicle on the tracking map — Navigate to Tracking and click on the vehicle marker you want to review. The vehicle becomes selected with a cyan glow.
- Open Route History tab — In the vehicle detail panel, click the "Route History" tab to switch from live tracking to historical replay mode.
- Choose a date range — Use the date picker to select the start and end dates for the route history you want to view. You can select a single day or a multi-day range.
- Read the GPS trail — The route appears as a colored line drawn on the map. Colors indicate speed: green segments are below 30 km/h, orange segments are between 30 and 80 km/h, and red segments indicate speeds above 80 km/h.
- View stop points — Stop points are marked along the route as circular pins. Each pin shows the timestamp when the vehicle stopped and how long it remained stationary.
- Analyze trip patterns — Review the route summary panel to see total distance driven, total drive time, number of stops, average speed, and maximum speed for the selected period.
- Identify efficiency opportunities — Look for unnecessary detours, excessive idle time at stops, or recurring high-speed segments. Use this data to optimize routes and improve fleet efficiency.
Adding a Vehicle
Register a new vehicle to your fleet with its specifications, department assignment, and insurance details.
Registering a New Vehicle
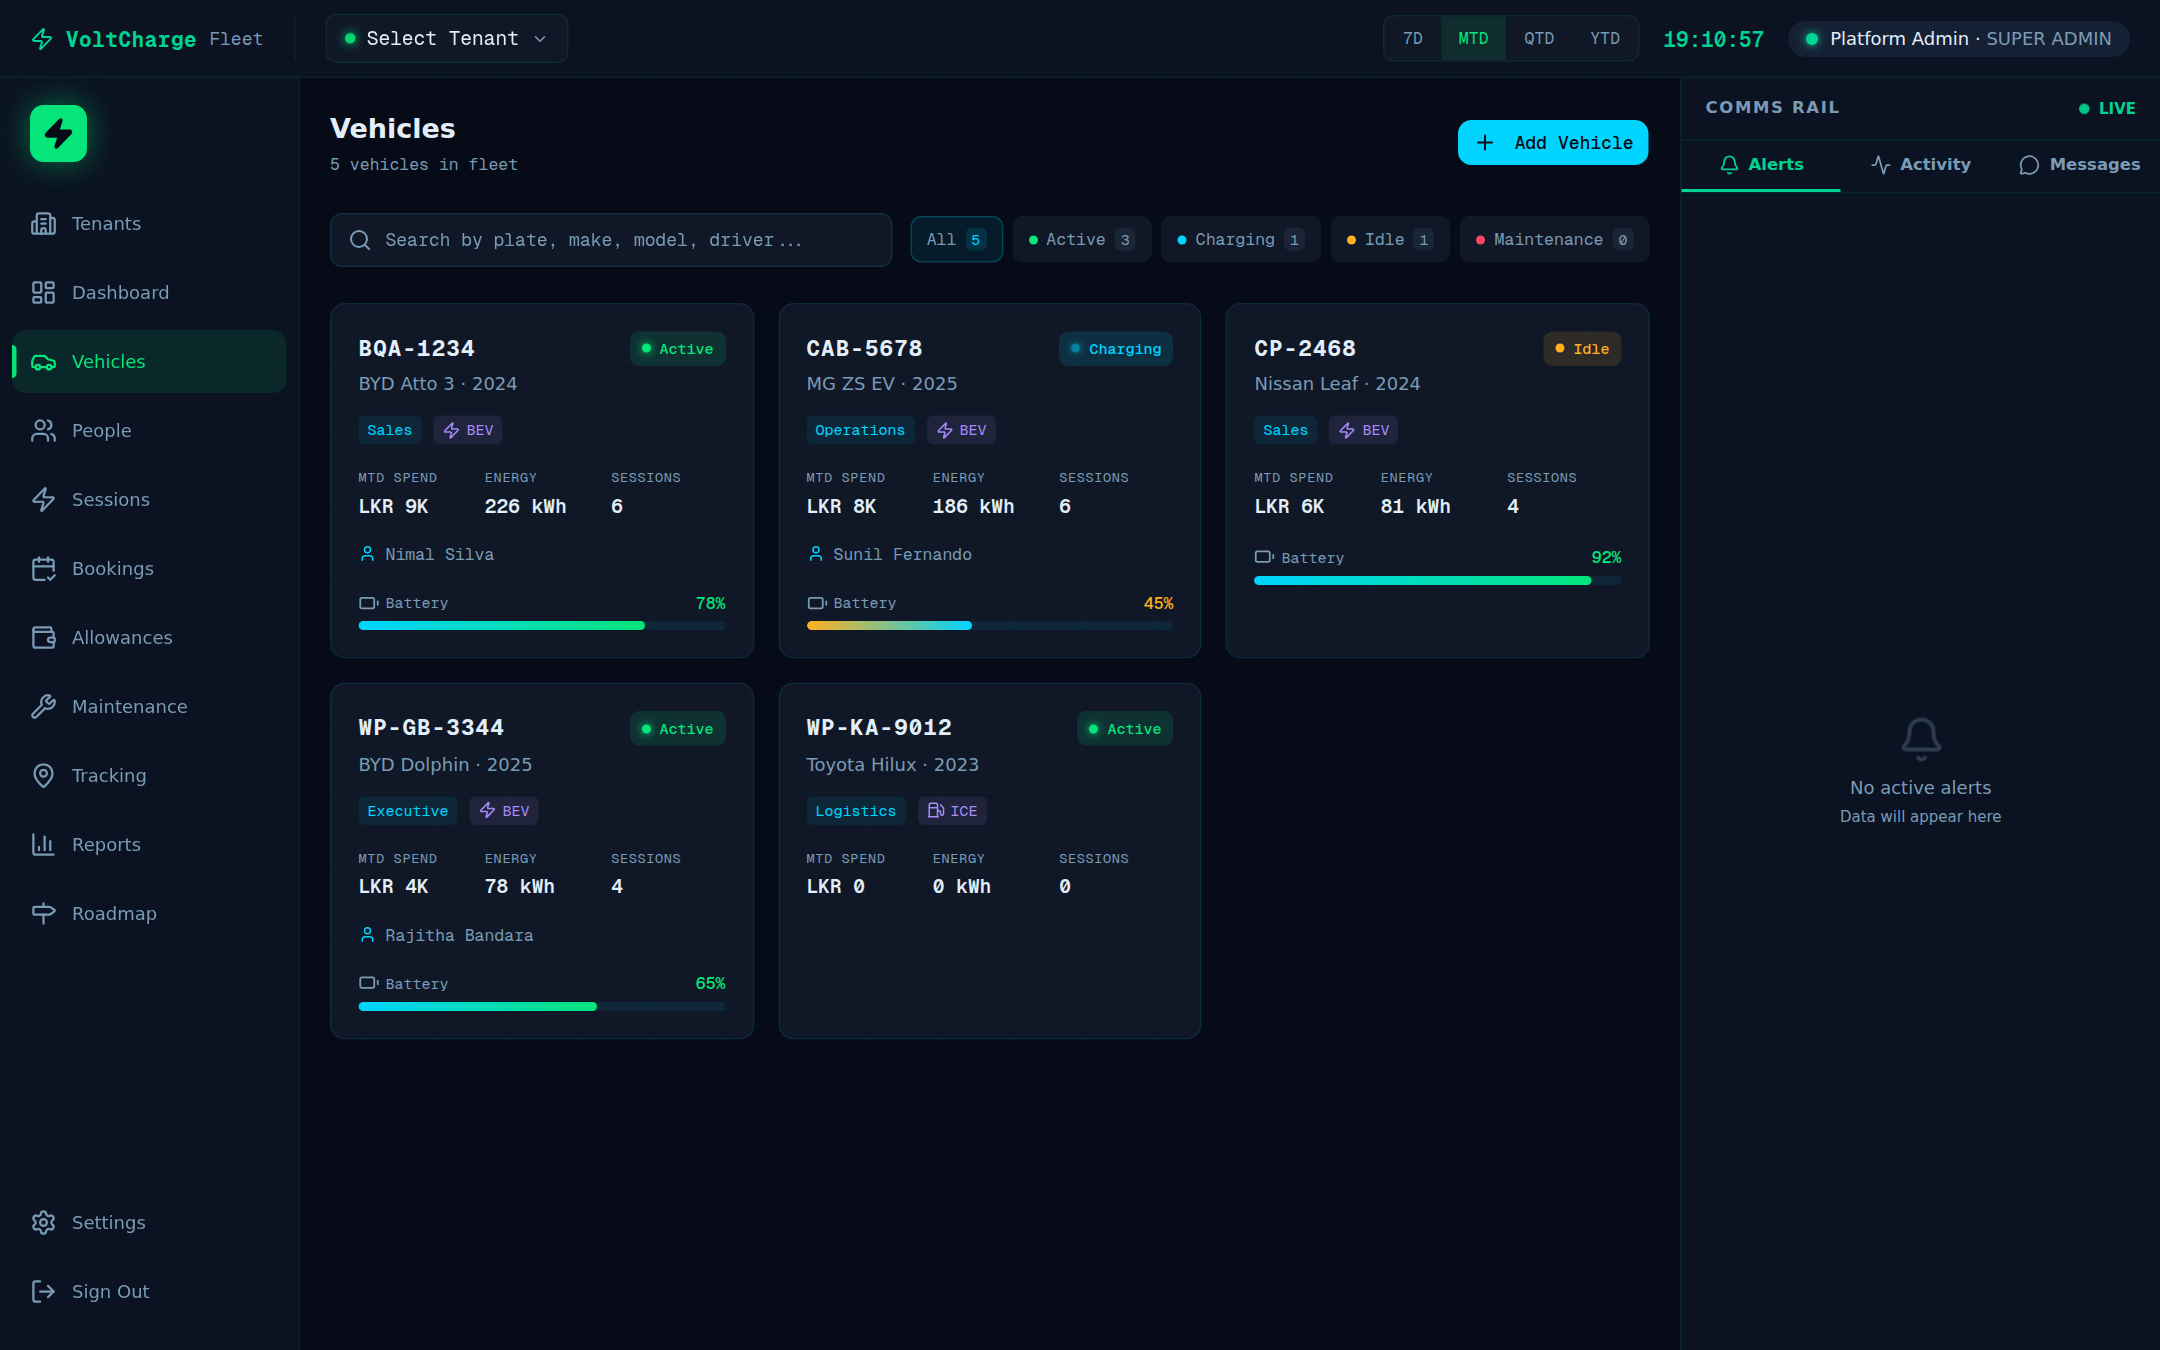
- Navigate to Vehicles — Click "Vehicles" in the sidebar to open the fleet grid, which shows all registered vehicles with their status indicators.
- Click "Add Vehicle" — The button is located in the top-right corner of the Vehicles page. A modal or form page opens with fields for vehicle details.
- Enter vehicle identity — Fill in Make (e.g., "BYD"), Model (e.g., "Atto 3"), and Year (e.g., "2025"). These fields help identify the vehicle across all reports.
- Select fuel type — Choose from BEV (Battery Electric Vehicle), PHEV (Plug-in Hybrid Electric Vehicle), ICE (Internal Combustion Engine), or Hybrid. This determines which charging fields are available.
- Enter battery and technical details — For electric vehicles, enter the battery capacity in kWh (e.g., "60.48"). Enter the VIN (Vehicle Identification Number) and the license plate number.
- Assign to a department — Select the department this vehicle belongs to from the dropdown (e.g., "Sales", "Logistics", "Executive"). Department assignments drive cost reports and spending breakdowns.
- Set insurance expiry dates — Enter the insurance policy expiry date and any other relevant dates. The system will alert you when insurance is nearing expiration.
- Click "Save" — The new vehicle is added to the fleet grid immediately. It appears with an "Idle" status by default. You can now assign a driver and begin tracking.
Updating Vehicle Status
Change a vehicle's operational status to reflect its current state, whether active, idle, charging, or in the workshop.
Changing Vehicle Status
- Navigate to Vehicles — Open the Vehicles page from the sidebar. The fleet grid displays all vehicles with color-coded status badges.
- Search or filter — Use the search bar to find a vehicle by name, license plate, or VIN. Alternatively, click the status filter chips (Active, Charging, Idle, Maintenance) at the top of the grid to narrow the view.
- Open the vehicle detail panel — Click on the vehicle card to expand its detail view. The current status is highlighted at the top of the panel.
- Select a new status — Choose from the available statuses: Active (on the road), Idle (parked, not in use), Charging (plugged in), In Maintenance (at workshop), or Offline (decommissioned or unavailable).
- Confirm the change — Click "Update" to save the new status. The map marker color, dashboard KPI counts, and vehicle grid badge all update immediately.
- Review the audit log — All status changes are logged with the timestamp, the user who made the change, and the previous status. Navigate to the vehicle's activity tab to review the full history.
Adding a Driver
Register an employee and promote them to driver status with license details and VoltCharge mobile app linking.
Creating an Employee Record
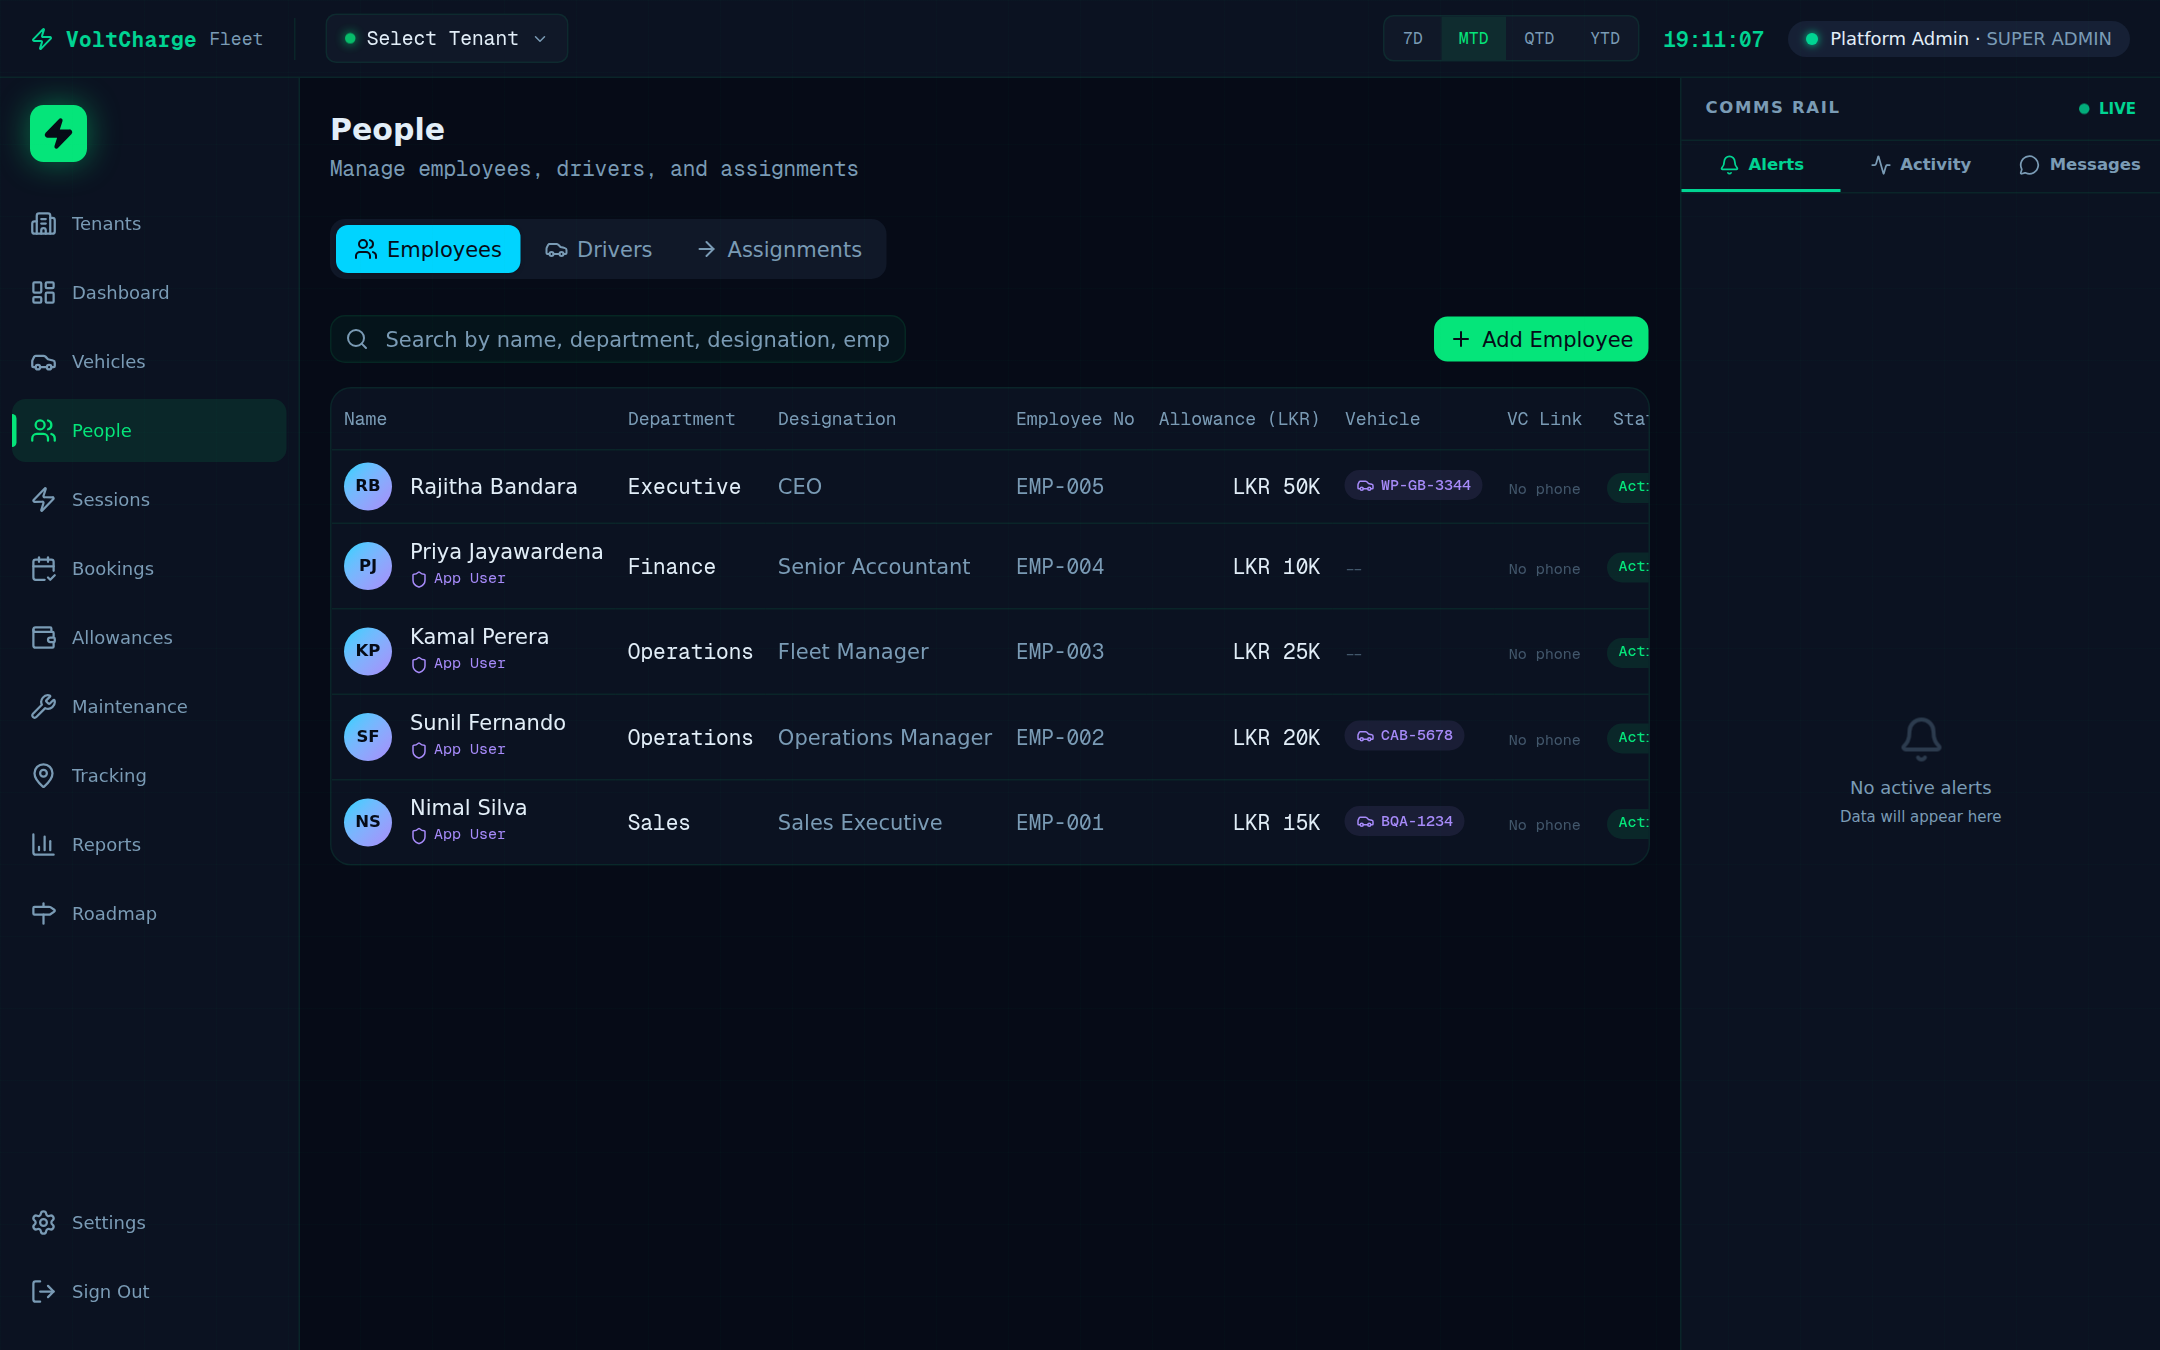
- Navigate to People — Click "People" in the sidebar. The page opens with the Employees tab active, showing all registered personnel.
- Click "Add Employee" — A form appears where you enter the employee's full name, email address, phone number, and department assignment.
- Save the employee — Click "Save" to create the employee record. The employee now appears in the Employees tab but is not yet a driver.
Promoting to Driver
- Switch to the Drivers tab — Click the "Drivers" tab at the top of the People page to view the current list of registered drivers.
- Click "Create Driver" — A dialog opens where you can promote an existing employee to driver status.
- Select the employee — Choose the employee you want to promote from the dropdown list. Only employees who are not already drivers are shown.
- Enter license details — Type the driver's license number and select the license expiry date from the date picker. Both fields are required.
- Link to VoltCharge mobile app (VC Link) — Enter the driver's VoltCharge mobile app account identifier to link their fleet profile with their personal charging app. This enables the driver to use fleet credits when charging.
- Click "Confirm" — The driver appears in the Drivers list with their license information and VC Link status badge (linked or not linked).
Assigning a Vehicle to a Driver
Create a vehicle-driver assignment with a defined date range so the system knows who is responsible for each vehicle.
Creating an Assignment
- Navigate to People — Click "People" in the sidebar and switch to the "Assignments" tab to see the current assignment roster.
- Click "Assign Vehicle" — The assignment form opens with two primary dropdowns and date fields.
- Select the vehicle — Choose a vehicle from the dropdown list. The list shows license plate, make, model, and current status. Vehicles already assigned are labeled accordingly.
- Select the driver — Choose a driver from the dropdown. Only drivers with valid licenses are selectable.
- Set the assignment period — Choose the start date and end date for the assignment. For permanent assignments, leave the end date open. For temporary swaps, set a specific end date.
- Click "Confirm" — The assignment becomes active immediately. The vehicle now shows the assigned driver in the Vehicles grid, and the driver's profile shows their assigned vehicle.
- Verify the assignment — Navigate to the Vehicles page and confirm that the assigned driver's name appears on the vehicle card. On the tracking map, the vehicle tooltip now includes the driver's name.
Managing Fleet Credits
Top up and manage charging credit balances for drivers and review the fleet-wide allowance overview.
Adjusting Driver Credits
- Navigate to People — Click "People" in the sidebar and open the "Drivers" tab to see all registered drivers with their current credit balances.
- Find the driver — Use the search bar or scroll through the list to locate the driver whose credits you need to adjust.
- Open the credit dialog — Click the fleet credit icon (wallet symbol) next to the driver's name. The credit management dialog opens.
- Review current balance — The dialog displays the driver's current credit balance, their monthly allowance amount, and the date of the last credit adjustment.
- Add or adjust credits — Enter the amount to add (positive value) or deduct (negative value). Select the reason from the dropdown: Monthly Allowance, Bonus, Adjustment, or Correction.
- Confirm the transaction — Click "Apply" to process the credit change. The driver's balance updates immediately, and a transaction record is created in the audit trail.
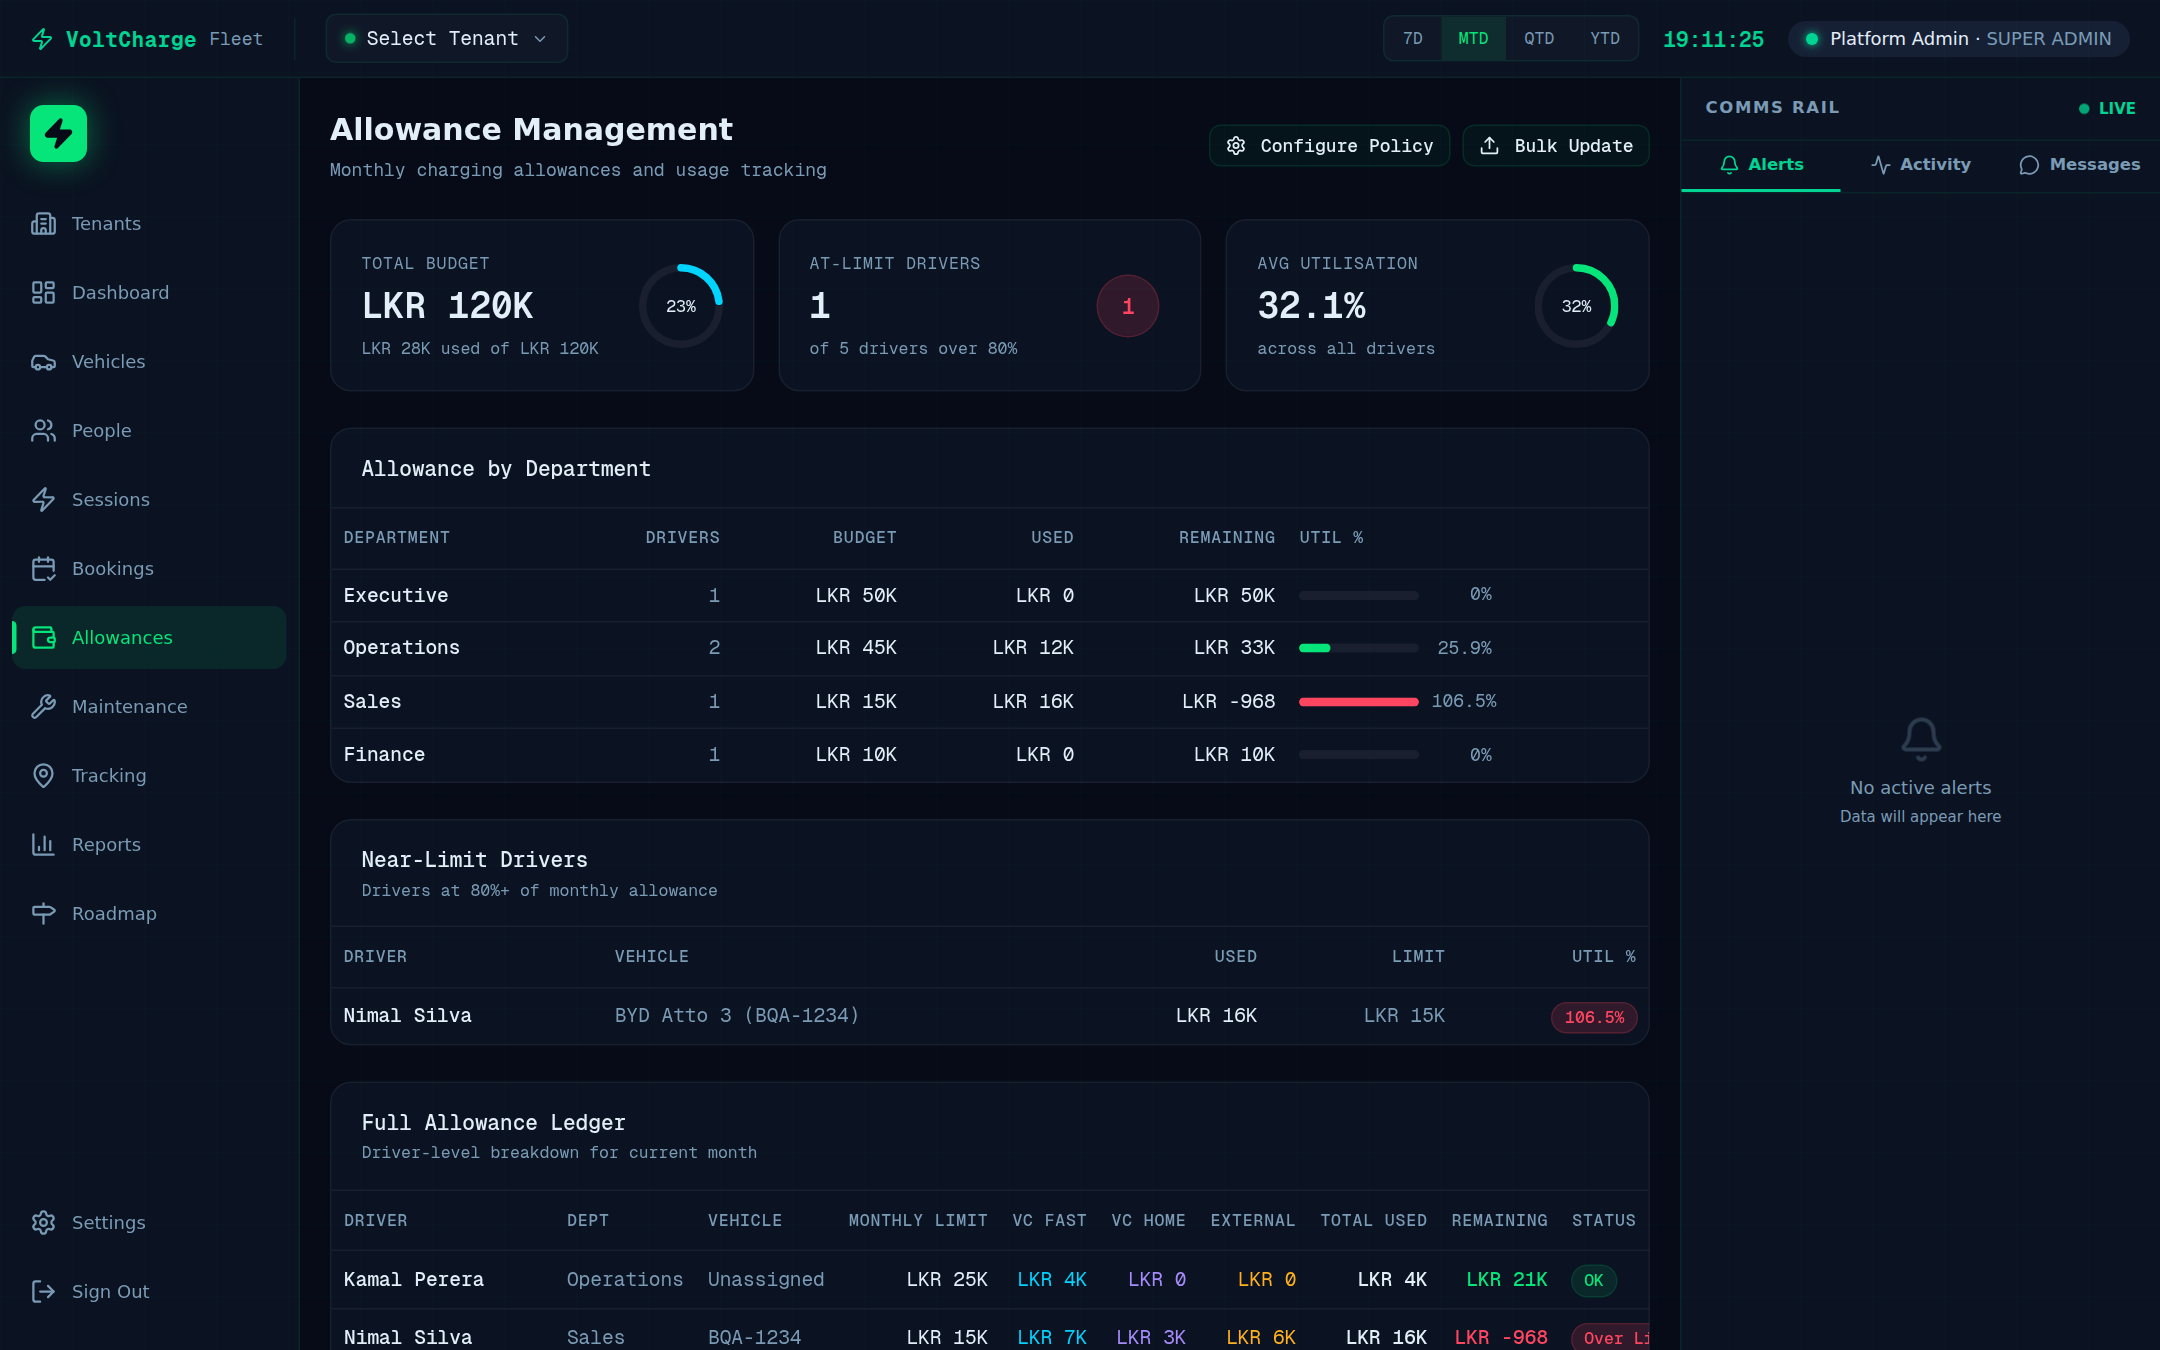
- View the fleet-wide overview — Navigate to the Allowances page from the sidebar to see a summary of all driver credit balances, total allocated credits, total consumed credits, and remaining balances across the fleet.
Creating a Geofence Zone
Draw virtual boundaries on the map to automatically monitor when vehicles enter or exit defined zones.
Drawing and Configuring a Geofence
- Navigate to Tracking — Open the Tracking page from the sidebar. The live map loads with all vehicle markers visible.
- Open the Geofences panel — Click the "Geofences" panel or toggle in the map toolbar. A panel opens listing all existing geofence zones with their names and alert statuses.
- Click "Create Geofence" — The map enters drawing mode. Your cursor changes to a crosshair, and a toolbar appears with drawing tools.
- Draw the zone boundary — Click on the map to place polygon vertices that define the zone boundary. Each click adds a new vertex. Alternatively, select the circle tool and click once to set the center, then drag to set the radius.
- Close the polygon shape — Double-click to close the polygon. The enclosed area is shaded to indicate the geofence boundary. You can drag vertices to adjust the shape after closing.
- Enter the zone name — Type a descriptive name for the zone (for example, "Main Depot", "Client Site A", or "Colombo Restricted Area"). This name appears on the map and in alert notifications.
- Choose a category — Select the zone category from the dropdown: Depot (home base), Service Area (client locations), Restricted (off-limits zones), or Custom (any other purpose).
- Set the zone color — Pick a display color for the zone overlay on the map. Using distinct colors for different categories makes the map easier to read at a glance.
- Configure alerts — Under the "Alerts" section, toggle entry alerts (triggered when a vehicle enters the zone), exit alerts (triggered when a vehicle leaves), or both. Each toggle can be enabled independently.
- Select vehicles or groups — Choose which vehicles or vehicle groups the geofence rule applies to. You can select "All Vehicles" or pick specific vehicles from the list.
- Click "Save Geofence" — The geofence zone is saved and immediately active on the map. It appears in the Geofences panel with its name, category, and alert status.
Viewing Zone Alerts
Monitor geofence entry and exit events and configure how you receive zone alert notifications.
Monitoring Geofence Alerts
- Check dashboard notifications — When a vehicle enters or exits a geofence zone, an alert notification appears in the notification bell in the top navigation bar. The bell displays a count badge for unread alerts.
- Review alert details — Click the notification to see the full details: vehicle name, zone name, event type (entry or exit), and the exact timestamp of the event.
- View alert history — Navigate to the Geofences panel on the Tracking page and click "Alert History". The log shows all zone events with columns for vehicle, zone, entry or exit, and timestamp.
- Run zone-based reports — Navigate to Reports and select "Zone Report" to see aggregated data: time spent inside each zone per vehicle, number of entries and exits, and zone compliance metrics.
- Configure alert delivery — In Settings, open the Notifications tab. Choose how you want to receive geofence alerts: in-app notifications, email notifications, or push notifications to your mobile device. Each channel can be toggled independently.
Logging a Charging Session
View automated charging records from VoltCharge stations and manually log external charging sessions for complete cost tracking.
Reviewing Charging Sessions
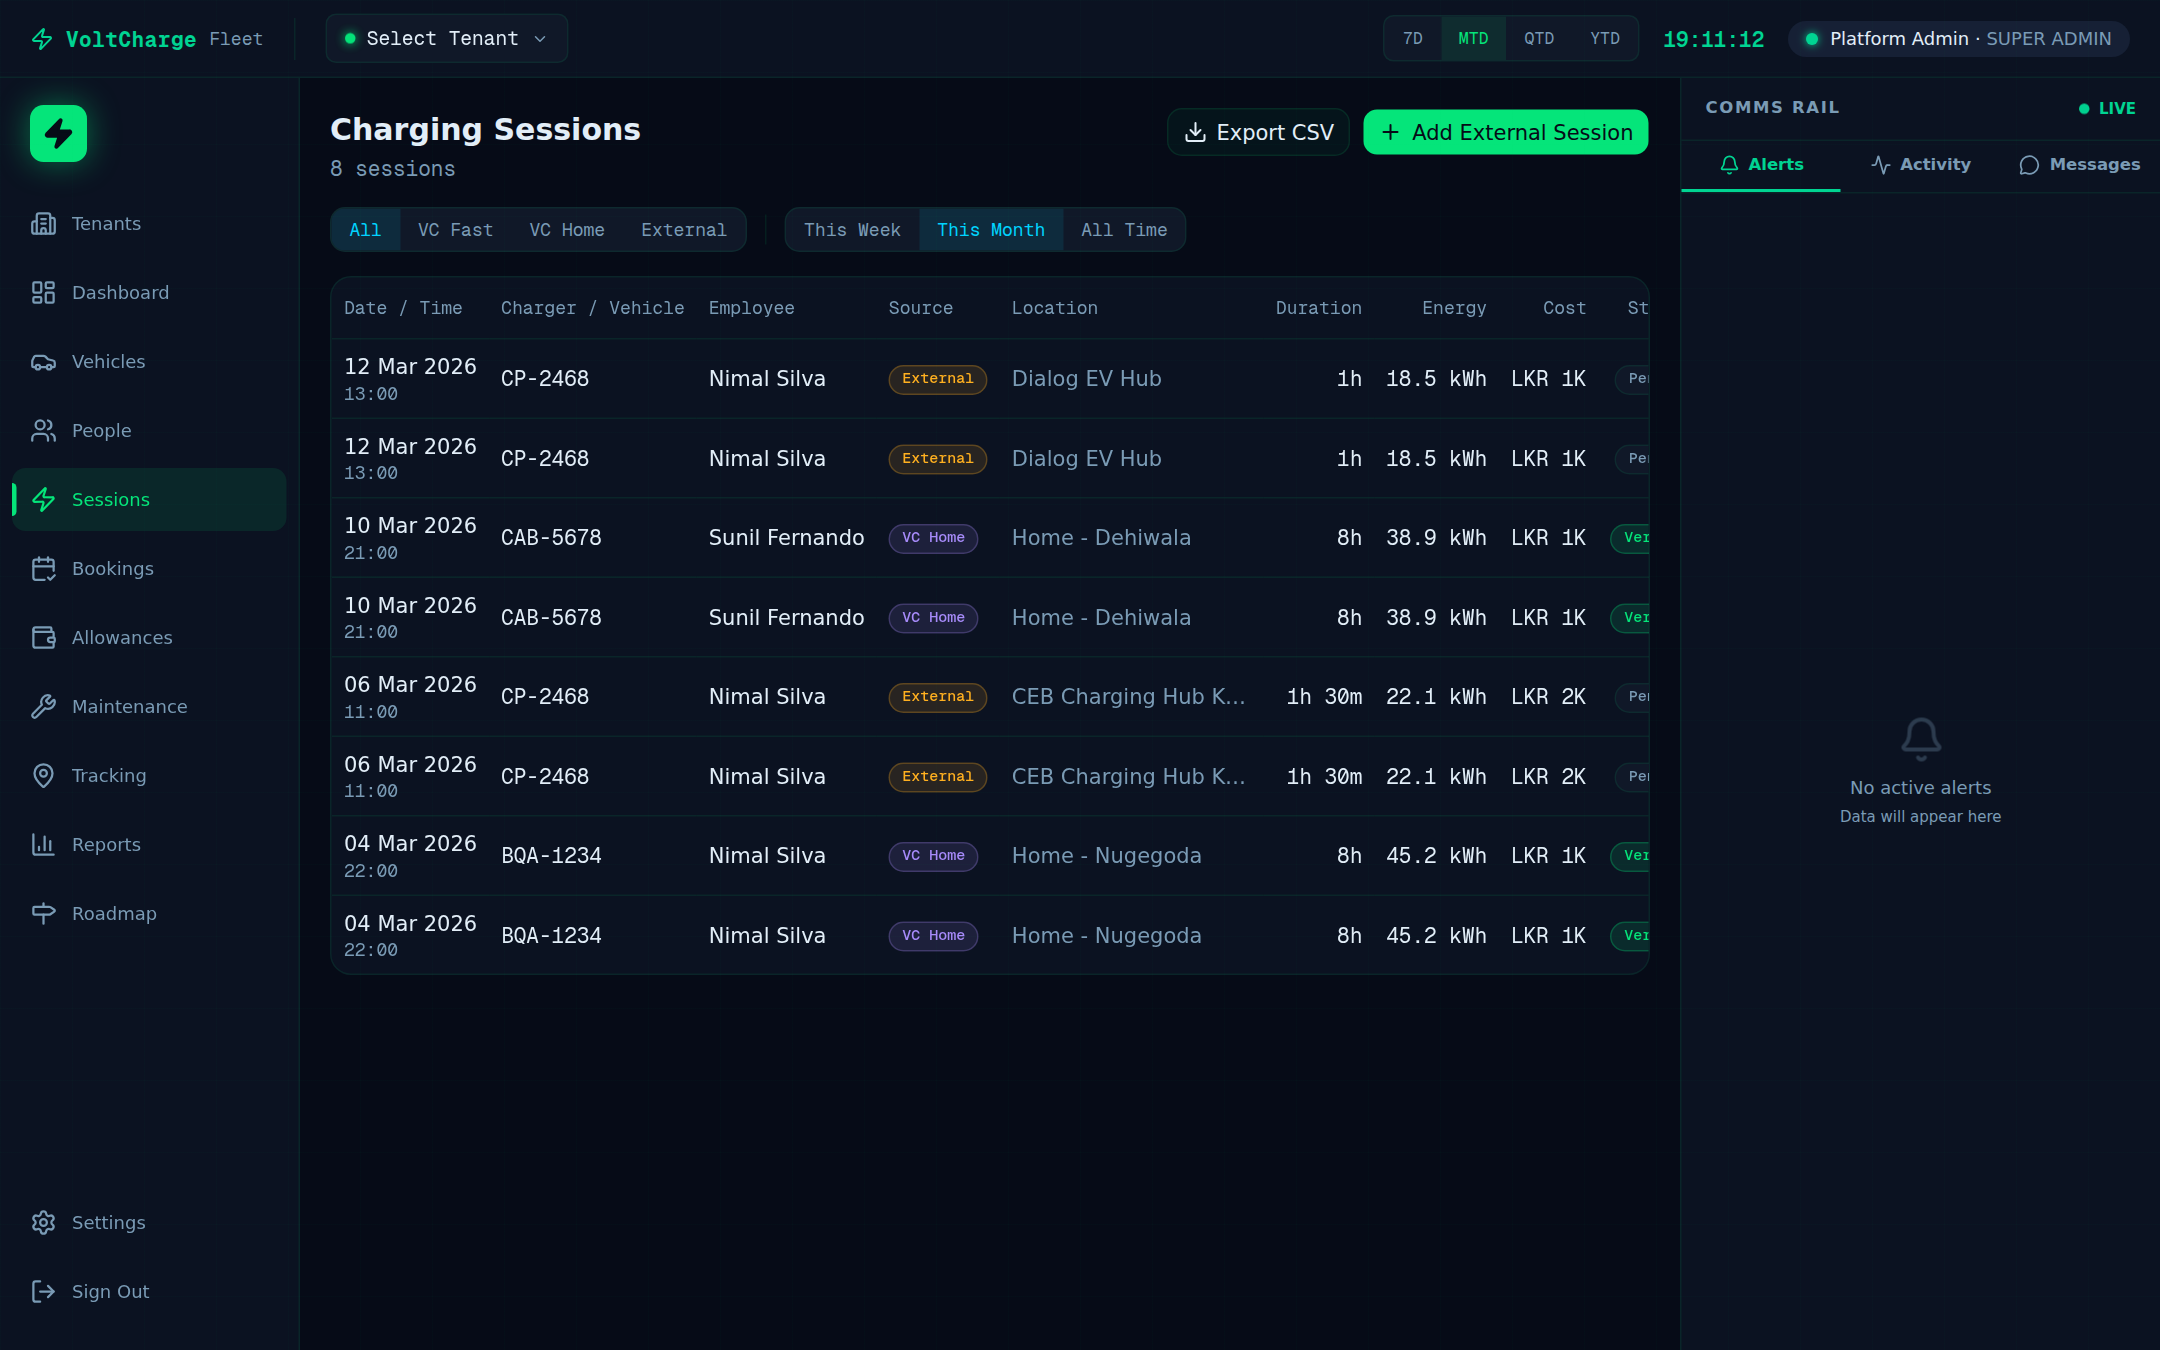
- Navigate to Sessions — Click "Sessions" in the sidebar. The page displays a table of all recorded charging sessions sorted by most recent first.
- Read session details — Each row shows the vehicle, driver, charger name or location, energy consumed (kWh), cost, session duration, and the charging source (VC Fast, VC Home, or External).
- Filter by source — Use the source filter tabs at the top to show only VC Fast, VC Home, or External sessions. This helps separate VoltCharge network usage from third-party charging.
- Filter by other criteria — Use the date range picker, vehicle dropdown, or driver dropdown to narrow the session list to a specific time period, vehicle, or driver.
Adding an External Charging Session
- Click "Add External" — This button is located in the top-right of the Sessions page. It opens a form for manually recording a charging session that occurred outside the VoltCharge network.
- Select the vehicle — Choose the vehicle that was charged from the dropdown list.
- Enter location details — Type the charging location name or address where the external session took place.
- Enter energy and cost — Fill in the energy delivered in kWh and the total cost of the session. These values are used in fleet cost reports.
- Set the date — Select the date when the external charging session occurred.
- Click "Save" — The external session appears in the Sessions table with an "External" source badge, and its cost is included in all fleet spending reports and dashboards.
Creating a Booking
Reserve a vehicle for a specific date and time using the booking calendar to manage shared fleet availability.
Reserving a Vehicle
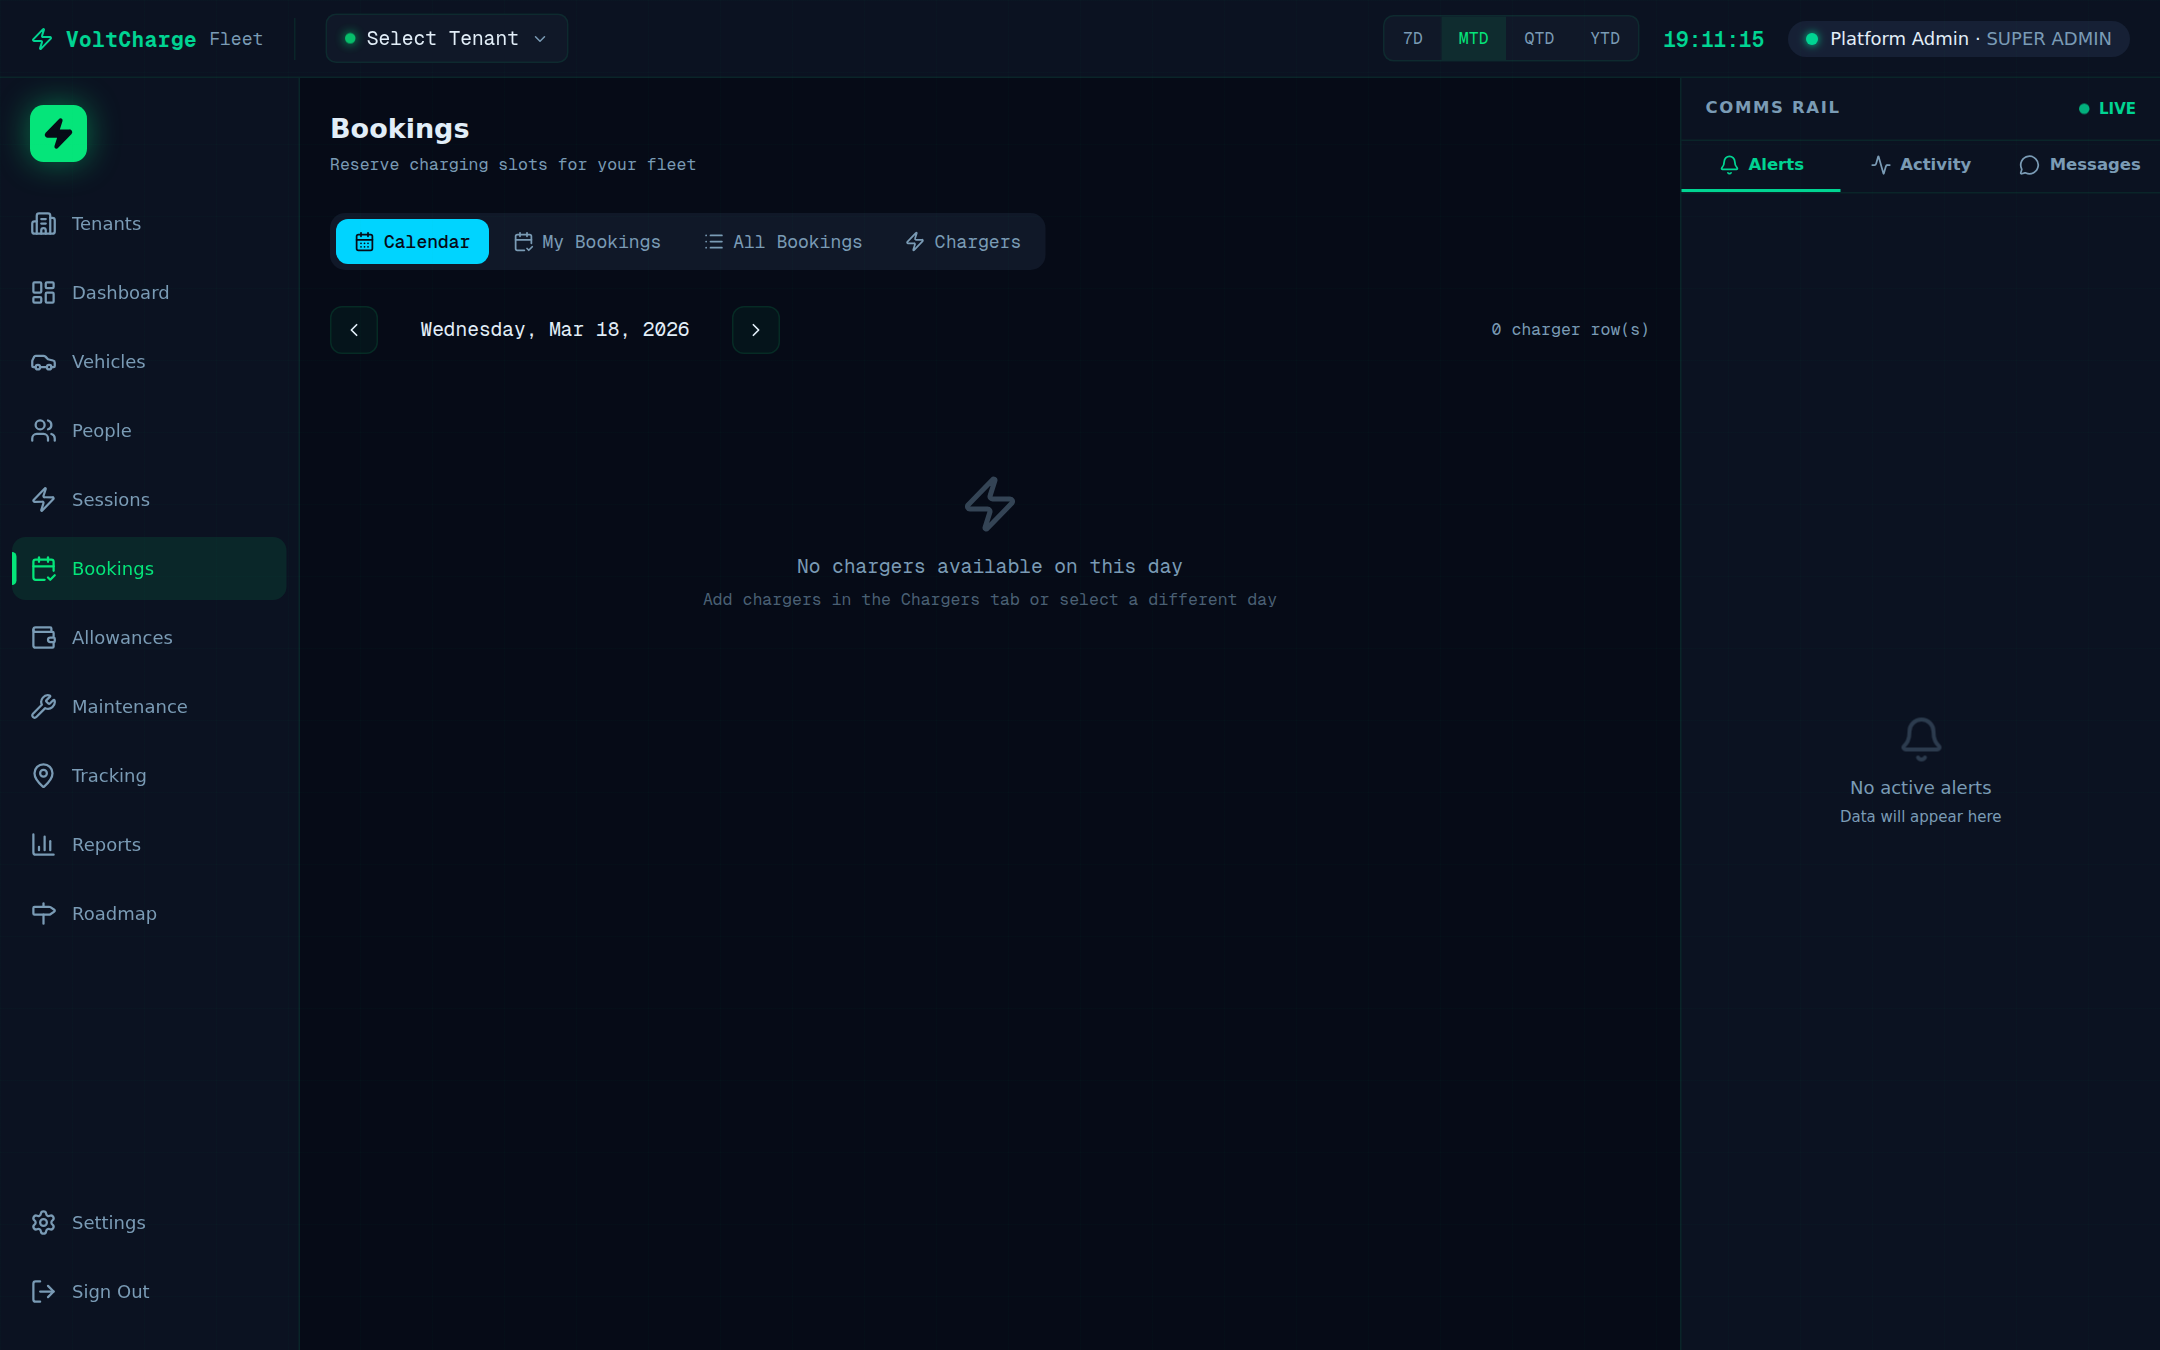
- Navigate to Bookings — Click "Bookings" in the sidebar. The page shows a list of all bookings with their statuses and associated vehicles.
- Switch to Calendar view — Click the "Calendar" tab at the top of the Bookings page. A weekly or monthly calendar view loads showing all bookings as color-coded blocks on a timeline.
- Find an available slot — Scroll through the calendar to find an open time slot for the vehicle you need. Available slots appear as empty space on the vehicle's row.
- Click on the available slot — Clicking an empty slot opens the booking creation form pre-populated with the selected date and time.
- Select the vehicle — Choose the vehicle you want to book from the dropdown. If you clicked an available slot on a specific vehicle's row, it is pre-selected.
- Confirm date and time — Verify or adjust the booking start time and end time. The calendar highlights any conflicting reservations for the same vehicle.
- Click "Create Booking" — The reservation is created with a "Pending" status. It appears as a block on the calendar and in the bookings list.
- Track booking lifecycle — Bookings follow a lifecycle: Pending (awaiting confirmation), Confirmed (approved by a manager), Active (vehicle currently in use), Completed (vehicle returned), Cancelled (booking withdrawn), or No Show (driver did not pick up).
- Cancel a booking — To cancel, click the booking block on the calendar or find it in the list view, then click "Cancel". Provide a cancellation reason when prompted. The vehicle becomes available again immediately.
Scheduling Maintenance
Plan routine vehicle servicing by setting up recurring maintenance schedules with reminders and provider assignments.
Creating a Maintenance Schedule
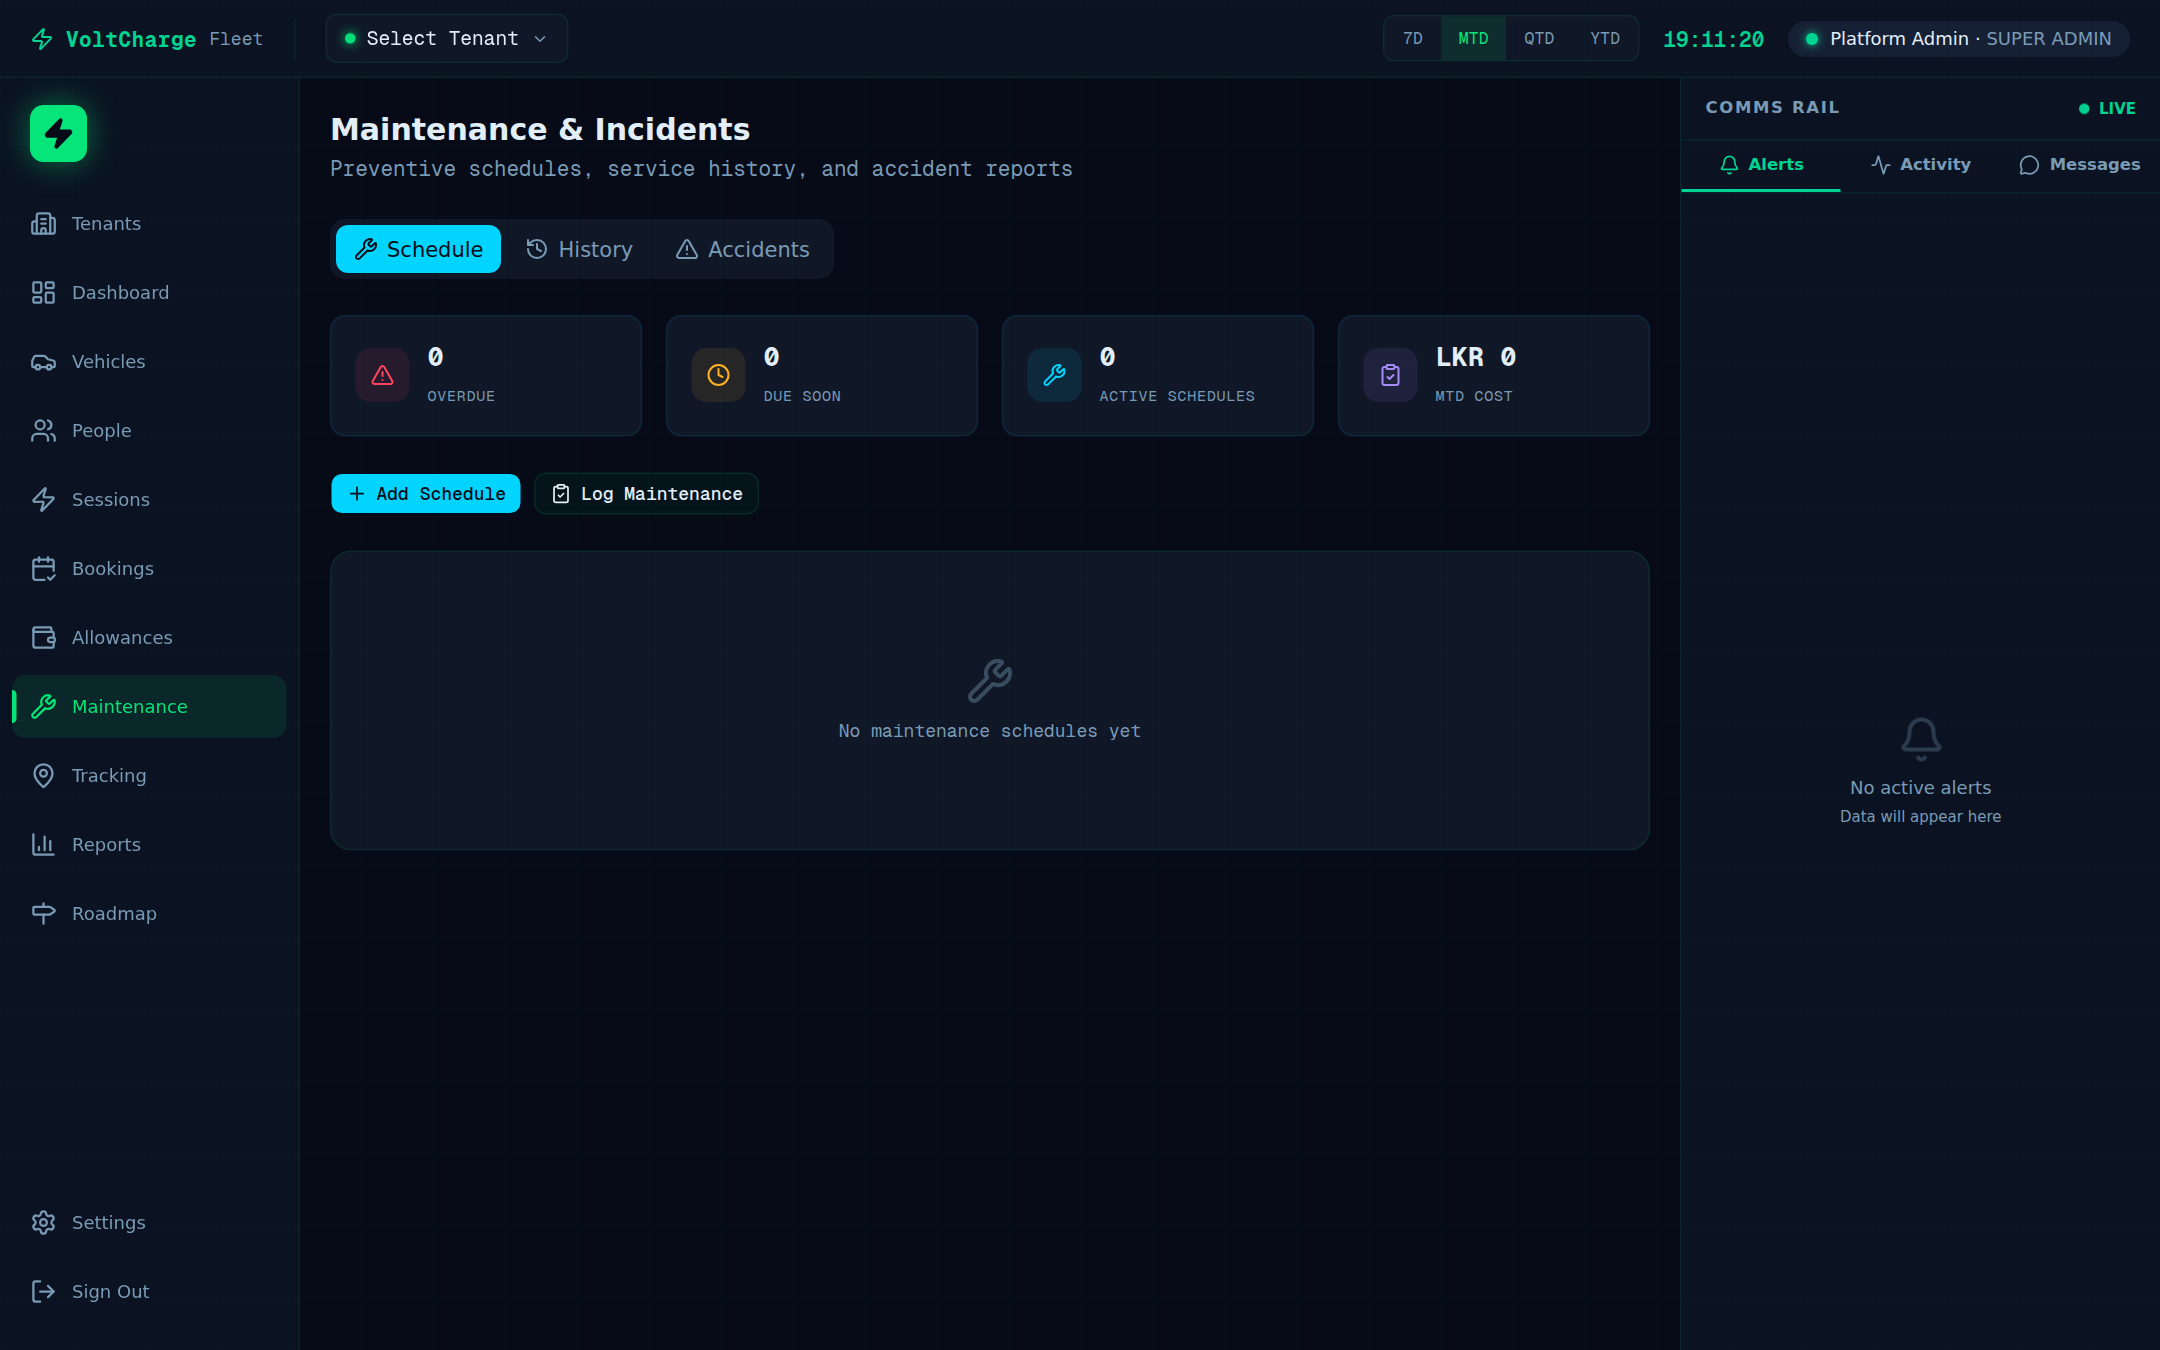
- Navigate to Maintenance — Click "Maintenance" in the sidebar. The page opens with the Schedule tab active, showing a calendar view of upcoming and overdue services.
- Click "Schedule Service" — A form opens where you can configure all details of the planned maintenance.
- Select the vehicle — Choose the vehicle from the dropdown. The form displays the vehicle's current mileage and the date of its last service for reference.
- Choose the service type — Select from the predefined types: Tire (rotation, replacement), Brake (pads, fluid), Battery (health check, conditioning), Motor (diagnostics), AC (refrigerant, filter), or General Inspection (multi-point check).
- Set the recurrence interval — Choose how often this maintenance should repeat: Monthly, Quarterly, Biannual (every 6 months), Annual, or Custom (specify a number of days or kilometers).
- Set the next scheduled date — Pick the date for the next service appointment. Future occurrences will be automatically calculated based on the recurrence interval.
- Assign a service provider — Select or type the name of the workshop, service center, or technician who will perform the maintenance.
- Add notes — Enter any relevant notes, such as specific parts to inspect, warranty information, or special instructions for the technician.
- Click "Save" — The scheduled maintenance appears on the maintenance calendar. Reminder notifications are sent before the service date according to your notification settings.
Logging Completed Service
Record maintenance work after it is completed, including costs, vendor details, and any accident reports.
Recording a Maintenance Entry
- Navigate to Maintenance — Click "Maintenance" in the sidebar and switch to the "History" tab to see all previously completed maintenance records.
- Click "Log Maintenance" — A form opens for recording a completed service event.
- Select the vehicle — Choose the vehicle that was serviced from the dropdown list.
- Choose the category — Select the maintenance category: Tire, Brake, Battery, Motor, AC, General, or Inspection. This categorization drives maintenance cost reports.
- Enter completion details — Fill in the date the work was completed, the total cost of the service, and the vendor or service provider name.
- Add technician notes — Record what work was performed, parts replaced, any issues found, and recommendations for follow-up. These notes become part of the vehicle's permanent service history.
- Click "Save" — The maintenance record is saved to the vehicle's history. The vehicle's "last serviced" date is updated, and the next scheduled maintenance is recalculated if a recurring schedule is set.
Reporting an Accident
- Switch to the Accidents tab — Within the Maintenance page, click the "Accidents" tab to view and report vehicle incidents.
- Click "Report Accident" — A form opens for recording the incident details.
- Select the vehicle and date — Choose the vehicle involved and the date the accident occurred.
- Set severity level — Select the severity: Minor (cosmetic damage, vehicle still operable), Moderate (functional damage, requires repair), or Major (vehicle not drivable, significant repair needed).
- Enter incident details — Describe what happened, the location, any third parties involved, and estimated repair costs.
- Click "Save" — The accident is recorded in the vehicle's maintenance history and flagged in the fleet reports for insurance and compliance tracking.
Generating a Report
Create, preview, download, and schedule fleet reports covering utilization, energy consumption, costs, and driver activity.
Creating a One-Time Report
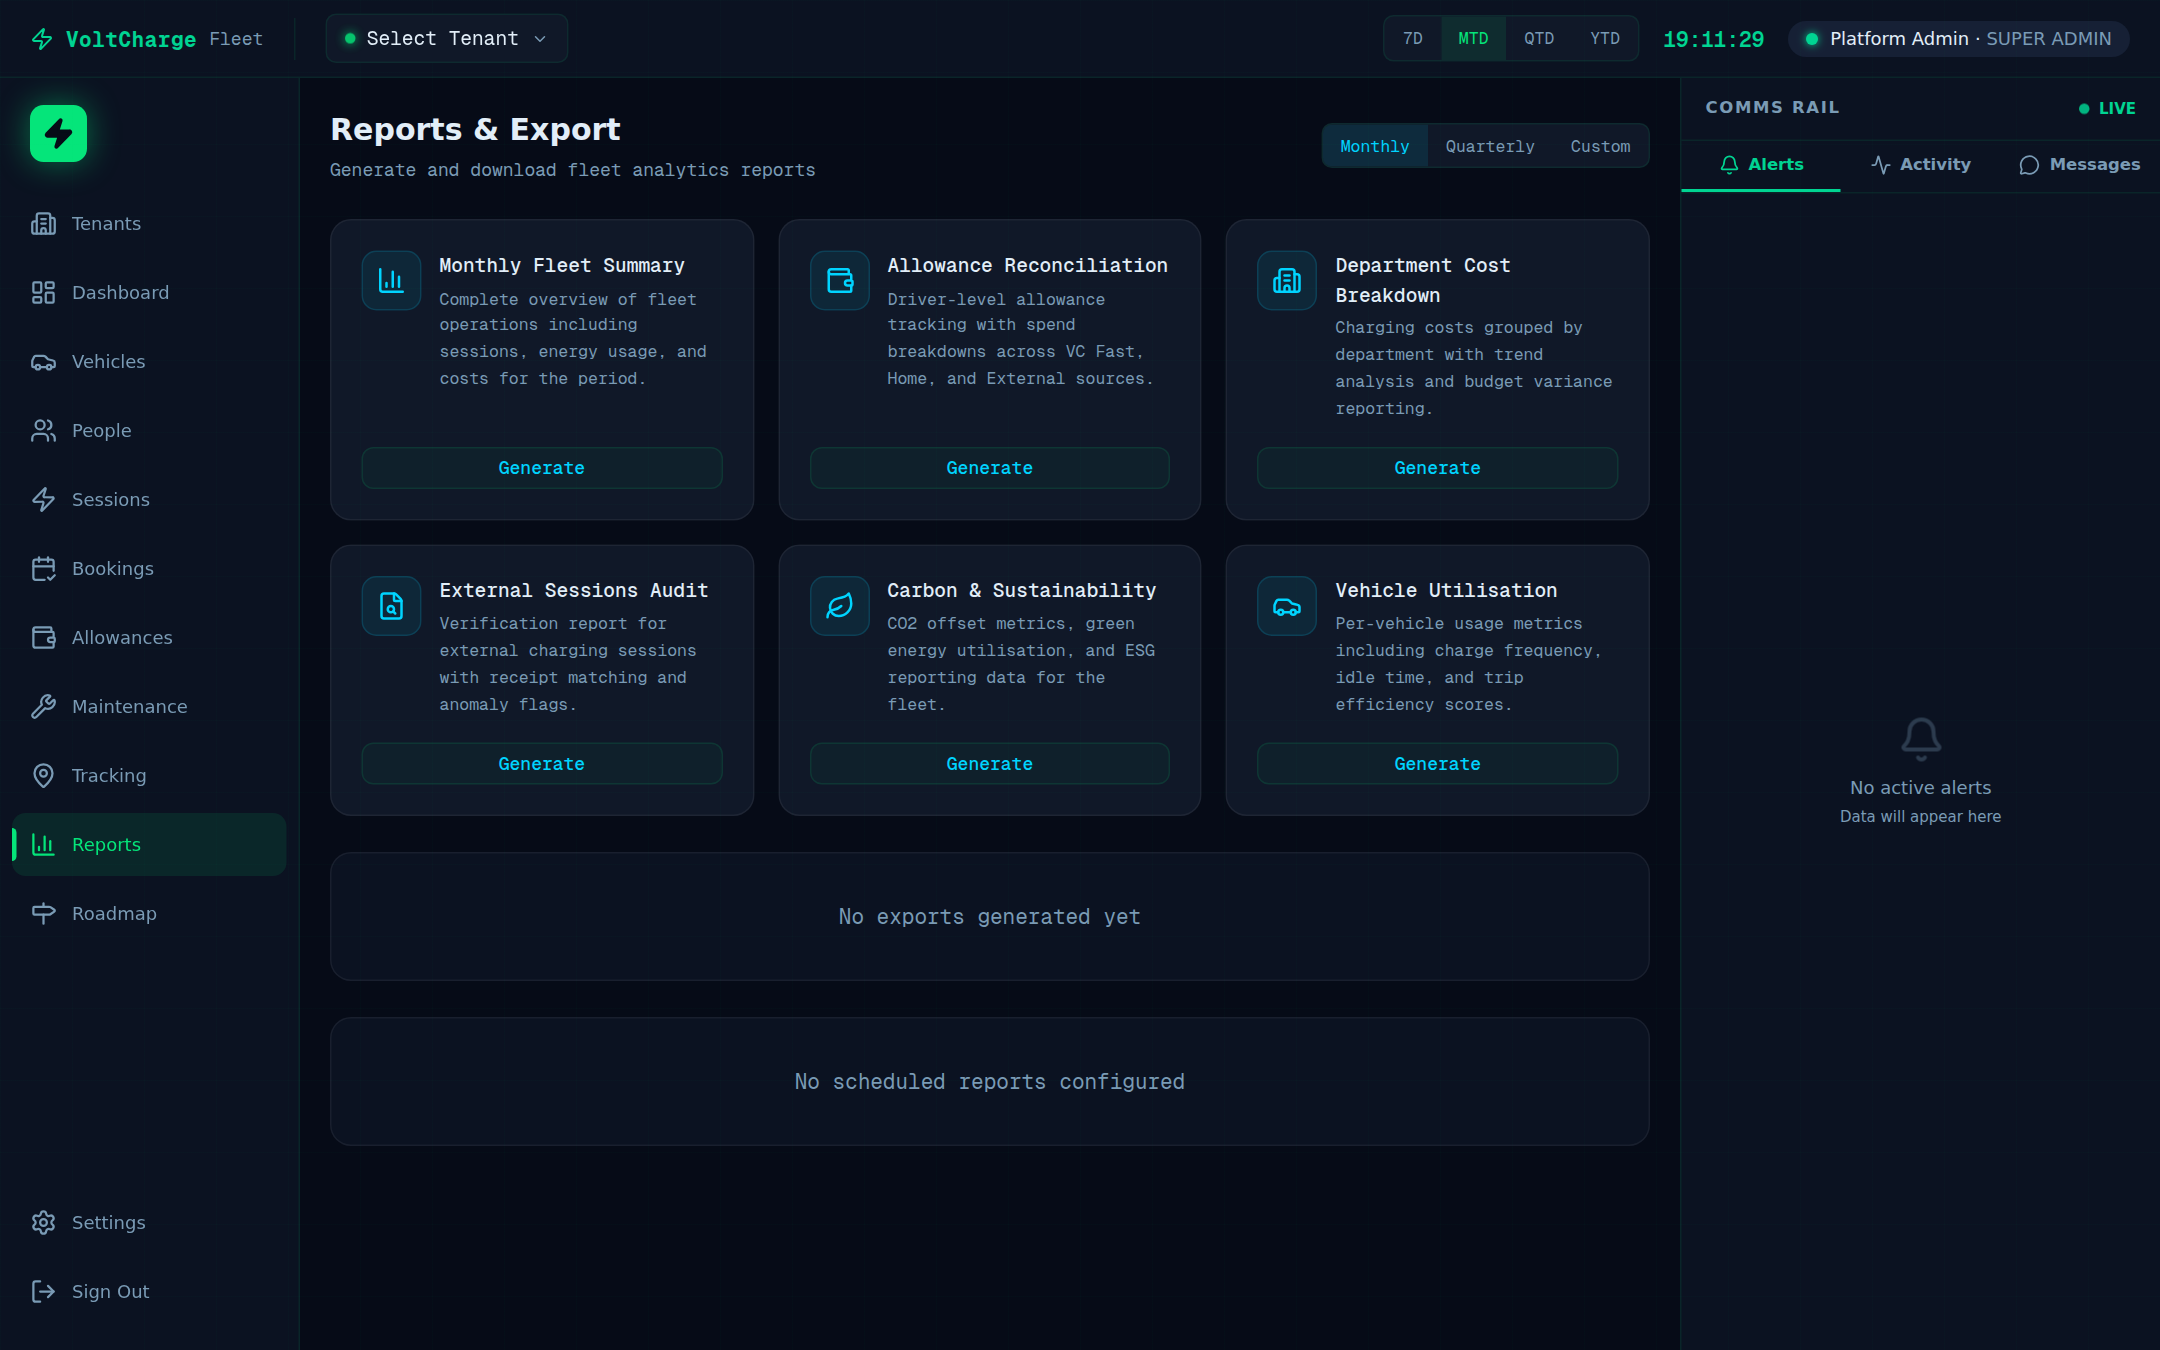
- Navigate to Reports — Click "Reports" in the sidebar. The reports page shows available report types and a history of previously generated reports.
- Select the report type — Choose from: Fleet Utilization (vehicle usage rates and idle time), Energy Consumption (kWh by vehicle, source, and period), Cost Analysis (spending breakdown by vehicle, department, and source), Zone Report (geofence time and compliance), Driver Activity (individual driver usage and behavior), or Department Comparison (side-by-side departmental metrics).
- Set the date range — Choose a preset period (Monthly, Quarterly) or select a custom start and end date using the date pickers.
- Choose the scope — Select "All Vehicles" to include the entire fleet, or pick a specific department or vehicle group to narrow the report.
- Click "Generate Report" — The report is generated and a preview renders directly in the browser. Charts, tables, and summary statistics are displayed on screen.
- Download the report — Click "Download PDF" for a formatted printable report, or "Export CSV" for raw data that you can open in a spreadsheet application.
Scheduling Recurring Reports
- Toggle "Schedule" — On the report configuration page, enable the "Schedule" toggle to set up automatic recurring generation.
- Set the frequency — Choose how often the report should be generated: Daily, Weekly (select day of week), or Monthly (select day of month).
- Enter delivery email — Type the email address where the completed report should be sent. You can enter multiple addresses separated by commas.
- Click "Save Schedule" — The recurring report is activated. Reports are generated automatically at the specified frequency and delivered to the email addresses provided.
Role Permissions Reference
A complete reference of what each role can access across all Fleet Management modules.
Role Definitions
- Super Admin — Full access to every module and feature, including tenant management, user provisioning, billing, and system settings. Can create and delete other users of any role.
- Fleet Manager — Full access to all operational modules (Dashboard, Vehicles, Tracking, People, Sessions, Bookings, Maintenance, Allowances, Reports, Settings) except tenant management. Can add vehicles, drivers, and manage all fleet operations.
- Dispatcher — Operational access to Dashboard, Vehicles, Tracking, and Bookings. Read-only access to Maintenance. Can view vehicle locations, create and manage bookings, and monitor the fleet but cannot add vehicles or manage personnel.
- Driver — Limited access to Dashboard (own data only), own Sessions, own Bookings, and own Allowance balance. Drivers can view their assigned vehicle, see their charging history, create bookings for themselves, and check their credit balance.
- Accountant — Financial access to Dashboard, Vehicles, Sessions, Bookings, Allowances, Maintenance, and Reports. Can view all cost data, generate financial reports, manage fleet credits, and review spending. Cannot modify vehicle assignments or tracking settings.
- Viewer — Read-only access to Dashboard, Vehicles, Tracking, Maintenance, and Reports. Can observe fleet operations and generate reports but cannot create, modify, or delete any records.
Permissions Matrix
| Module | Super Admin | Fleet Manager | Dispatcher | Driver | Accountant | Viewer |
|---|---|---|---|---|---|---|
| Dashboard | Full | Full | Full | Own data | Full | Read |
| Vehicles | Full | Full | Read | Own vehicle | Read | Read |
| Tracking | Full | Full | Full | — | — | Read |
| People | Full | Full | — | — | — | — |
| Sessions | Full | Full | — | Own sessions | Read | — |
| Bookings | Full | Full | Full | Own bookings | Read | — |
| Maintenance | Full | Full | Read | — | Read | Read |
| Allowances | Full | Full | — | Own balance | Full | — |
| Reports | Full | Full | — | — | Full | Read |
| Settings | Full | Full | — | — | — | — |