CMS Dashboard User Guide
Step-by-step instructions for finance teams, CPOs, and network managers.
User GuideGetting Started
Learn how to log in to the CMS Dashboard, navigate the interface, and find your way around the key areas of the platform.
Logging In
- Open the CMS Dashboard — Navigate to your organization's CMS URL in a modern web browser (Chrome, Firefox, Safari, or Edge). You will see the VoltCharge login screen.
- Enter your credentials — Type your registered email address in the Email field and your password in the Password field. Both fields are required.
- Click "Sign In" — Press the Sign In button to authenticate. If your credentials are correct, you will be redirected to the main dashboard. If not, an error message will appear below the form.
- Two-factor authentication (if enabled) — If your administrator has enabled two-factor authentication for your account, enter the verification code sent to your registered email or authenticator app.
- Session duration — Your session lasts for one hour. After that, you will be automatically signed out and need to log in again. Save any in-progress work before your session expires.
Navigating the Interface
- Left sidebar — The sidebar is your primary navigation. It contains links to all available modules: Dashboard, Chargers, Organizations, Transactions, Finances, Payment Gateway, Users, Push Notifications, and Grid Monitor. Modules visible to you depend on your role.
- Top navigation bar — The top bar displays the VoltCharge logo (click to return to the dashboard), the organization selector dropdown, and your user profile area on the right.
- Role badge — Your role is displayed as a colored badge next to your name in the top-right corner. This helps you confirm which permissions level you are operating under.
- Organization selector — If you have access to multiple organizations, use the dropdown at the top to switch between them. Data on all pages will update to reflect the selected organization.
Signing Out
- Click your profile — Click on your name or avatar in the top-right corner of the navigation bar to open the profile menu.
- Select "Sign Out" — Click the Sign Out option from the dropdown menu. You will be returned to the login screen and your session will be terminated.
- Confirm sign-out — For security, always sign out when you are finished working, especially on shared computers. Closing the browser tab does not immediately end your session.
Quick-Start Checklist
Complete these five steps after your first login to familiarize yourself with the platform and confirm your account is set up correctly.
Your First Five Minutes
- Check the Dashboard — After logging in, review the main dashboard. Verify that you can see charger status tiles and revenue summary cards. If the dashboard appears empty, confirm you have the correct organization selected in the top-right dropdown.
- Review your organization — Navigate to Organizations in the sidebar. Confirm that your organization name, currency, timezone, and billing configuration are correct. If anything looks wrong, contact your administrator.
- Browse your chargers — Go to the Chargers page and confirm that all chargers assigned to your organization are listed. Check that each charger shows the correct location name, type (AC or DC), and current status. Note any chargers showing as Offline or Faulted.
- Check recent transactions — Navigate to Transactions and set the date range to the last 7 days. Verify that charging sessions are being recorded. Review a few transaction rows to understand the data columns: charger name, user, energy delivered, duration, cost, and status.
- Explore the Finances section — Open Finances from the sidebar and review the revenue summary cards. Compare the daily, weekly, and monthly totals to ensure they match your expectations. If you have Accounts or Admin access, explore the invoice generation and payment gateway pages.
Monitoring the Dashboard
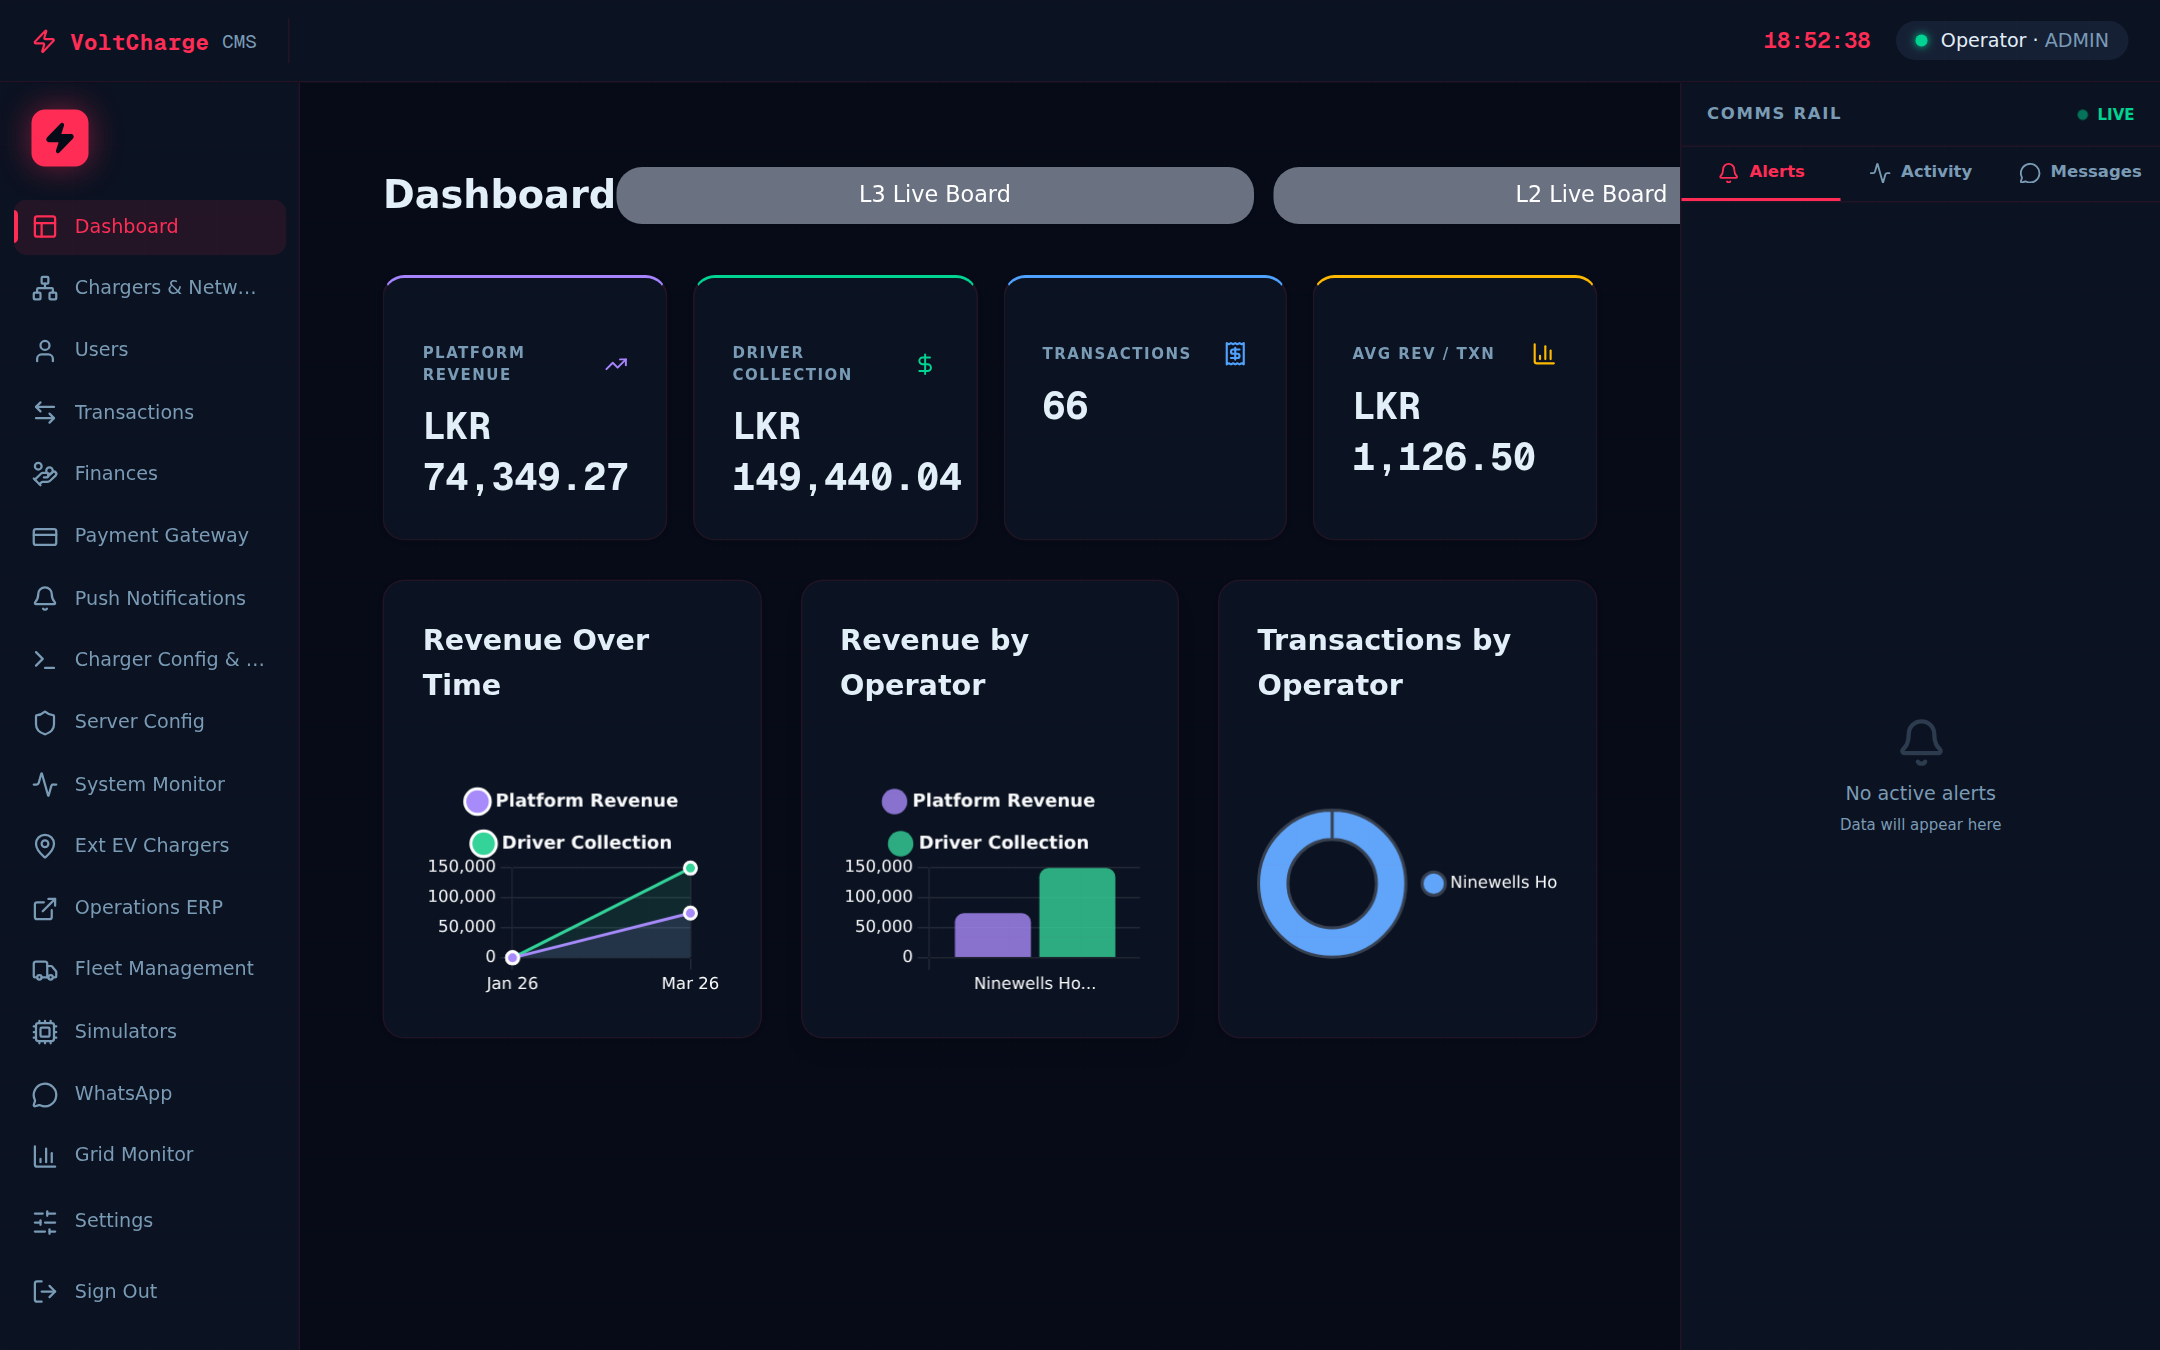
The live dashboard provides a real-time overview of your charging network's health, revenue performance, and charger availability.
Reading Revenue Summary Cards
- Locate the revenue cards — At the top of the dashboard, you will see four summary cards: Daily Revenue, Weekly Revenue, Monthly Revenue, and Yearly Revenue. Each card displays the total revenue collected for that time period.
- Understand the time periods — Daily covers the last 24 hours, Weekly covers the last 7 days, Monthly covers the last 30 days, and Yearly covers the last 365 days. All values are shown in your organization's configured currency.
- Check energy metrics — Below the revenue figures, each card may also display the total kWh delivered and the number of charging sessions completed during that period.
- Compare trends — Use the revenue cards to quickly spot trends. If daily revenue is unusually low, it may indicate chargers are offline or experiencing faults. Investigate further on the Chargers page.
Interpreting Charger Status Tiles
- Find the charger grid — Below the revenue cards, the dashboard displays a grid of charger tiles. Each tile represents one charger in your network and shows its current real-time status.
- Green = Available — The charger is online, connected, and ready to accept a new charging session. All connectors are free.
- Blue = Charging — The charger is currently in an active charging session. The tile may show the current power draw or session duration.
- Red = Faulted — The charger has reported an error condition. This requires attention from your operations or technical team. Click the tile for more details about the fault.
- Grey = Offline — The charger is not communicating with the platform. This could indicate a network issue, power outage, or the charger has been intentionally taken offline for maintenance.
- Click for details — Click any charger tile to drill into that charger's individual performance view, showing its revenue breakdown, recent transactions, and connector-level status.
Using the Organization Selector
- Multi-organization access — If your account has access to multiple organizations, the organization selector dropdown appears in the top-right area of the dashboard.
- Switch organizations — Click the dropdown and select a different organization. All dashboard data, including revenue cards and charger tiles, will refresh to show data for the selected organization.
- View all organizations — Admin and Technical users may see an "All Organizations" option that aggregates data across every organization in the network.
- CPO and Location Owner view — If you are a CPO or Location Owner, the dashboard is automatically filtered to show only your assigned organization or chargers. The organization selector may not be available to you.
Viewing Transactions
Browse, filter, and export your charging session transaction history with detailed per-session breakdowns including energy, duration, and cost data.
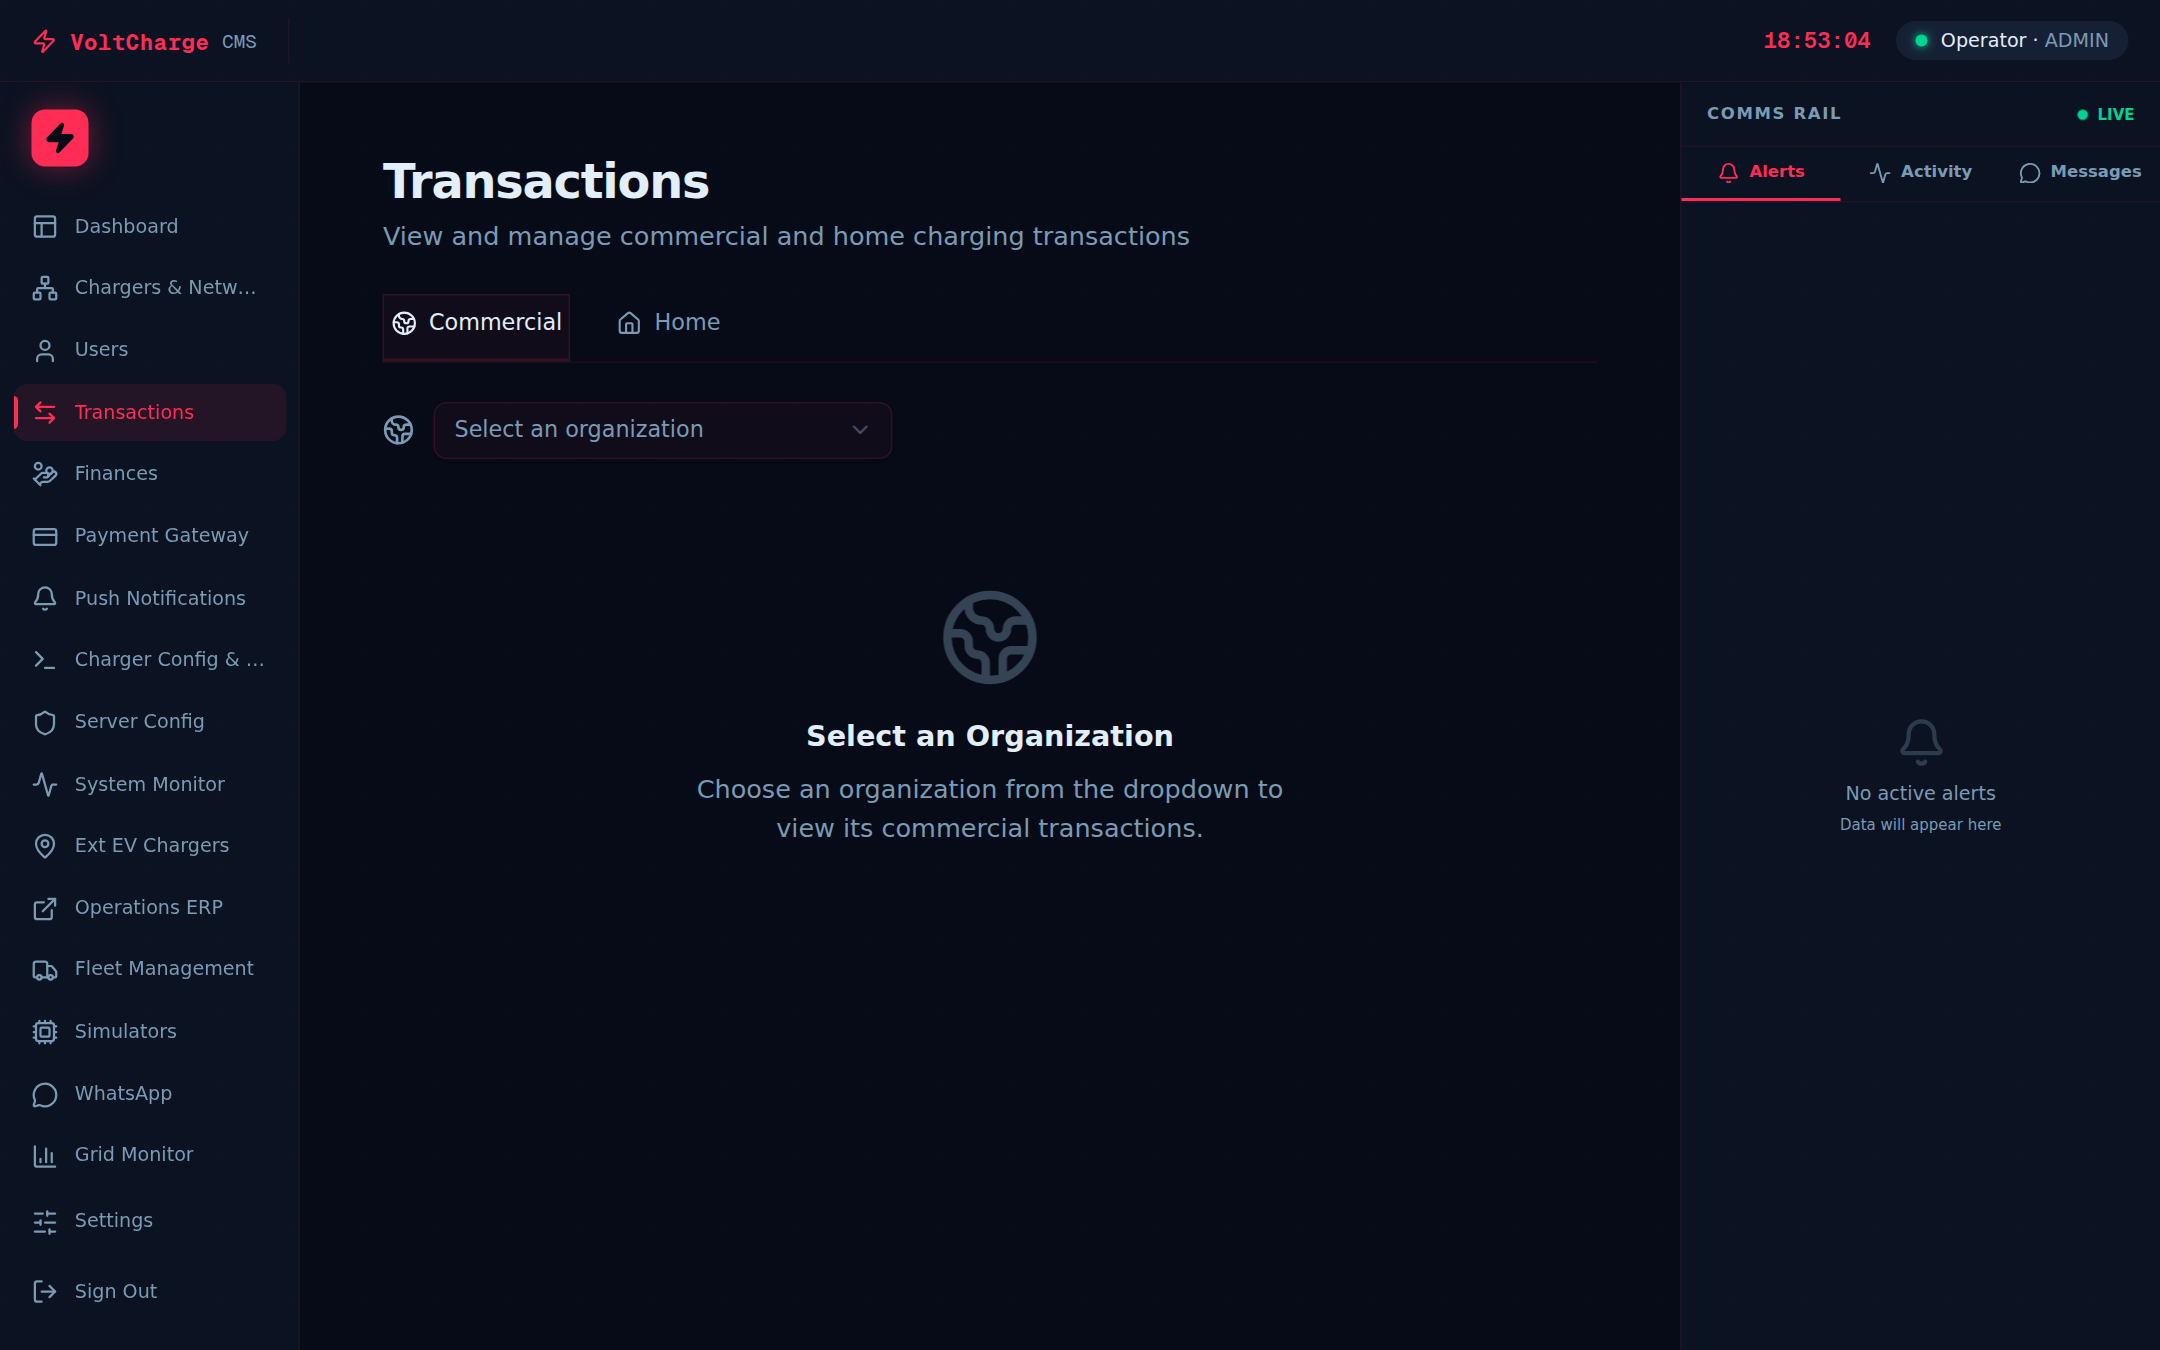
Browsing Transaction History
- Navigate to Transactions — Click "Transactions" in the left sidebar. The transactions page loads with a table showing the most recent charging sessions.
- Select your organization — If you have access to multiple organizations, use the organization dropdown at the top of the page to filter transactions to a specific organization. CPO and Location Owner accounts are automatically filtered.
- Set the date range — Click the date picker controls to set a start date and end date. Only transactions within this window will be displayed. The default range is typically the last 30 days.
- Filter by charger — Use the charger dropdown to narrow results to a specific charger. This is useful when investigating issues with a particular station or when preparing charger-specific reports.
- Read the transaction columns — Each row displays: Charger (the station name and ID), User (the customer who initiated the session), Energy (kWh delivered during the session), Duration (how long the session lasted), Cost (the amount charged to the customer), and Status (Completed, In Progress, or Failed).
- Sort the table — Click any column header to sort transactions by that field. Click again to reverse the sort order. Sorting by Cost or Energy helps identify your highest-value sessions.
Exporting Transaction Data
- Apply your filters first — Before exporting, make sure your date range, organization, and charger filters are set correctly. The export will include only the filtered data currently displayed.
- Click the Export button — Look for the "Export CSV" button above or below the transactions table. Click it to generate a downloadable CSV file.
- Open in a spreadsheet — The downloaded CSV file can be opened in Microsoft Excel, Google Sheets, or any other spreadsheet application for further analysis, pivot tables, or custom reporting.
- Verify the data — After opening the export, confirm that the row count and date range match what you see in the CMS table. The CSV includes all columns visible in the web interface.
Checking Charger Status
Monitor the real-time status of every charger in your network, filter by type or status, and drill into individual charger details.
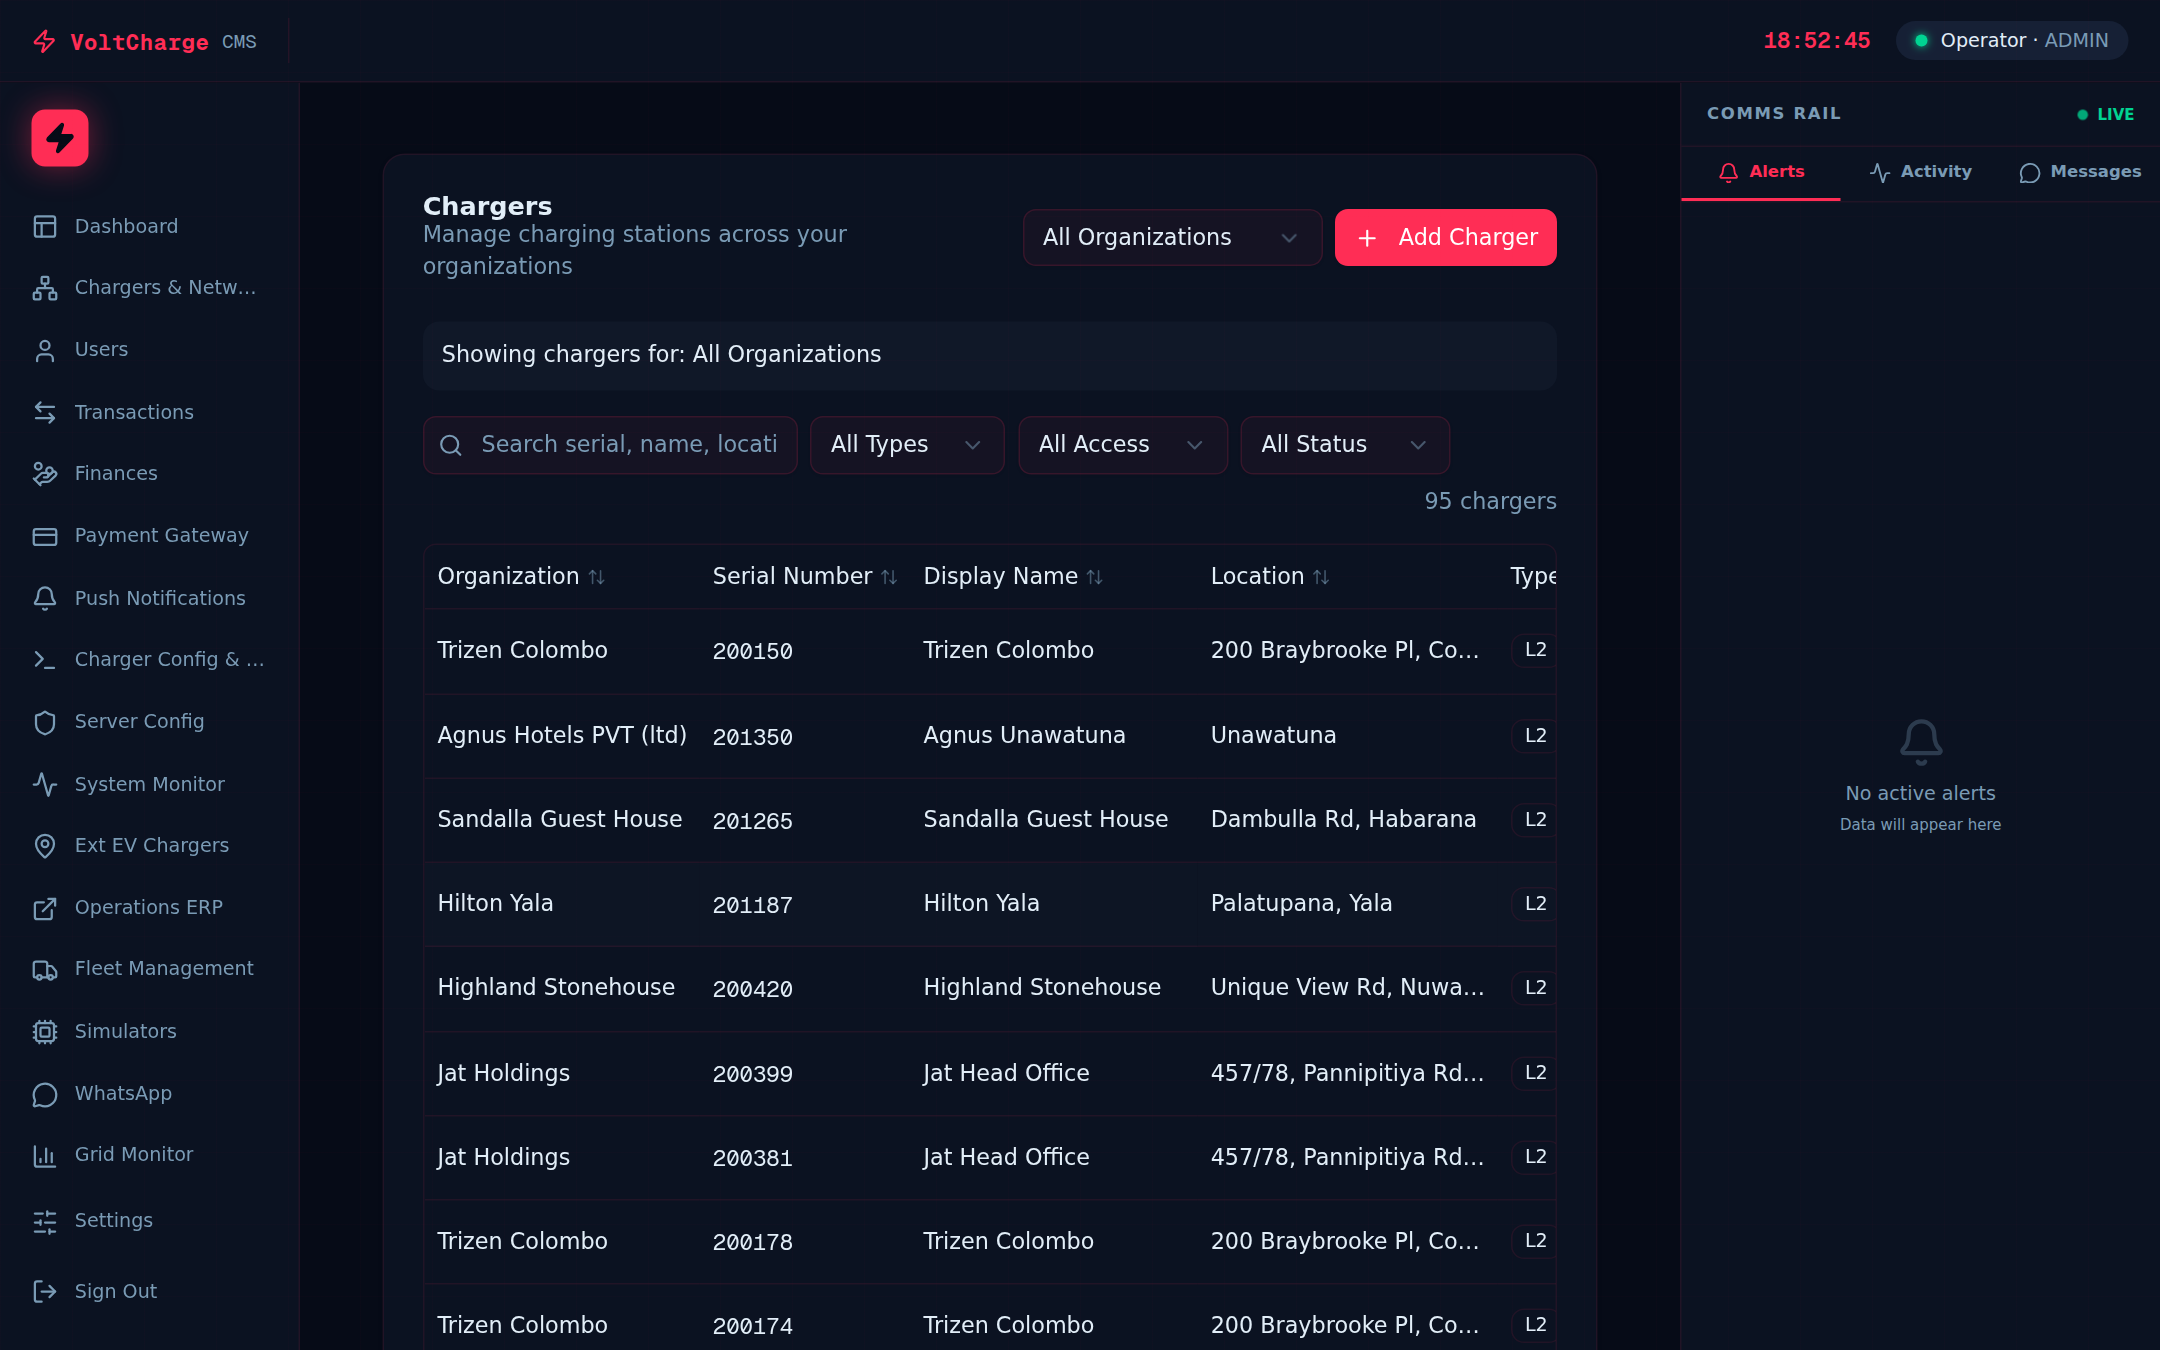
Viewing the Charger List
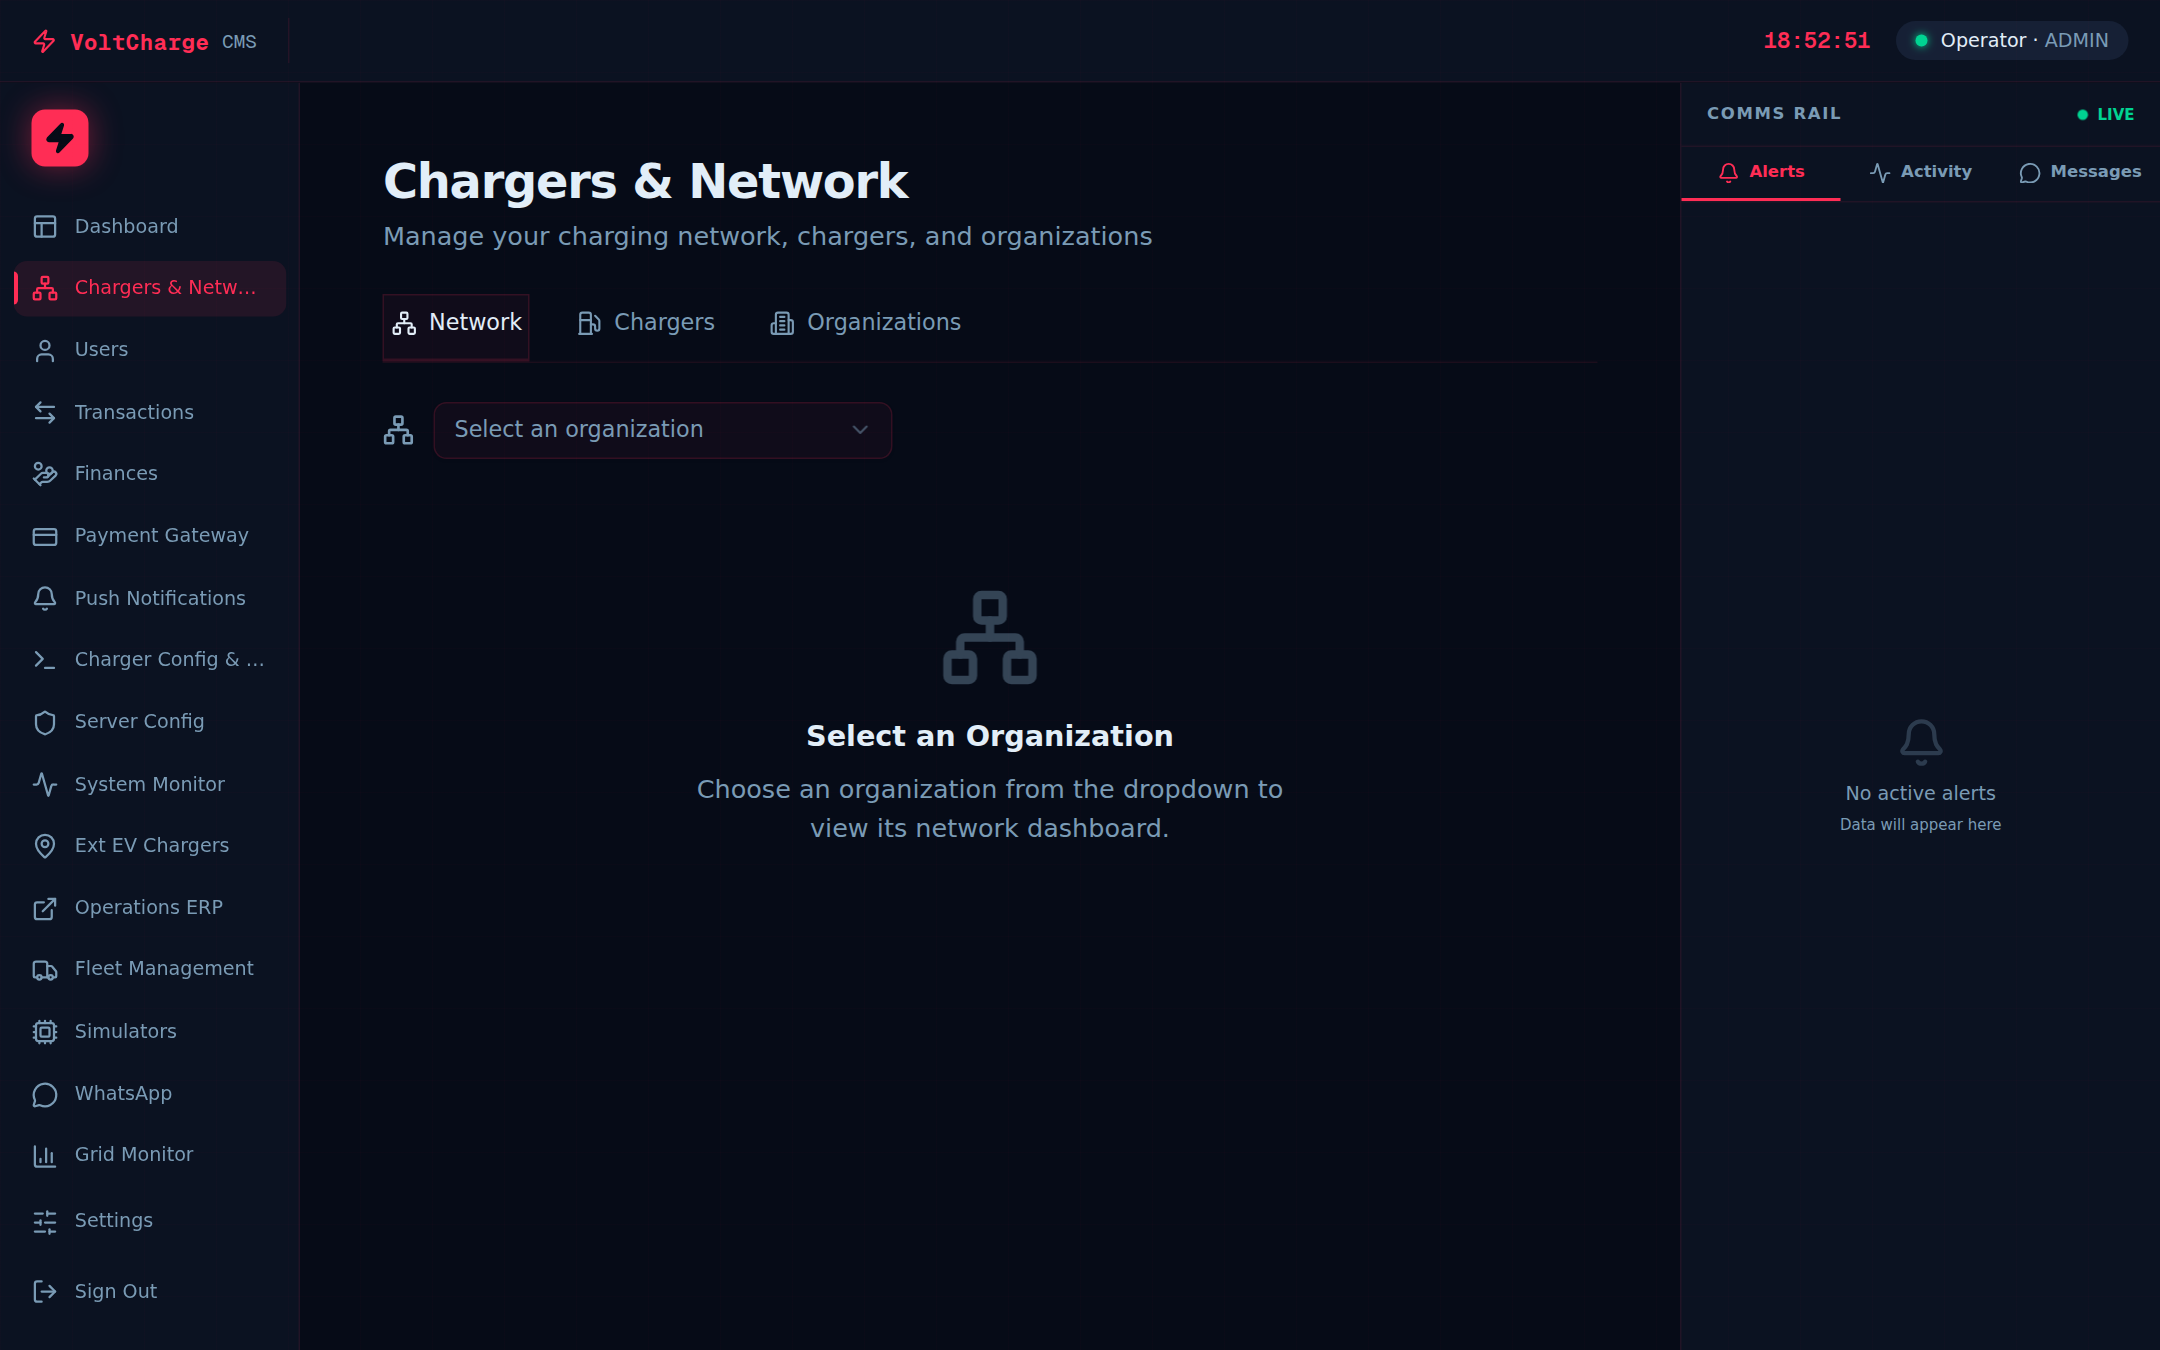
- Navigate to Chargers — Click "Chargers" in the left sidebar. The chargers page displays a table listing every charger in your network with its current status, location, type, and access level.
- Understand status colors — Each charger row includes a status indicator: green for Available (online and ready), blue for Charging (active session in progress), red for Faulted (error state requiring attention), and grey for Offline (not communicating with the platform).
- Use the search bar — Type a charger name, ID, or location into the search bar at the top of the table to quickly find a specific charger. The table filters in real time as you type.
- Filter by type — Use the Type filter dropdown to show only AC chargers, only DC chargers, or all types. This is helpful when reviewing your fast-charging (DC) network separately from your destination (AC) chargers.
- Filter by access level — Use the Access filter to show chargers by their access classification, such as Public, Private, or Restricted. This helps when managing chargers with different availability policies.
- Filter by status — Use the Status filter dropdown to isolate chargers in a specific state. For example, filter to "Faulted" to see all chargers that need immediate attention, or "Offline" to review connectivity issues.
Viewing Charger Details
- Click a charger row — Click on any charger row in the table to open its detailed view. This page shows comprehensive information about the selected charger.
- Review live connector status — The detail view shows a live data board for each connector on the charger. You can see whether each connector is Available, Occupied, Charging, or in an error state.
- Check charger information — The detail page shows the charger's full name, unique identifier, location address, charger type (AC/DC), power rating, number of connectors, and the organization it belongs to.
- View recent sessions — The charger detail view may include a list of recent charging sessions at that specific station, showing users, energy delivered, and revenue generated.
- Return to the list — Click the back arrow or the "Chargers" link in the sidebar to return to the full charger table view.
Adjusting Pagination
- Choose rows per page — At the bottom of the charger table, select how many rows to display per page: 10, 20, or 50. Choose a higher number if you want to see more chargers at once without paging.
- Navigate between pages — Use the page navigation controls (Previous, Next, or page numbers) at the bottom of the table to move through the list when you have more chargers than fit on one page.
Generating an Invoice
Create professional invoices for your charging partners with auto-populated line items, tax calculations, and PDF download capabilities.

Creating a New Invoice
- Navigate to Finances — Click "Finances" in the left sidebar, then select the "Invoices" tab or sub-page. You will see a list of existing invoices (if any) and a button to create a new one.
- Click "New Invoice" — Press the "New Invoice" or "Generate Invoice" button to begin creating a new invoice. A form will open with fields for the invoice details.
- Select the organization — Use the organization dropdown to choose which partner organization this invoice is for. The invoice will be populated with that organization's billing details, address, and tax configuration.
- Set the billing period — Choose the start date and end date for the billing period. The system will automatically pull all completed charging transactions within this date range for the selected organization.
- Review auto-populated line items — The invoice form will display line items generated from the transaction data. Each line item typically includes the charger name, number of sessions, total energy delivered (kWh), and the revenue amount. Verify that the totals match your expectations.
- Check tax calculations — The system applies the organization's configured VAT rate and any applicable levies (such as SSC) to the subtotal. Review the tax breakdown to ensure it is correct.
- Save as draft or mark as sent — You can save the invoice as a "Draft" to review later, or mark it as "Sent" if you are ready to issue it. Draft invoices can be edited; Sent invoices are locked for record-keeping.
- Download the PDF — Click the "Download PDF" button to generate a formatted PDF version of the invoice. This PDF includes your organization's branding, the partner's details, all line items, tax breakdown, and payment terms.
Managing Invoice Status
- Track invoice lifecycle — Invoices progress through statuses: Draft (being prepared), Sent (issued to the partner), Paid (payment received), and Overdue (past the payment due date).
- Mark as paid — When you receive payment for an invoice, open it and click "Mark as Paid" to update its status. This helps you track outstanding balances across all organizations.
- Filter by status — On the invoices list, use the status filter to quickly find all overdue invoices or all drafts that need to be finalized and sent.
- View invoice history — Click any invoice in the list to view its full details, download the PDF again, or review the line items and tax calculations.
Bulk Invoice Generation
Generate invoices for multiple organizations at once, saving time during monthly billing cycles with batch processing and ZIP download.
Batch Invoicing Workflow
- Navigate to Bulk Generate — Go to Finances and select the "Bulk Generate" tab or option. This page is designed for end-of-period billing runs where you need to invoice all organizations at once.
- Select the organization scope — Choose whether to generate invoices for all organizations or select specific ones from the list. Each selected organization will receive its own individual invoice.
- Review the charger list — For each selected organization, the system displays the chargers that will be included in the invoice. Chargers are automatically pulled from the organization's assigned network. Verify that the correct chargers are listed.
- Set the billing period — Choose the billing period start and end dates. This period will apply to all invoices in the batch. Typically this aligns with the end of a calendar month or the organization's configured billing cycle.
- Choose itemization style — Select how line items should be grouped: "By Charger" (one line item per charger with session totals), "By Type" (grouped by AC and DC charger types), or "Aggregated" (a single line item with the total for all chargers combined).
- Preview before generation — Click "Preview" to see a summary of all invoices that will be created. Review the organization names, charger counts, total revenue, and tax amounts. Make corrections to the billing period or selections if needed.
- Generate the batch — Click "Generate All" to create all invoices. The system processes each organization's data, applies their specific tax rates and commission structures, and creates individual invoices for each.
- Download all as ZIP — Once generation is complete, click "Download All (ZIP)" to download every invoice PDF in a single ZIP archive. Each PDF is named with the organization name and billing period for easy identification.
Processing a Refund
Issue full or partial refunds to customers by locating the original payment transaction, specifying the refund amount, and tracking its status.
Issuing a Refund
- Navigate to Payment Gateway — Click "Payment Gateway" in the left sidebar, then select the "Refunds" tab. This page is dedicated to managing all refund requests.
- Search for the transaction — Use the search bar to find the original payment transaction. You can search by the customer's email address, phone number, or the original transaction ID. The search results display matching payment records.
- Select the transaction — Click on the specific transaction you want to refund. The transaction details panel opens, showing the original payment amount, date, gateway used, and customer information.
- Enter the refund amount — Specify the amount to refund. You can issue a full refund (the entire original amount) or a partial refund (any amount up to the original payment). The form validates that your refund amount does not exceed the original payment.
- Select a refund reason — Choose a reason from the dropdown menu: "Charging session error," "Overcharge," "Customer request," "Technical fault," or "Other." Selecting a reason helps with auditing and reporting.
- Add notes (optional) — Enter any additional context or explanation in the notes field. This information is stored with the refund record for future reference by your team.
- Submit the refund — Click "Submit Refund" and confirm the action in the confirmation dialog. The system processes the refund through the original payment gateway. Refunds typically take 3-5 business days to appear in the customer's account.
- Track refund status — Return to the Refunds tab or the Transactions tab to monitor the refund status. Statuses include: Pending (submitted, awaiting gateway processing), Completed (successfully refunded), and Failed (gateway rejected the refund).
Managing Wallet Top-ups
View customer wallet balances, review top-up history, and understand payment breakdowns across different payment gateways.
Viewing Wallet Balances
- Navigate to User Wallets — Click "Payment Gateway" in the left sidebar, then select the "User Wallets" tab. This page shows a searchable list of all customer wallets.
- Search for a user — Use the search bar to find a specific customer by their email address or phone number. The results show matching user accounts with their current wallet balance.
- View wallet balance — The wallet balance displayed is the customer's current available balance, which they can use to pay for charging sessions through the mobile app.
- Review top-up history — Click on a user's wallet entry to expand their transaction history. This shows all top-ups (incoming payments) and charging deductions (outgoing payments) in chronological order.
- View payment breakdown by gateway — The wallet detail view shows how the customer's top-ups were made: via CyberSource (credit/debit card), Amex, Dialog Fuel Card, or manual adjustment. This breakdown helps when investigating payment disputes.
- Check for discrepancies — Compare the wallet balance against recent top-ups and charging deductions. If the balance does not match the expected total, note the discrepancy and escalate to your administrator for investigation.
Managing Organizations
Create and configure organizations that represent your charging network partners, each with independent billing, tax, and commission settings.
Creating a New Organization
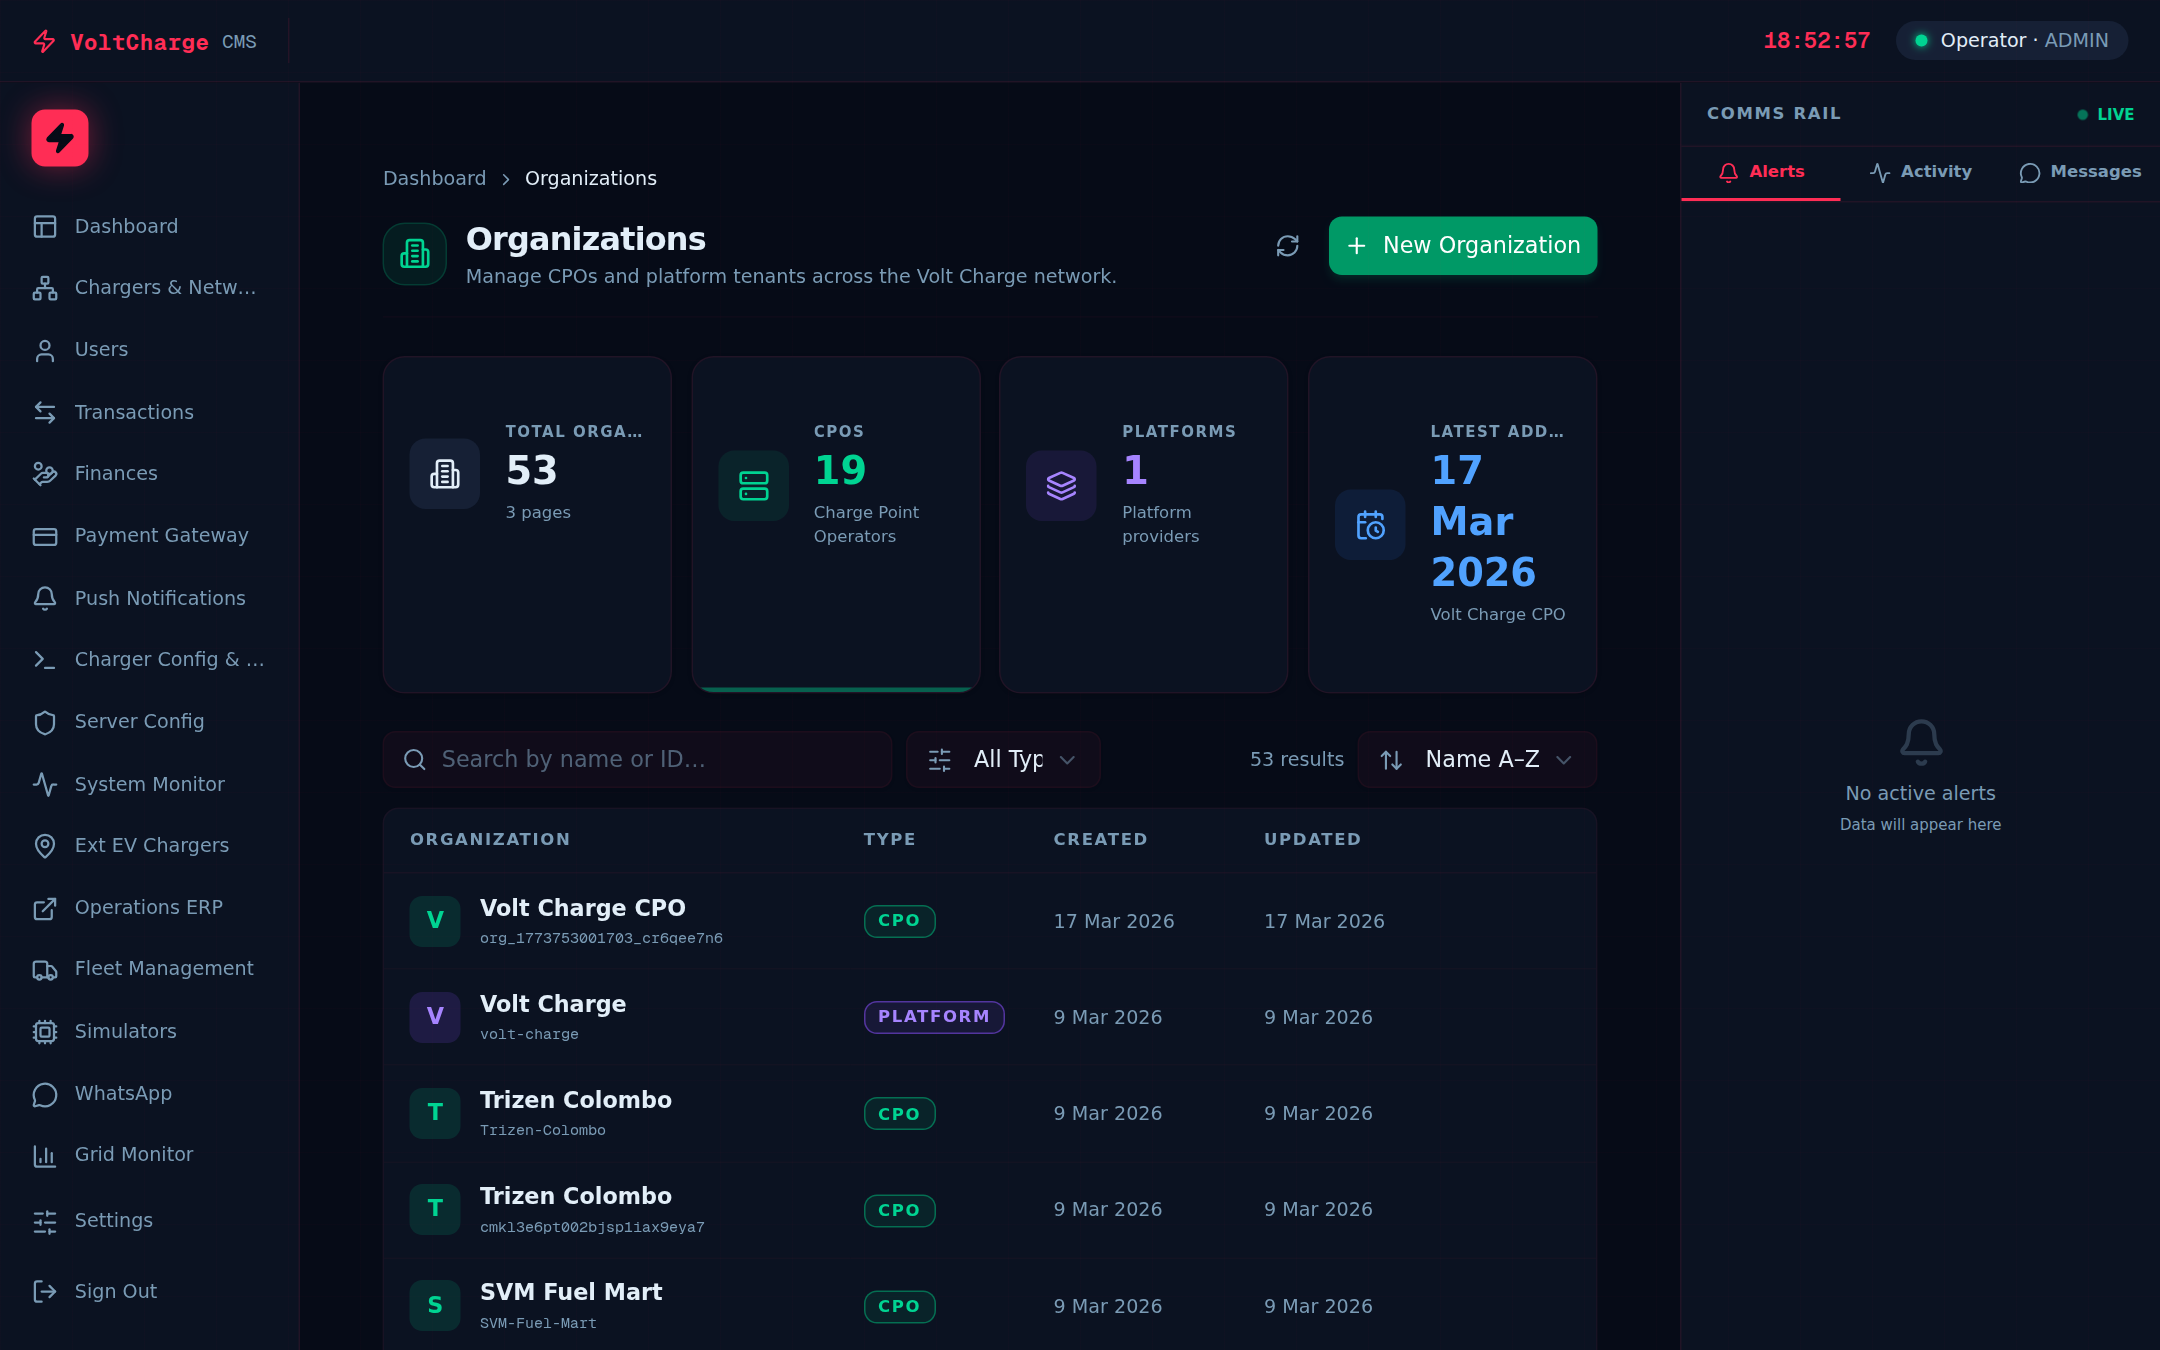
- Navigate to Organizations — Click "Organizations" in the left sidebar. You will see a list of all existing organizations in the platform.
- Click "New Organization" — Press the "New Organization" button at the top of the page to open the creation form.
- Enter the organization name — Type the full legal name of the organization. This name will appear on invoices, reports, and the organization selector throughout the dashboard.
- Set the organization type — Select the appropriate type for this partner, such as Charging Point Operator, Property Owner, or Fleet Operator. The type helps categorize organizations for reporting purposes.
- Configure currency and timezone — Select the organization's billing currency and timezone. All revenue calculations, invoice amounts, and report timestamps will use these settings.
Configuring Billing and Commission
- Set the billing cycle — Choose the billing frequency: Monthly, Weekly, or Quarterly. This determines how often invoices are generated for the organization.
- Configure the billing day — Set the day of the month (or week) when invoices should be generated. For monthly billing, this is typically the 1st or the last day of the month.
- Set payment terms — Specify the number of days the organization has to pay after an invoice is issued (for example, Net 30 means payment is due within 30 days).
- Configure commission rates — Set the platform commission percentage that applies to this organization's revenue. This rate is used in invoice calculations to determine the commission split.
- Set tax rates — Enter the applicable VAT rate and any additional levies (such as SSC) for the organization. These rates are automatically applied during invoice generation.
- Add contact information — Enter the organization's primary contact name, email, phone number, and physical address. This information appears on generated invoices and is used for communication.
Viewing Organization Performance
- Open an organization — Click on any organization in the list to view its detailed profile and performance metrics.
- Review the charger list — The organization detail page shows all chargers assigned to it, along with their current status and recent revenue.
- Check revenue totals — View the organization's total revenue across different time periods. Use this data to verify billing amounts and identify trends in the partner's network performance.
Managing Users & Roles
Create user accounts, assign roles with specific permission levels, and manage access control for your team and partner organizations.
Creating a New User
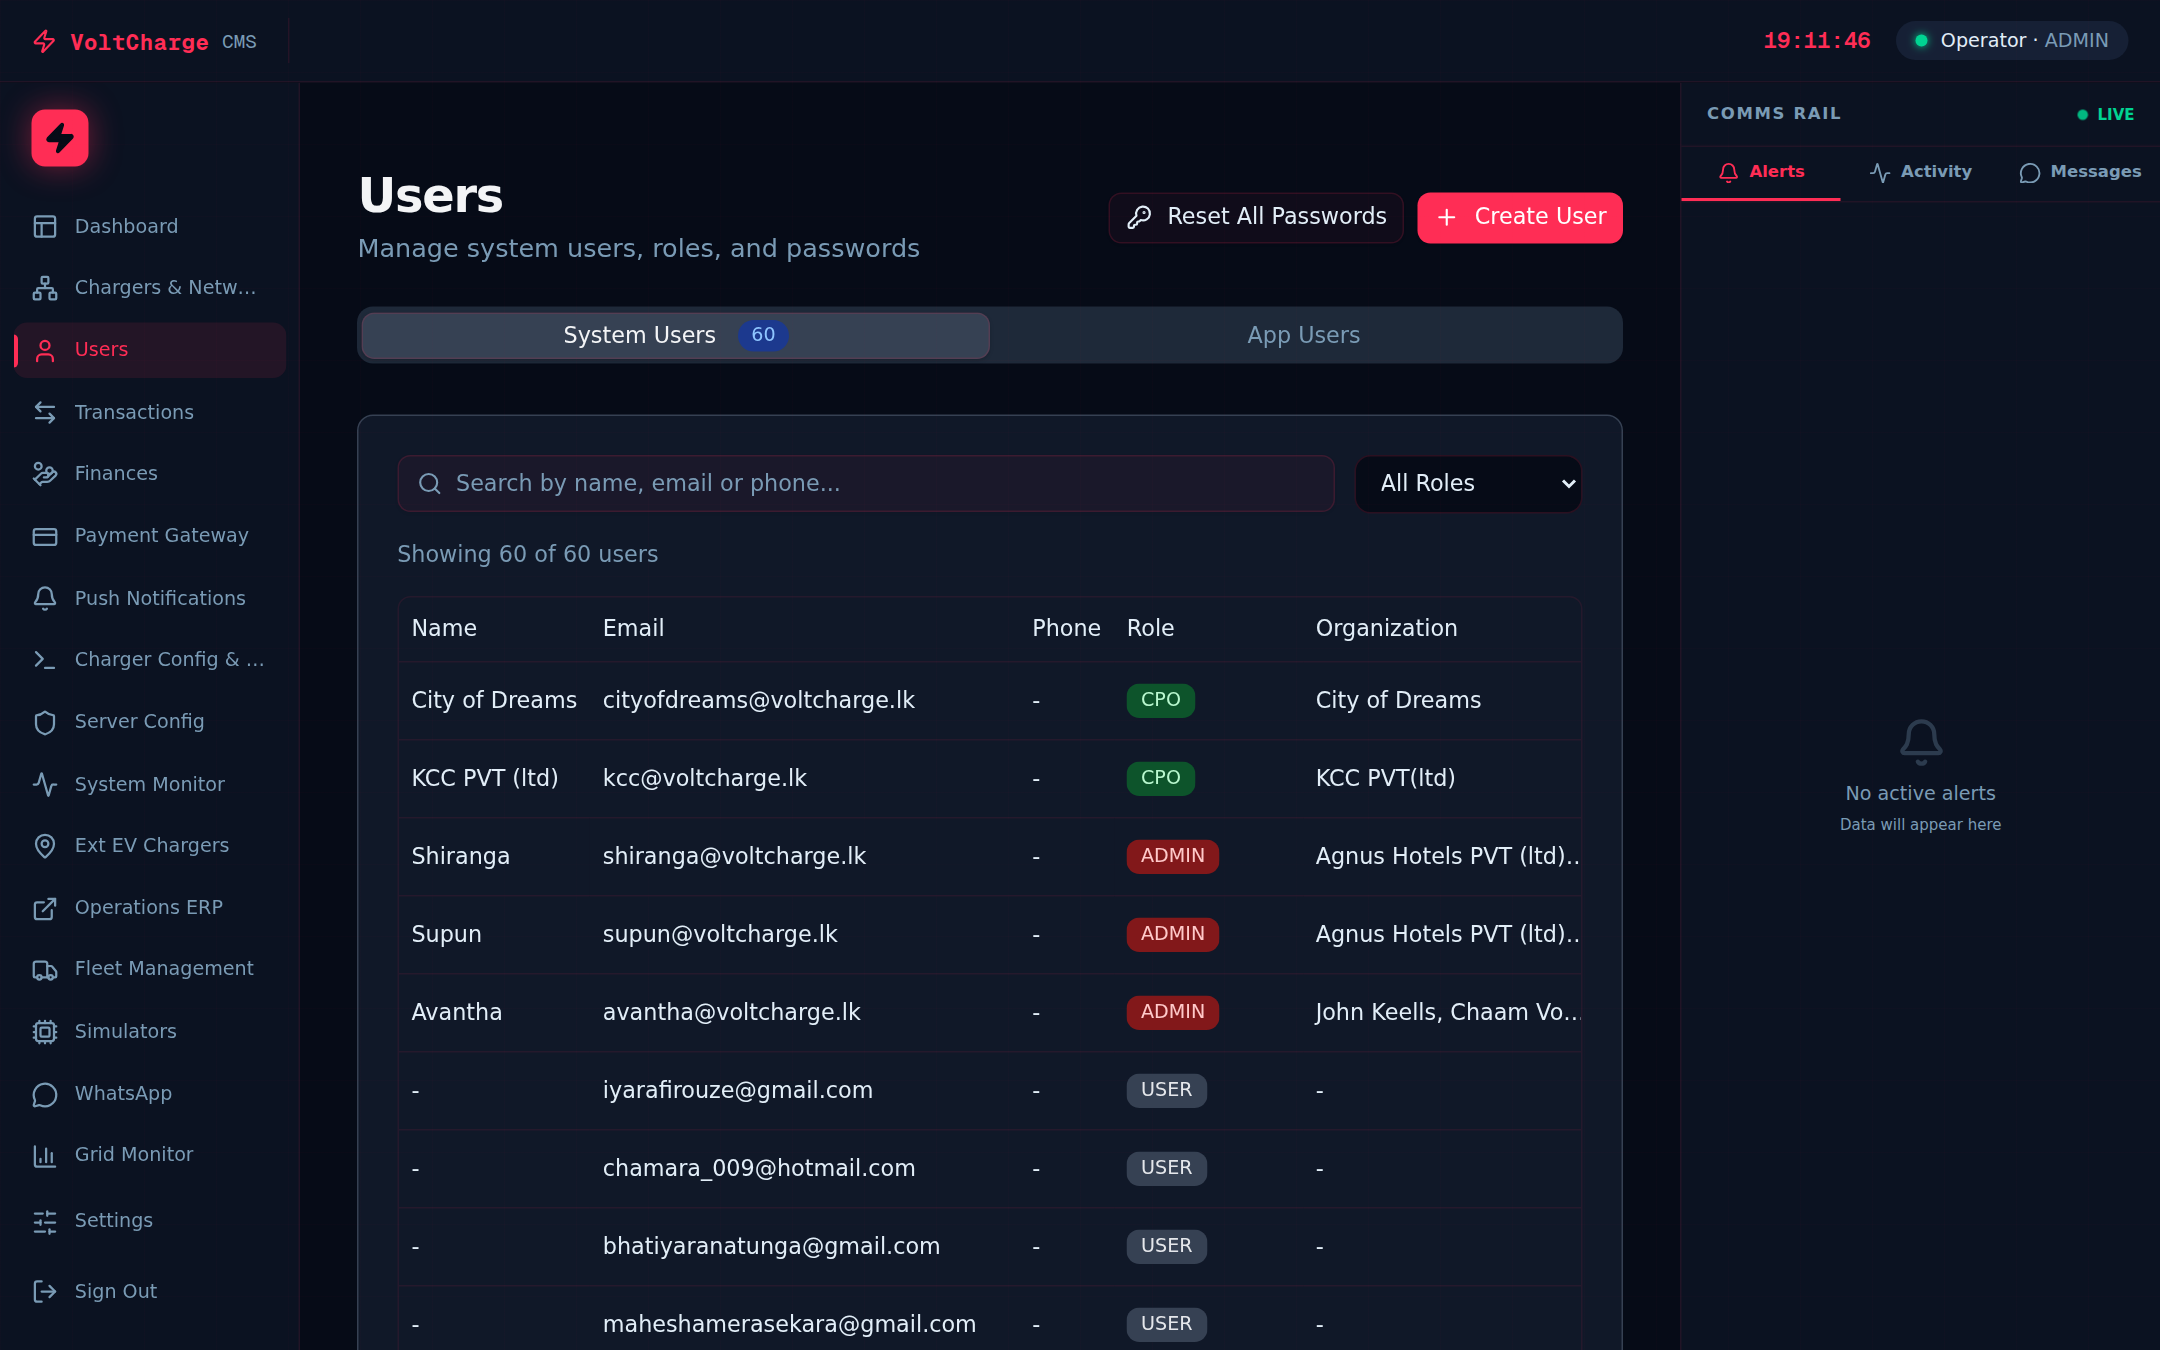
- Navigate to Users — Click "Users" in the left sidebar. The users page displays a table of all existing user accounts with their names, email addresses, roles, and assigned organizations.
- Click "New User" — Press the "New User" button to open the user creation form.
- Enter user details — Fill in the required fields: full name, email address (used for login), and an initial password. The email must be unique across the platform.
- Select a role — Choose the appropriate role from the dropdown. Each role determines what the user can see and do. See the Role Permissions Reference section below for a detailed breakdown of each role's capabilities.
- Assign to an organization — For CPO, Location Owner, and other organization-scoped roles, select the organization(s) the user belongs to. This determines which data they can access.
- Save the user — Click "Create User" to save the new account. The user can now log in with their email and the password you set.
Understanding Role Types
- Admin — Full access to every feature and all organizations. Can create users, manage organizations, configure payment gateways, generate invoices, and access all data. Intended for VoltCharge platform administrators.
- Technical — Same access level as Admin, with full visibility across all organizations. Intended for technical operations staff who need to manage chargers, diagnose issues, and monitor the network.
- Accounts — Access to financial features including transactions, invoices, payment gateway, and user wallets. Can generate invoices and process refunds. Cannot manage chargers, organizations, or users.
- Network Manager — Access to charger management, network monitoring, and operational data. Can view and manage chargers across organizations. Cannot access financial features or user management.
- CPO (Charging Point Operator) — Read-only access to their own organization's data. Can view their chargers, revenue, and transactions. Cannot modify settings, create invoices, or access other organizations.
- Location Owner — A filtered version of the CPO role. Can only see chargers specifically assigned to them within their organization. Useful for third-party hosts who earn commission on chargers at their premises.
- User — Basic read-only access with minimal permissions. Suitable for stakeholders who need visibility into the dashboard but should not modify any data.
Resetting Passwords and Deactivating Users
- Reset a password — Click on a user in the table, then click "Reset Password." Enter a new password and confirm it. The user will need to use the new password on their next login.
- Deactivate a user — To revoke access without deleting the account, click on the user and toggle the "Active" switch to off. Deactivated users cannot log in but their data and history are preserved.
- Reactivate a user — To restore access, open the deactivated user's profile and toggle the "Active" switch back on. The user can then log in again with their existing credentials.
- Edit user details — Click on any user to modify their name, email, role, or organization assignment. Changes take effect immediately on the user's next page load or login.
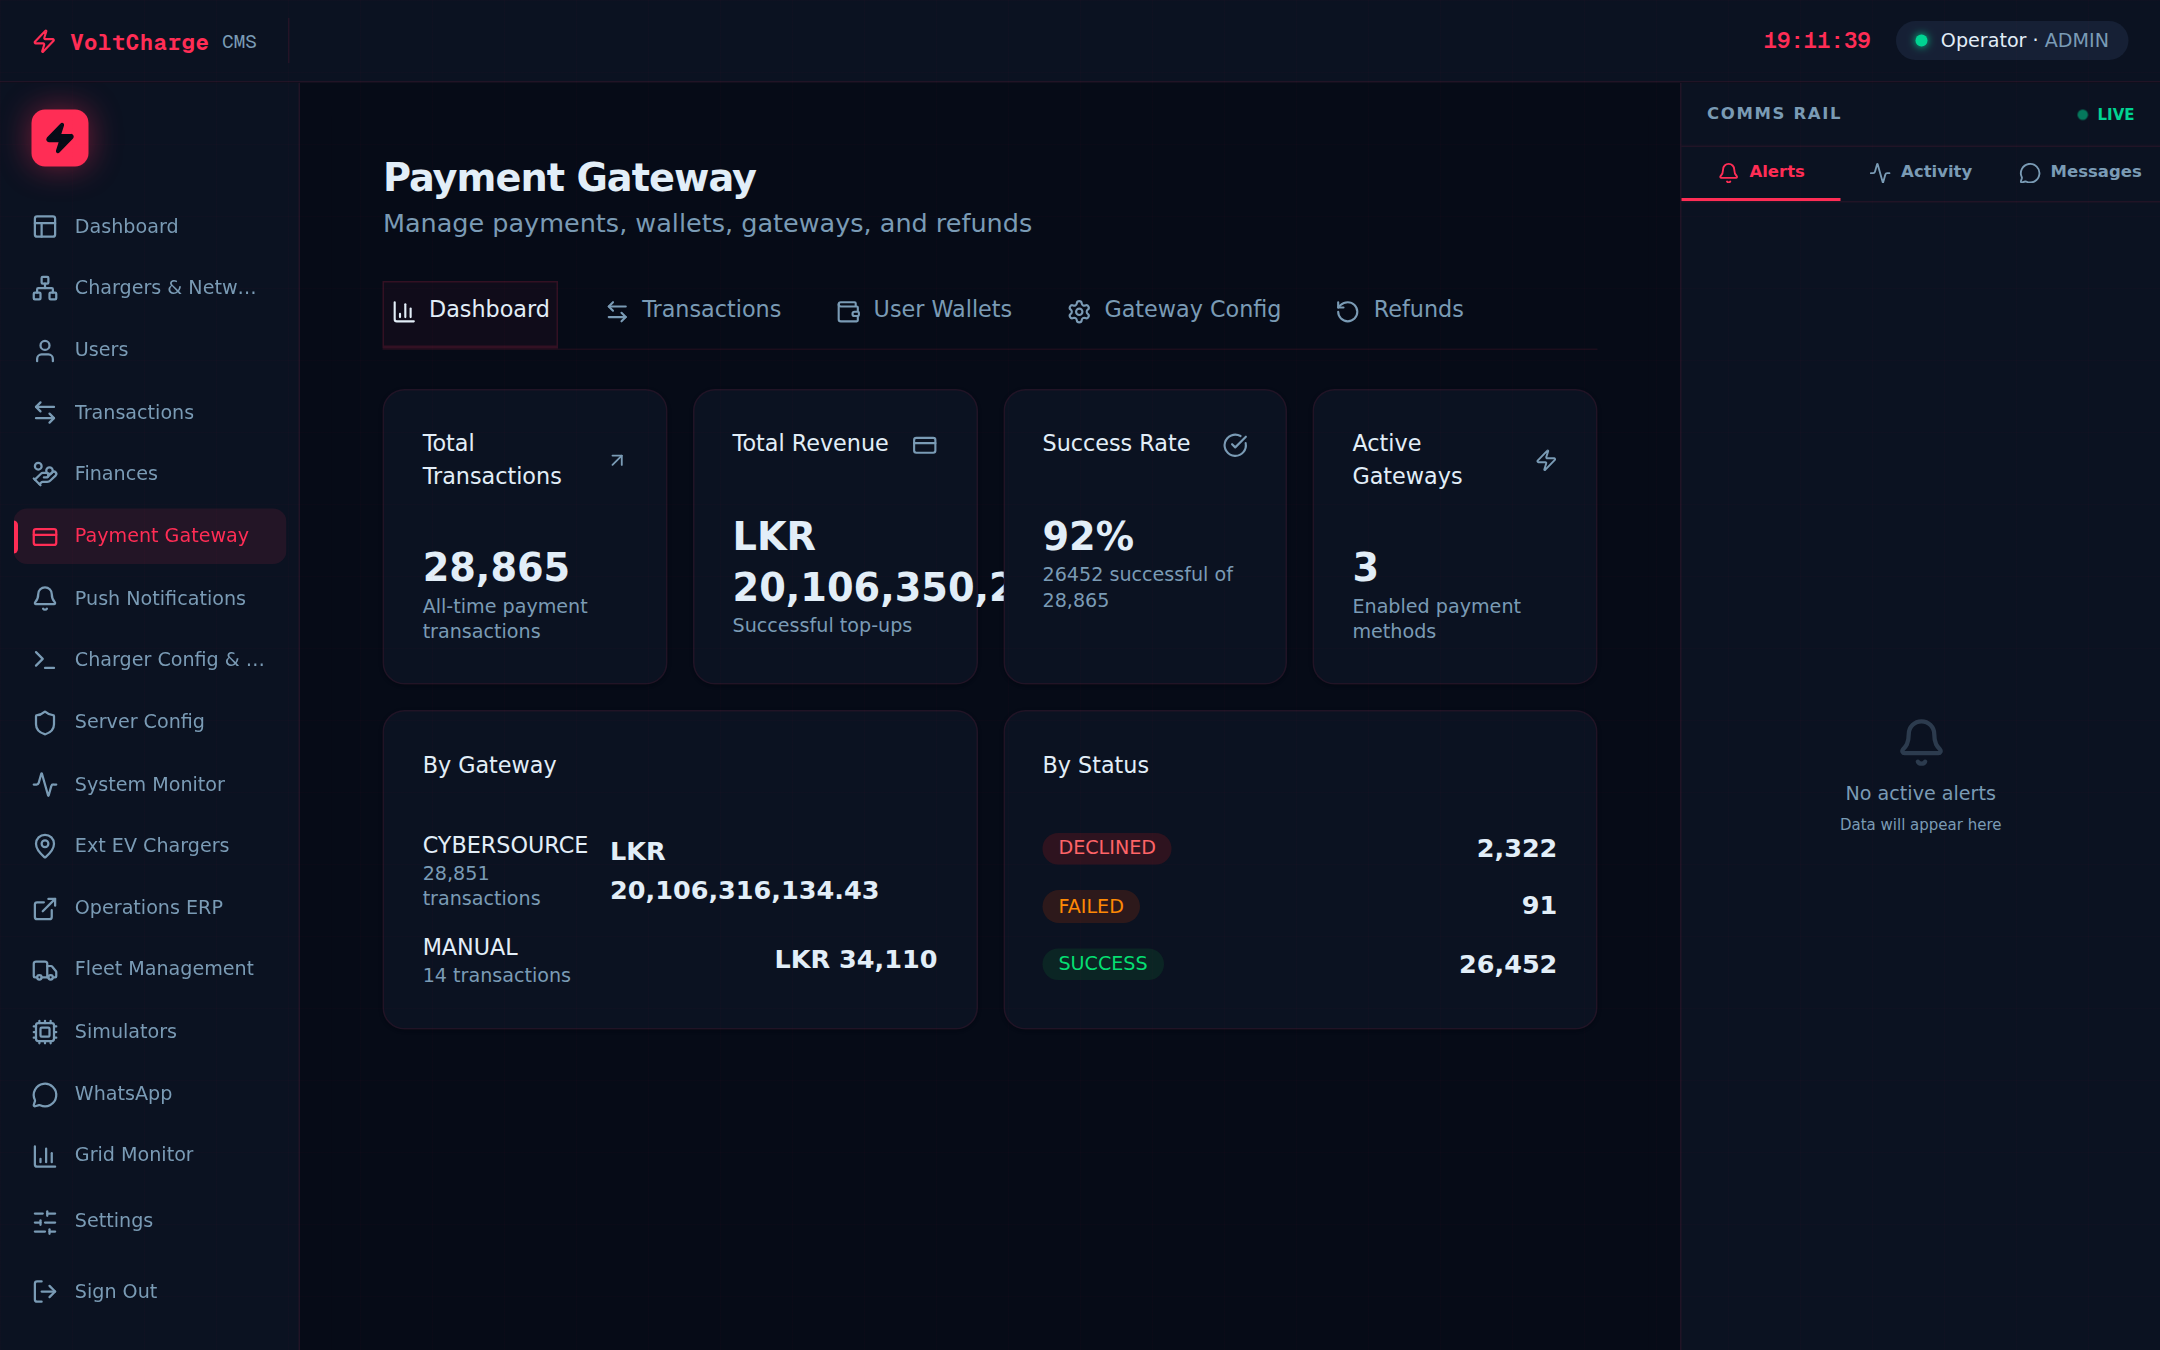
Configuring Payment Gateways
Set up and manage payment gateway integrations to process customer wallet top-ups through multiple payment methods.
Gateway Configuration
- Navigate to Gateway Config — Click "Payment Gateway" in the left sidebar, then select the "Gateway Config" tab. This page shows all available payment gateways and their current status.
- View available gateways — The platform supports multiple payment gateways: CyberSource (for Visa and Mastercard payments), Amex (for American Express cards), and Dialog Fuel Card (for Dialog corporate fuel card payments). Each gateway has its own configuration panel.
- Select a gateway to configure — Click on the gateway you want to set up. The configuration form opens with fields specific to that gateway's requirements.
- Enter gateway credentials — Fill in the required credentials provided by the payment gateway. This typically includes a Merchant ID, API key or secret, and the gateway endpoint URL. These credentials are encrypted and stored securely.
- Set processing parameters — Configure additional settings such as the default currency, transaction limits, and any gateway-specific parameters required for your merchant account.
- Enable the gateway — Toggle the "Enabled" switch to activate the gateway. Once enabled, customers can use this payment method to top up their wallets through the mobile app.
- Disable a gateway — If you need to temporarily or permanently stop accepting payments through a specific gateway, toggle the "Enabled" switch to off. Existing payments in progress will complete, but no new payments will be accepted through that gateway.
Testing Gateway Configuration
- Use test mode — Before going live, configure the gateway in test mode using the sandbox credentials provided by your payment gateway. This allows you to verify the integration without processing real payments.
- Run a test transaction — With test mode active, attempt a small top-up through the mobile app using the gateway's test card numbers. Verify that the transaction appears in the CMS Transaction dashboard with the correct amount.
- Switch to production — Once testing is successful, update the gateway credentials to the production values and disable test mode. Monitor the first few live transactions closely to ensure everything is working correctly.
- Monitor gateway health — The Gateway Config tab displays the status of each gateway (Active, Error, or Disabled). If a gateway shows an error, review the error details and verify your credentials are correct and not expired.
Managing Chargers
Add new chargers to the network, control their visibility on the dashboard, edit charger details, and manage your charging infrastructure.
Adding a New Charger
- Navigate to Chargers — Click "Chargers" in the left sidebar to open the charger management page.
- Initiate new installation — Click the "New Installation" or "Add Charger" button at the top of the page. A form opens for entering the new charger's details.
- Enter charger identity — Provide the charger's unique identifier (as configured in the charger firmware), a human-readable name, and the physical location address where the charger is installed.
- Set charger type — Select the charger type: AC (alternating current, typically for slower destination charging) or DC (direct current, for fast charging). Set the power rating in kW.
- Assign to an organization — Select the organization that owns or operates this charger. The charger will appear in that organization's dashboard and revenue reports.
- Configure access level — Set whether the charger is Public (available to all app users), Private (restricted to specific user groups), or Restricted (requires authorization). This controls who can initiate charging sessions.
- Save the charger — Click "Save" to register the charger in the platform. The charger will appear in the charger table once it connects to the platform and begins communicating.
Toggling Dashboard Visibility
- Find the visibility switch — In the chargers table, each row includes a visibility toggle switch. This controls whether the charger appears on the CMS dashboard monitoring view.
- Hide a charger — Toggle the visibility switch off to hide the charger from the dashboard. The charger remains registered and operational; it simply will not appear in the dashboard charger grid or revenue summaries. This is useful for chargers under maintenance or testing.
- Show a charger — Toggle the visibility switch on to restore the charger to the dashboard. Its status tile and revenue data will reappear in the monitoring view.
- Note on mobile app visibility — The dashboard visibility toggle only affects the CMS dashboard. Visibility in the mobile app for end users is controlled separately and is not affected by this setting.
Editing Charger Details
- Click a charger row — Click on the charger you want to edit to open its detail view.
- Modify fields — Update the charger's name, location, type, access level, power rating, or organization assignment as needed. Fields that can be edited are indicated with editable form controls.
- Save changes — Click "Save" or "Update" to apply your changes. The updated information is reflected immediately across the dashboard, reports, and invoices.
- Sort and filter — Back on the charger table, use the column headers to sort by any field (name, type, status, organization). Combine sorting with the search and filter bar to quickly find specific chargers in a large network.
Push Notifications
Send push notifications to mobile app users for announcements, promotions, charger alerts, and important platform updates.
Composing a Notification
- Navigate to Push Notifications — Click "Push Notifications" in the left sidebar. The page shows a list of previously sent notifications and a button to compose a new one.
- Click "New Notification" — Press the button to open the notification composer form.
- Enter the notification title — Type a concise, attention-grabbing title (recommended: under 50 characters). This is the bold headline that users see on their lock screen and notification tray.
- Write the notification body — Compose the message body with the details you want to communicate. Keep it informative but brief (recommended: under 150 characters for maximum visibility across all devices).
- Set an action (optional) — Configure a tap action for the notification, such as opening a specific page in the app, navigating to a charger location, or opening a promotional link.
Targeting and Delivery
- Select target audience — Choose who should receive the notification: all app users (broadcast), users in a specific organization, users who have used a particular charger, or individual users by email.
- Choose delivery timing — Select "Send Immediately" to dispatch the notification right away, or "Schedule" to set a specific date and time for delivery. Scheduling is useful for planned announcements or promotions.
- Preview before sending — Review the notification title, body, target audience, and scheduled time. Verify everything is correct before proceeding, as sent notifications cannot be recalled.
- Send or schedule — Click "Send Now" or "Schedule" to finalize the notification. A confirmation dialog will appear asking you to confirm the action.
- View delivery status — After sending, monitor the notification's delivery metrics in the notifications list. You can see the total number of recipients, successful deliveries, and open rates when users tap the notification.
Grid Monitor
Monitor real-time power grid conditions to understand how grid health and demand impact your charging network operations.
Reading the Grid Dashboard
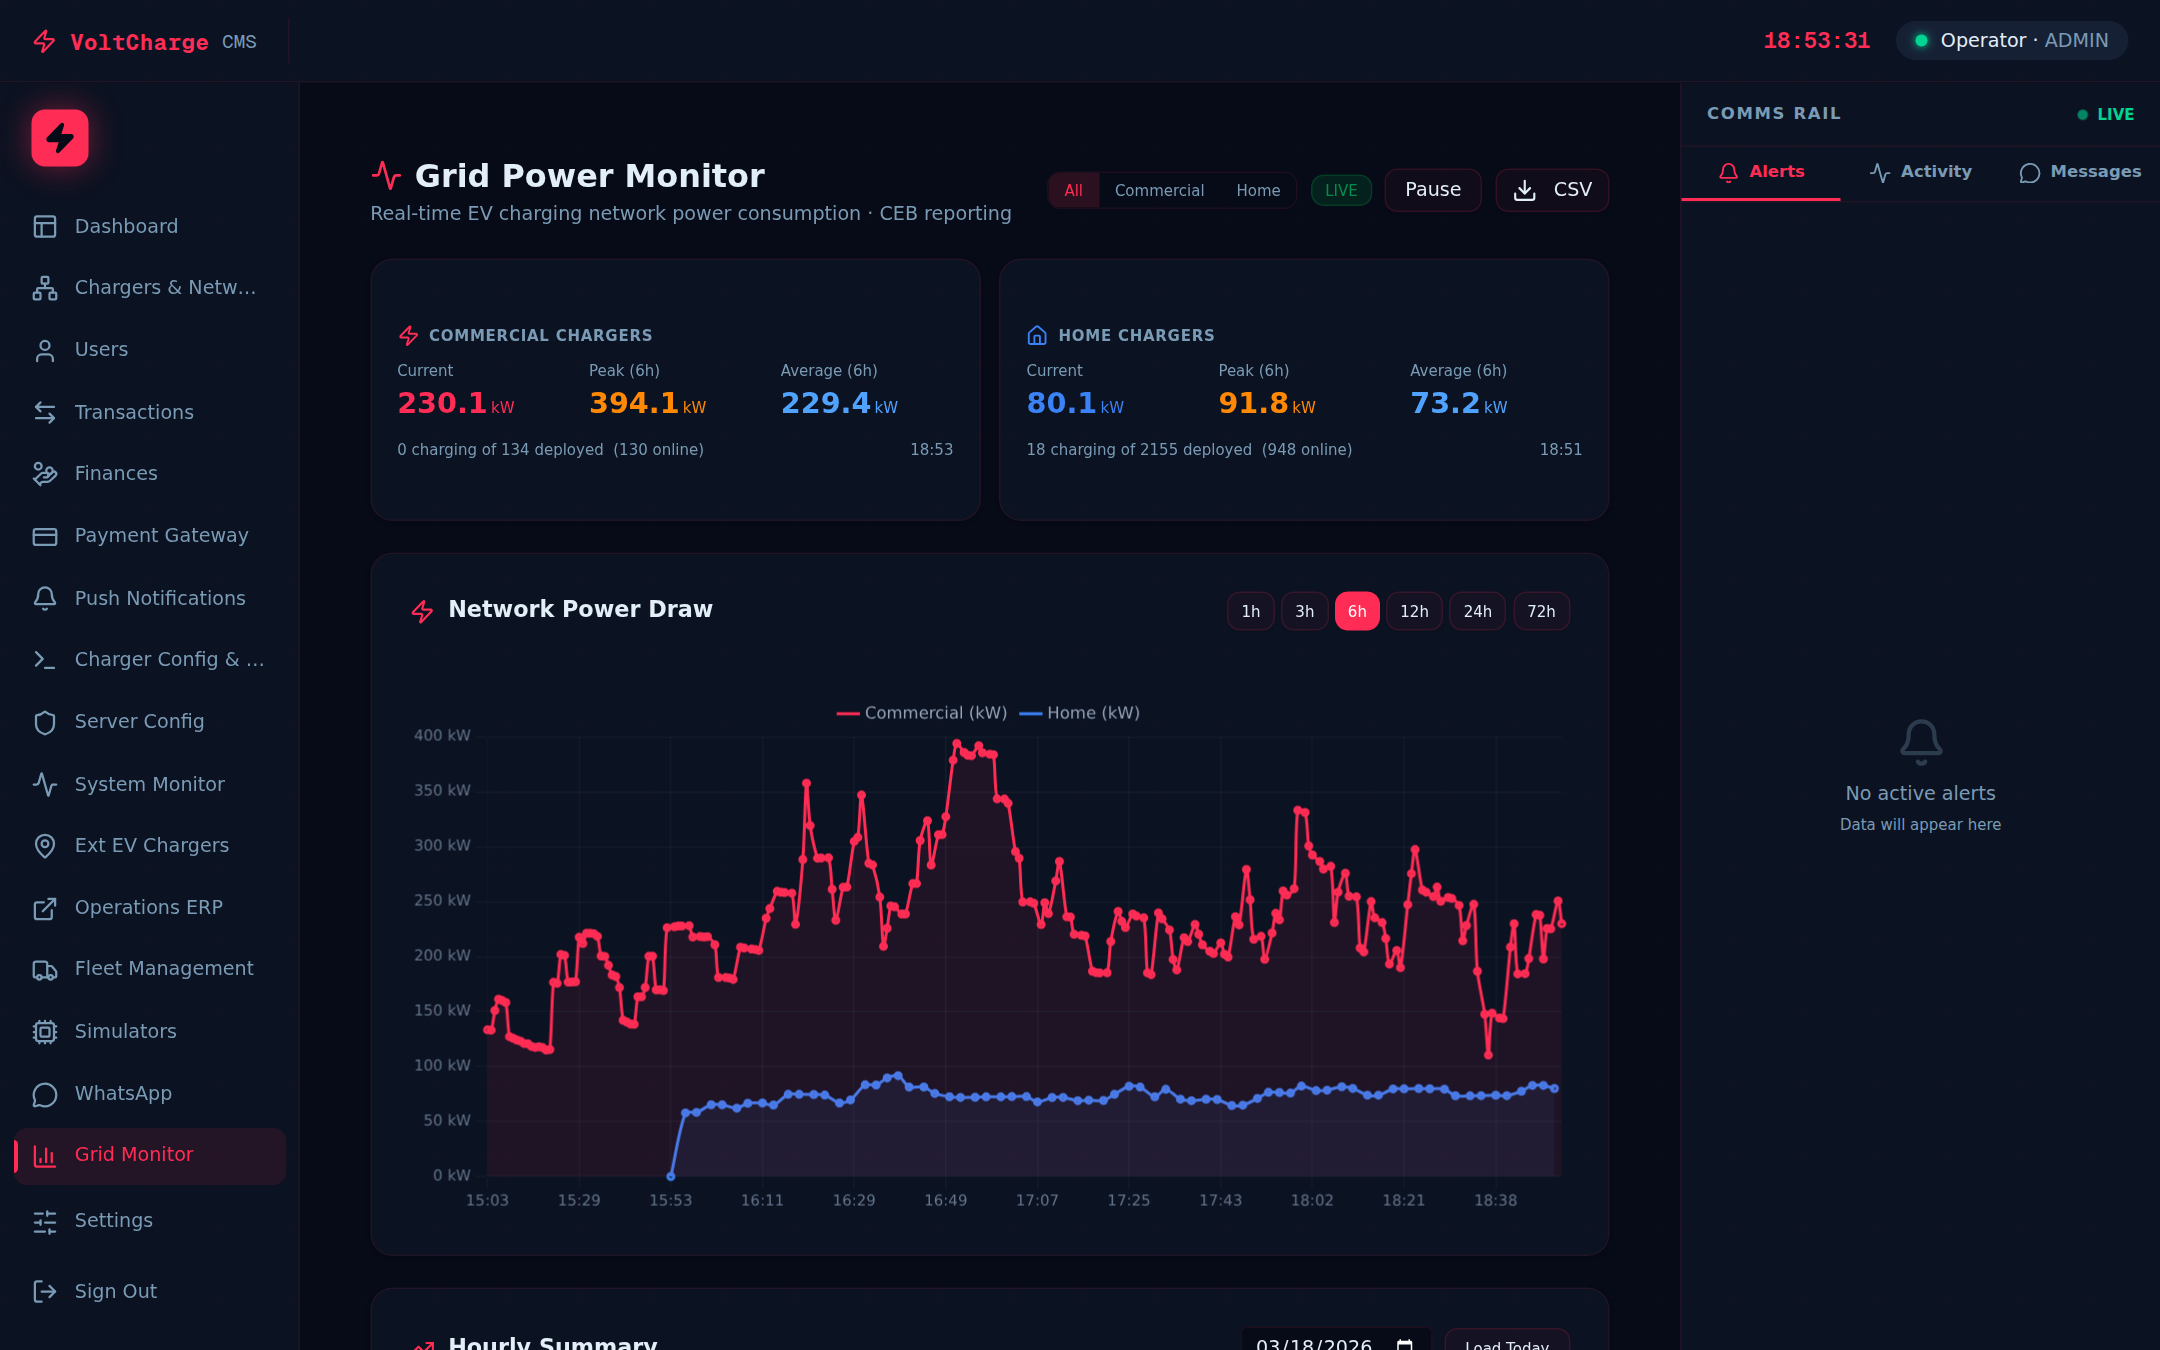
- Navigate to Grid Monitor — Click "Grid Monitor" in the left sidebar. The page displays live power grid data sourced from the national grid operator.
- View power consumption graphs — The main chart shows real-time power demand and generation on the national grid. The X-axis represents time and the Y-axis shows power in megawatts (MW). Watch for demand spikes that could affect grid stability.
- Understand grid frequency — The grid frequency indicator shows the current frequency (target: 50 Hz). A frequency significantly above or below 50 Hz indicates grid stress. During low-frequency events, charging sessions may be deprioritized by grid operators.
- Check grid health indicators — Color-coded indicators summarize overall grid health: green means the grid is stable and operating within normal parameters, yellow indicates moderate stress, and red signals critical conditions that may affect service.
- Monitor peak load times — The grid monitor highlights peak demand periods (typically early evening). During peak hours, energy costs may be higher, and grid operators may request demand reduction. Use this information to plan scheduled maintenance or communicate with charging partners.
- Correlate with charging activity — Compare the grid demand graphs with your network's charging activity from the main dashboard. Understanding the relationship between grid conditions and your charging network helps with capacity planning and cost optimization.
Role Permissions Reference
A complete reference table showing which features and capabilities are available to each role in the CMS Dashboard.
Permissions Matrix
| Feature | Admin | Technical | Accounts | Net Manager | CPO | Loc Owner | User |
|---|---|---|---|---|---|---|---|
| Dashboard | Full | Full | Full | Full | Own org | Assigned chargers | Read-only |
| Chargers | Full | Full | Read-only | Full | Read-only | Assigned chargers | — |
| Transactions | Full | Full | Full | Read-only | Own org | Assigned chargers | — |
| Finances | Full | Full | Full | — | Own org | Assigned chargers | — |
| Payment Gateway | Full | Read-only | Full | — | — | — | — |
| Organizations | Full | Full | Read-only | Read-only | Own org | — | — |
| Users | Full | Read-only | — | — | — | — | — |
| Push Notifications | Full | Full | — | — | — | — | — |
| Grid Monitor | Full | Full | Read-only | Full | — | — | — |
Permission Levels Explained
- Full — Complete read and write access. The user can view, create, edit, and delete records within this feature area.
- Read-only — The user can view all data in this feature area but cannot make any changes. Edit, create, and delete buttons are hidden or disabled.
- Own org — The user can only see data belonging to their assigned organization. Data from other organizations is completely hidden. This is the default for CPO accounts.
- Assigned chargers — The user can only see data for chargers specifically assigned to their account. This is the most restrictive data filter and applies to Location Owner accounts.
- Dash (—) — No access. The sidebar link for this feature is hidden entirely, and direct URL access is blocked by the permission system.
Requesting Access Changes
- Identify the access you need — Refer to the permissions matrix above to determine which role provides the access level you require.
- Contact your administrator — Send a request to your platform administrator (Admin role) specifying your current role, the feature you need access to, and the reason for the change.
- Role change takes effect immediately — Once your administrator updates your role, the change takes effect on your next login or page refresh. You do not need to create a new account.
- Organization assignment changes — If you need access to a different organization's data, your administrator can update your organization assignment without changing your role.